Member Benefits 073: Video Learning
Filed in 3: Member Benefits,Video Learning, June 5, 2014, 11:01 am Your videos for the Sweet Pea cane are absolutely fabulous! Can I just say that I don’t know how you do it, but no other polyclay artist I’ve found on line can even come close to the quality of your videos and the degree of care that goes into them, especially at this incredibly low price!! ~Marion-R >> Original comment was posted here: Sweet Pea Earrings Polymer Clay Tutorial
Hard to believe that another month is gone, and a great selection of new videos and custom clay colours offered by the multi-talented Lietz team. Every month I reflect on how pleased I am that I became a member… but since I am not an impulsive soul I naturally had to “study” these videos for a while before joining. I bought quite a few of the previously released videos and tried them out at my leisure. It didn’t take long for me to realize what fantastic value they offered! Now as a member I get them for a “steal”, and Fridays are extra-special. Anyone who feels reluctant to purchase a membership, just purchase a volume or two (or ten) to enjoy. There is so much variety, and Cindy’s conversational style makes me feel like I’m in my studio with my best friend; the professional filming and editing by Doug means I get superior close-ups of everything Cindy is demonstrating. Thanks you guys for the kind of video teaching I can’t get anywhere else, and for a price even I can afford! ~Monique-U >> Original comment was posted here: Polymer Clay Tutor Video Library
Hi Cindy, I just purchased a subscription (yay!!) and I have been wanting to do that for awhile. I just finished watching your series of videos on making a faux jasper cabochon. Your videos are phenomenal! You explain things thoroughly and clearly, and you don’t miss or skip any steps. It is an absolute joy to sit and watch you go through the process – I feel like I just attended a class I should have paid $100 for. I am so excited to see what other videos come my way! Thank you for all the hard work you put into making these videos and coming up with color recipes. Your work is truly amazing. ~Karen-R >> Original comment was posted here: Faux Jasper Polymer Tutorial
Continue reading this entry »
Vol-072: Shoreline Bracelet (6 Videos)
Filed in 1: Video Tutorials,Bead Projects, May 3, 2014, 11:03 amJewelry For Those Long Walks On The Beach. Scroll Down For Links To All 6 Videos. |
Vol-072-1: Video #512: Intro (that clip just above): In this 6 part video tutorial series, you will learn how to create my original Polymer Clay Shoreline Bracelet design. Included are many tips, tricks and techniques that you can use to create cool color blends in the colors I suggest, or your own, to make truly one-of-a-kind Beach Jewelry. These pretty and stylistic looking landscape tile components can then be used to create gorgeous bracelets, earrings, pendants, and other jewelry pieces. As well, you will learn how to make your own twisted wire jump rings and wire clasps, to use in this project, and with many other jewelry making projects that you may have on the go.
Vol-072-2: Video #513: Shoreline Blend: In this video, I show how to make the custom color blends using several Premo Polymer Clay Colors, as well as some of your old dried out polymer clay… even your scrap clay. You will be surprised with just how simply these complex designs come together… like magic! It so addictive that you’ll find yourself coming back to create more and more, one-of-a-kind beachy blends. It’s fun too! You and your friends will end up saying things like, “I can see an island and birds in the background,” or “I love that part, it looks like a pile of rocks in a tidal pool.”
Vol-072-3: Video #514: Cutting, Baking and Finishing: In this video, you will use the blend created in Part 2, and start making your tiles for the bracelet project. Here you will learn the tricks of cutting, baking and finishing your polymer clay pieces so that they will be strong and professional looking. Depending on the size of your original blend, you can create a variety of different polymer clay jewelry pieces from the tiles. If you make a bracelet and have a few pieces left over, you can use them to create a matching pendant or a pair of earrings.
Vol-072-4: Video #515: Twisted Wire: In this lesson, you will learn some unique techniques for creating hand twisted wire strands, that can be used to make jump rings, clasps and a variety of other jewelry making findings. You will learn tricks for choosing the correct wire… measuring the correct amount of wire for a project… and wrapping the wire to create your own custom jump rings. The stuff you learn in this part of the video series will come in handy with many other jewelry making projects as well. If you don’t want to do you own wirework, there are lots of of options available for using more standard findings purchased from your favorite jewelry supply store.
Vol-072-5: Video #516: Cutting Jump Rings Drilling Tiles: In this video, you will learn some interesting information about the proper way to cut jump rings using flush cutters. As well, I will show you how to measure and mark your tile pieces for drilling. It is important that the holes are drilled in the correct location on your pieces so that they are strong and the bracelet is properly aligned. I’ll demonstrate some neat little tricks to do these jobs, quickly, easily and precisely.
Vol-072-6: Video #517: Twisted Wire Clasp: In this video, the Shoreline Bracelet project comes together! You will learn how to make a handmade wire clasp that not only suites this jewelry project beautifully, but can also be custom fitted to your bracelet sizing needs. I’ll share with you my little tips and tweaks, so that your clasp fits your tiles perfectly and can be sized exactly how you need it. This unique hook and bar design has a great nautical looking style, and it is strong and easy for the wearer to use. So let’s making this bracelet and head off to the beach!
By the way, many of the “shopping” links I provide for the various tools and supplies used in my tutorials, are “affiliate” resources. That means companies like Amazon and the other suppliers I refer, pay me a small commission if you click on the links and end up making a purchase at their site. It’s not a lot, but every little bit helps in keeping the cost of my tutorials down. And, the prices for products that you may purchase through my links, are exactly the same as what you would normally pay, even if it is a “sale” price. So please feel free to click whenever you need to pick up a few things for your studio. Thanks so much for your support.
Vol-072: Orchid A-Palette (4 Premo Color Recipes)
Filed in 2: Color Recipes,Pink,Purple,Red,Yellow, , 11:02 am |
1-A: Orchid 2-A: Phalaenopsis 3-A: Nectar 4-A: Exotic Flower |
Orchid is a gorgeous purple pink found in the throat of this gorgeous flower. It’s a very close match to the Pantone 2014 Color of the Year, which was named Radiant Orchid. Phalaenopsis is the amazing soft purple found on the sepals of this Orchid blossom. Nectar is the soft sweet yellow found in the center lip of the flower. And Exotic Flower is the deep wine red of the spotted column.
To download the 4 color recipe cards, click here: Orchid Palette
Member Benefits 072: Sculptural
Filed in 3: Member Benefits,Sculptural, , 11:01 amEnjoyed the tutorial and as usual you made it so simple.They look so beautiful, so real. I saved the photo and sent it to my mother. She loves painting flowers and also molds them and makes sculpted paper flowers too. ~Cherie-H >> Original comment was posted here: Poinsettia Charms for Christmas
I’m very happy that I stumbled upon you. I bought the clover flowers video. They are so gorgeous! I’m talking to a friend who’s a master florist, suggesting that if she designs the arrangement I can do the flowers. That really grabbed her. So many ideas… so little time! Thanks to you Cindy, because I have never sculpted before. But I’ve done all kinds of art work and crafts since my daddy taught me to draw a straight line and cut with scissors at age 5. I’ve taught myself most everything…I get impatient with having to relearn everything I already know and that’s what usually happens to me in most classes. So I go at it alone. But IMAGINE! Now I came across you and some other awesome artists that not only give me the fundamentals I may have missed but that are willing to SHARE all this wonderful knowledge. It’s a totally different experience for me learning this way. And all of you in the ‘polymer community’ are willing to share unreservedly of everything you learn and do! You all contribute to each other but you all have your unique style and forte. I’ve gotten some commissions at work that I have to finish and a very serious lead that could be ‘big time’ for me. I wasn’t looking for it but the opportunities seem to be knocking on my door and I’d love to go at it. Love ya! LET’S CLAY! ~Andrea-P >> Original comment was posted here: Red Clover Flower Beads
Hi Cindy, thanks for the cupcake video. It’s amazing to me how many different skills you teach within 1 project. I don’t know if I will be making cupcakes anytime soon. I’m working on my sculptures. But I will use some of the new techniques that you taught in this lesson. You are a brilliant teacher. My work has improved by leaps and bounds since I “met” you. I think that one of the most important things that I am learning is that working in poly clay is really an art form. I knew that of course, but I’ve always been a little embarrassed about it. I’m almost done with my latest sculpture. I will send a picture. Your techniques are all over it! Thanks again. ~Cassie-C >> Original comment was posted here: Miniature Cupcake Beads
Continue reading this entry »
Vol-071: Foxgloves & Raindrops (6 Videos)
Filed in 1: Video Tutorials,Bead shapes, April 3, 2014, 11:03 am| A Springtime April Showers May Flowers Tutorial. Scroll Down For Links To All 6 Videos. |
Vol-071-1: Video #502: Intro (that clip just above): In this 6 part video tutorial series, you will learn how to create my original Polymer Clay Foxglove Earrings and Raindrop Pendant deigns. Included are many tips, tricks and techniques that you can use to create translucent color blends in the colors I suggest, or your own, to make truly one-of-a-kind Foxglove and Raindrop Beads. These pretty and stylistic looking flower beads can then be used to create gorgeous earrings, pendants, and other jewelry projects. As well, you will learn to make Rainbow Raindrop Beads that you can use the make the wire wrapped pendant in Part 5 of this series, or a myriad of other creative jewelry projects of your own.
Vol-071-2: Video #503: Rainbow Raindrop Beads: In this video, I show how to make the custom color blends using Premo Sculpey White Translucent polymer clay and Sharpie Permanent Markers, that will allow you to make the lovely rainbow colored raindrop beads in this Part 2 of the series. I give the exact amounts of clay needed for the project, and teach you how to combine them into custom ink blends in a way that you will be not only surprised about, but will be pleased how easy it is to recreate yourself… even if you are a total beginner.
Vol-071-3: Video #504: Sculpted Foxglove Beads: In this video, you will take what you learned in Part 2 a step further, by creating a new color blend and sculpting it into a beautiful stylized Foxglove Flower that can be used to make the gorgeous flower earrings. You could also make a matching pendant or dangle if desired. Customizing the color blends is easy by following inspiration from Google Images of Foxgloves… or maybe even from your own garden. What you learn in this video can be adapted to other polymer clay projects as well.
Vol-071-4: Video #505: Baking and Finishing: In this lesson, you will learn about some specialized information for baking the translucent polymer clay beads and flowers created in the previous videos of this series. These gorgeous beads need very little finishing, though there are a few small pointers that will help to make your beads look more professional than if you just used them straight from the oven. Both the Raindrops and the foxglove beads are very versatile and can be used in any situation where you would use a teardrop or flower shaped bead… almost anywhere!
Vol-071-5: Video #506: Wirewrapped Raindrop Pendant: In this video you will learn some simple wire wrapping techniques. I talk about what gauge and temper of wire is best suited to make it easy for you to create classy wire jewelry designs for yourself and your friends. The pretty design I show how to make in this Par 5 video, includes a crystal at the bottom that brings a little sparkle to to the project, and makes your rainbow patterned raindrop bead dance in the bright Spring sunshine… just like you will shine when you wear this dainty charm!
Vol-071-6: Video #507: Kidney Shaped Ear Wires: In this video the Foxglove Earrings project comes together! First you will learn how to make your own custom sized Kidney Shaped Ear Wires, one of the most secure of all the earwire designs. You will learn the secrets to making these ear wires in several different sizes, as well as the type of wire and tools that you will need to get them made at a fraction of the cost of purchasing ready made ear wires. With all the tips and tricks I share in this tutorial series, it will leave your head spinning. Let’s just say, once completed, your whole world will be coming up Foxgloves and Raindrops!
By the way, many of the “shopping” links I provide for the various tools and supplies used in my tutorials, are “affiliate” resources. That means companies like Amazon and the other suppliers I refer, pay me a small commission if you click on the links and end up making a purchase at their site. It’s not a lot, but every little bit helps in keeping the cost of my tutorials down. And, the prices for products that you may purchase through my links, are exactly the same as what you would normally pay, even if it is a “sale” price. So please feel free to click whenever you need to pick up a few things for your studio. Thanks so much for your support.
Vol-071: River Flow A-Palette (4 Premo Color Recipes)
Filed in 2: Color Recipes,Blue,Green,Neutral, , 11:02 am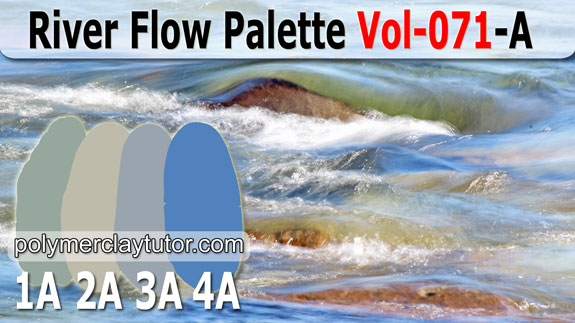 |
1-A: Stream 2-A: River Bed 3-A: River Flow 4-A: Brook |
Stream is that peaceful blue green of the water as it flows over the boulders in the stream. River Bed is the color of the shallow waters flowing over the pale river rocks. River Flow is the soft blue color where the deeper blue tones of the mineral dense waters mix with the frothy bubbles of the turbulent rapids. And Brook is the clear true blue where the current moves the slowest and swirls around the deep sink holes created by the years of erosion.
To download the 4 color recipe cards, click here: River Flow Palette
Member Benefits 071: All Ages
Filed in 3: Member Benefits,All Ages, , 11:01 amMy younger grandson and I made these tonight. Boy, did they turn out pretty. He’s seven and very proud of himself. I just gave instructions and he did all the work. Now he has presents for his mom and step mom. When he goes home tomorrow I will attempt some cause I really like how they look. ~Pollyanna >> Original comment was posted here: Mirror Image Heart Beads
Hi Cindy – I just taught my 9 and 5 year old grand daughter how to do the Komihimo cord technique. The younger one loves to say: “…look for the lonely one and brimful a friend.” That’s how I taught her to bring the third cord up to the single one on the top. Then she says in loud strong voice: “…now turn the wheel a little to the left.” She sounds so cute and she is so proud of herself that she does not want me to touch her hands when she does it. She knows that the right hand brings the cord down to the bottom right, and the left hand brings the left cord up to the left. My hubby thinks that I should have taught kindergarten instead of physical education. Who knows, he might have been right. Thanks for your showing me how to do Komihimo cord work, so I could teach it to them. They love this as much as they love working with me with polymer clay. Thanks, thanks and thanks. ~Natalie-H >> Original comment was posted here: Kumihimo Cord Jewelry Projects
Cindy, thanks for being so prompt in helping with my password issue. By the way, your video’s have really helped make everything simple for me. I’m 78 but still learning! ~Marky-G >> Original comment was posted here: Polymer Clay Color Recipes
Continue reading this entry »
Vol-070: Crocus Bead Lariat (6 Videos)
Filed in 1: Video Tutorials,Bead shapes, March 6, 2014, 11:03 am| A Versatile Piece Of Jewelry For Your Spring Collection. Scroll Down For Links To All 6 Videos. |
Vol-070-1: Video #490: Intro (that clip just above): In this 6 part video tutorial series, you will learn how to create my original Polymer Clay Crocus Bead Lariat design. Included are many tips, tricks and techniques that you can use to create Crocus Petal Canes in my colors, or your own, to make truly one-of-a-kind Crocus Beads. These pretty and realistic looking flower beads can then be used to create a lovely hand knotted lariat style necklace, earrings, pendants, and other jewelry projects. The ideas and techniques can not only be used for the projects I demonstrate in this tutorial series, but also for other home decor and other creative projects too.
Vol-070-2: Video #491: Custom Teardrop Blends: In this video, I share with you my custom color recipes using Premo Sculpey polymer clay, that you need to create this stunning Crocus flower cane. I will show you the exact amounts of clay needed for the project, and teach you how to combine them into a custom teardrop blend that, when combined with the darker shades of the veining colors, creates the realistic variations of the delicate crocus flower petals. I’ll also show you a neat trick for placing your veins so that the end result is natural and organic rather than stiff and manufactured looking.
Vol-070-3: Video #492: Crocus Flower Petal Cane: In this video, you will learn how to take the blended sheet we created in the previous video, and cut/combine it in such a way as to get the wonderful wispy variegation and veining of Crocus Flower Petal. You will also learn how to reduce this cane and save sections of it at a couple of different sizes, for making beads and using in other types of polymer clay projects. As well, you will discover that not all clay ‘moves’ at the same speed… and I’ll show you ways to deal with this problem, so that you will be able to successfully reduce your cane to whatever size is needed.
Vol-070-4: Video #493: Crocus Beads: In this video, we start slicing up that crocus cane and start making some beads. You will first learn a simple technique for making tiny crocus bud beads that have a sleek modern look to them. The you will learn how to create the delicate curved petals of the crocus and then combine them into realistic crocus flower heads that you will pierce and bake up as beads for our lariat project. These gorgeous beads need very little finishing and can be used in any situation where you would use a flower bead… almost everywhere!
Vol-070-5: Video #494: Hand Knotted Cord: In this video, we will quickly cover the finishing of the crocus beads, which includes smoothing out any rough surfaces, plus waxing and polishing to a soft sheen. Then we move on to creating a hand-knotted bead lariat onto which we will string a flourish of crocus beads. You will learn the secrets to getting a nice tight knot between beads, as well as some tips and tricks for making the knotting go quicker and easier. We’ll be using waxed cotton cording and real jade beads, but the technique can be used for all kinds of cording and bead types, including silk cord and pearls. So I think you’ll love adding the knotted cord to your jewelry making bag of tricks!
Vol-070-6: Video #495: Assembling The Lariat: In this video, the whole project comes together! First you will learn how to make a bead dangle using regular jewelry pliers… followed by a demo ov my new new favorite tool that makes in super fast to crank out a whole bunch of dangles in short order! Then we’ll add the chain to the hand knotted cord. And lastly the crocus bead dangles get added to the chain. With all the tips and tricks I share in this tutorial series, it will leave your head spinning. Let’s just say, once completed, your whole world will be coming up flowers!
By the way, many of the “shopping” links I provide for the various tools and supplies used in my tutorials, are “affiliate” resources. That means companies like Amazon and the other suppliers I refer, pay me a small commission if you click on the links and end up making a purchase at their site. It’s not a lot, but every little bit helps in keeping the cost of my tutorials down. And, the prices for products that you may purchase through my links, are exactly the same as what you would normally pay, even if it is a “sale” price. So please feel free to click whenever you need to pick up a few things for your studio. Thanks so much for your support.
Vol-070: Wild Tansy A-Palette (4 Premo Color Recipes)
Filed in 2: Color Recipes,Green,Orange,Pink,Yellow, , 11:02 am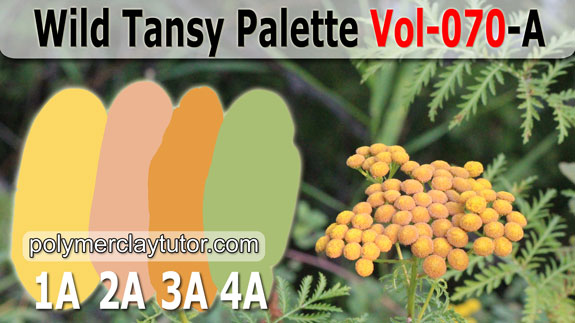 |
1-A: Wild Tansy 2-A: Dusty Peach 3-A: Dusty Amber 4-A: Tansy Leaves |
Wild Tansy is a dusty warm yellow found on the sunny flower buttons of the Wild Tansy. Dusty Peach is the dusty pastel peach color with a hint of lavender, that rims the blossoms. Dusty Amber is the rusted golden color of the aging flowers. And Tansy Leaves is the soft pastel green of the feather-like leaves of this fascinating little roadside wildflower.
To download the 4 color recipe cards, click here: Wild Tansy Palette
Member Benefits 070: Beyond Beginners
Filed in 3: Member Benefits,Beyond Beginners, , 11:01 amI am constantly amazed at how much information Cindy passes on. I’ve been messing around with PC for some years but she still manages to bring up subjects that seem quite basic until we hear what Cindy has to add. And to be still doing the videos after 4 years is amazing. When I first joined (approx 2/3 years ago) I said I wondered if she’d be able to keep this up. She assured me she would and she has! – and continues to do so. I am so delighted to be part of her ‘family’. ~Marion-R >> Original comment was posted here: Polymer Clay Tutorials
Hi Cindy; What a fantastic website you have! I’ve already mentioned it to a number of clayers who are looking for more and more information. I’ve worked with polymer clay for over twenty years now (egad, I’m getting old!). For quite some time I’ve been working with cutting the clay with a cutting machine. The one that works pretty well is my Silhouette Portrait. But I’m not totally happy with the results. So I’m ordering a Sizzix Big Shot which I felt would work better. And then I found your wonderful tutorial on your site and was so pleased to see how well it does work… I am so impressed with the variety of techniques you have done and are doing on your site. Wow! ~Dorothy-M >> Original comment was posted here: Scrapbooking Tools for Polymer Clay Projects
Hi, Cindy! I just wanted to tell you thank you for making so many wonderful instructional and informational videos available (for free!) on your site. I have been working with polymer clays for a while now, but I am by no means an expert. Your videos often cover techniques I already knew, but your instructions are so clear that several of them are easier now for me. Also, you have an absolutely charming accent which makes you fun to listen to. I just wanted you to know how much I appreciate all of your efforts to make clay arts easier and more enjoyable. Thanks again. ~Morgan-S >> Original comment was posted here: Reviving Dried Out Gilders Paste with Paint Thinner
Continue reading this entry »
Vol-069: Polymer Clay Batik Technique (6 Videos)
Filed in 1: Video Tutorials,Techniques, February 6, 2014, 11:03 am| Polymer Clay Batik Technique – Using Ingredients That May Surprise You. Scroll Down For Links To All 6 Videos. |
Vol-069-1: Video #479: Intro (that clip just above): In this 6 part video tutorial series, you will learn how to create my original Polymer Clay Batik Technique. You will also learn many tips, tricks and techniques that you can use to create your own unique patterns and colors to make truly one-of-a-kind beads, pendants, jewelry projects and more. The ideas and techniques can not only be used for the projects I demonstrate in this tutorial series, but also for other home decor and other creative projects as well.
Vol-069-2: Video #480: Creating Your Batik Design: In this video, I show how easy it is to create wonderful Original Batik Designs on flat sheets of polymer clay. The secret ingredients you will use in this technique are probably already in your home right now, and I think you’ll be surprised what they are! For pattern design inspiration you can use the ideas I share with you as well as patterns researched on your own over the internet. The options are once again, truly unlimited!
Vol-069-3: Video #481: Adding the Inks: In this video, In this video, I demonstrate the simple techniques and tools needed for batiking your polymer clay. I teach how to get a dyed rainbow effect, and give tips on how to avoid getting muddy colors on your own Faux Batik projects. You’ll see the pattern and crackles appear as if by magic, right before your eyes. And you’ll learn how easy it is to remove the resist from your clay in a way that you most likely will have never thought possible with a sheet of raw polymer clay! Oh the mystery… the intrigue!
Vol-069-4: Video #482: Laminating and Cutting: In this video, In this video, I walk you through the process of laminating your fresh sheet of polymer clay batik, onto a thicker sheet of polymer clay and then to cut it into the desired shapes needed for your specific project. You can use these polymer clay components to create earring, pendants, bracelets, links and a huge variety of other polymer clay jewelry and home decor projects. Anywhere you can use a sheet of polymer clay… you can use your sheet of polymer clay batik technique. Plus, I will share with you my nifty technique for using up all the leftovers to make some extra ‘crazy quilt’ pieces… so nothing will be wasted!
Vol-069-5: Video #483: Making Shaped Batik Beads: In this video, In this video, I teach you how to form your own custom bead shapes that you can use as your tiny canvas on which to ‘paint’ a batik pattern onto. These beads can be made in many shapes and sizes, that are perfect for jewelry making as well as many crafting projects. I will show you examples of how I used wire and seed beads to create unique polymer clay pendants, but you can you use your beads however you wish!
Vol-069-6: Video #484: Baking and Finishing: In this video, In this video, I teach you how to how to properly bake and finish your Polymer Clay Batik Technique Beads and creations, so that they not only look great, but will also be strong and durable for many years to come. You will also learn how to sand your pieces to a smooth and professional finish, using the proper grits for this unique technique. Included is a quick demo on how to drill holes in your polymer clay beads and components, And… I share many tips and ideas for customizing your creations with your own unique voice. I can’t wait to see what you guys come up with!
By the way, many of the “shopping” links I provide for the various tools and supplies used in my tutorials, are “affiliate” resources. That means companies like Amazon and the other suppliers I refer, pay me a small commission if you click on the links and end up making a purchase at their site. It’s not a lot, but every little bit helps in keeping the cost of my tutorials down. And, the prices for products that you may purchase through my links, are exactly the same as what you would normally pay, even if it is a “sale” price. So please feel free to click whenever you need to pick up a few things for your studio. Thanks so much for your support.
Vol-069: Chevy Bel Air A-Palette (4 Premo Color Recipes)
Filed in 2: Color Recipes,Orange,Pink,Red, , 11:02 am |
1-A: Chevy Bel Air 2-A: Pink Flamingo 3-A: Orange Sherbet 4-A: Red Leather Panel |
Chevy Bel Air is the hot tomato red of this fantastic vintage car interior. Pink Flamingo is the color of the iconic flamingos so common in 50′s fabrics and decor, as well as a color pulled from the dash of this stylish car. Orange Sherbet is the color of the steering wheel where the sun washes out the red… and for the popular treat you might buy at the counter of a soda shop back in the day. And Red Leather Panel is the dark brown red of the door panels in the shade, where the red looks deeper and heavier than in the rest of the vehicle.
To download the 4 color recipe cards, click here: Chevy Bel Air Palette
Member Benefits 069: Techniques Tools
Filed in 3: Member Benefits,Techniques Tools, , 11:02 amDear Cindy – I just watched the Rose Bead video. Thankyou-thankyou-thankyou!!!! I really needed to see the whole process because I have read instructions on how to make flowers and they were as clear as mud. Your instructions however are so clear and the colour blending is so logical and practical. I can see myself making all sorts of flowers using this technique. Your online classes are so fantastic and I look forward to each one! Thanking you again. Your grateful student. ~Cara-L >> Original comment was posted here: Variegated Sculpted Rose Beads
Cindy, thank you for the tutorial today about the faux bone. As always, you made it easier, better and more fun. I’ve seen a couple demos on this but they made it look difficult. I’ve tried it a couple times and was too precise on the stacking and cutting. I like your way “Very Real”. There just aren’t enough Fridays in the week. Thanks again. ~Bonnie-K >> Original comment was posted here: Faux Bone, Faux Ivory
Just wanted to tell you that I loved this weeks video on the Puffy Beads. It was an ‘A-ha’ moment as I watched you place the puffy bead on the clay sheet stuck to the glass. A solution so simple it had escaped me. lol. Thanks again Cindy. Hugs. ~Adrienne-L >> Original comment was posted here: Cute Little Hollow Puffy Beads
Cindy, I just wanted to say that I have completed my very first attempt at an ART SHEET, and if you knew just how little artistic training and confidence I have, you’d understand how I feel about your fantastic tutorial – I used a Penny Black stamp (4271L winter ledge) with scattered birds on bare limbs, and it’s one of the best things I’ve ever done, ALL thanks to you!!! ~Carol-B >> Original comment was posted here: Premo Color Recipes
Continue reading this entry »