Vol-068: Polymer Clay Journals (6 Videos)
Filed in 1: Video Tutorials,Bead Projects, January 2, 2014, 11:03 amPolymer Clay Journals – And Altered Books Too. Scroll Down For Links To All 6 Videos. |
Vol-068-1: Video #468: Intro (that clip just above): In this 6 part video tutorial series, you will learn how to create three different polymer clay journal covers using several mixed media techniques. You will also learn many tips, tricks and techniques that you can use to create your own unique style of art journal. The ideas and techniques can not only be used for the projects I demonstrate in this tutorial series, but also for other home decor and jewelry projects as well.
Vol-068-2: Video #469: Rainbow Zebra Journal Cover: In this video, I show how to make a funky rainbow zebra patterned journal cover, that will inspire you whenever you look at it. The youthful cover has a smooth, layered, dimensional design, that looks cool… and it feels great too, when you run your fingers over the raised stripe pattern. This technique works well for journal covers, and anywhere else that colorful zebra inspiration may roam.
Vol-068-3: Video #470: Pavelka Peel Technique: In this video, I demonstrate the simple techniques and tools needed to do the Pavelka Peel treatment, originally created by well known polymer clay artist Lisa Pavelka. I’ll be teaching you how to use Lisa’s signature Transfer Foils as well as metal leaf, to create this wonderful technique with unlimited possibilities. The information you learn in this video will cross over to many other polymer clay projects as well.
Vol-068-4: Video #471: Make Time Altered Book: In this video, I walk you through the process of creating an altered book, mixed media project, with a theme that I call ‘Make Time’. It has a rustic distressed looking polymer clay cover, that’s made using alcohol inks, rubber stamps, embossing powders, powdered pigments, metal embellishments and reclaimed watch parts. You can let your creativity run wild with this one, because the the possibilities are truly endless… and I’m not just saying that!
Vol-068-5: Video #472: Baking and Finishing: In this video, I teach you how to how to properly bake and finish your Polymer Clay Journals so that they not only look great, but will also be strong and durable for many years to come. Just as there were many techniques and options for creating the actual journal covers, so are there many ways to finish them. I share with you many tips and ideas, that you can use to customize your creations with your own unique voice.
Vol-068-6: Video #473: Creative Options And Ideas: In this video, I give you a brain dump of ideas to pick and choose from, for working into your own Polymer Clay Journal and Altered Book projects. I show many examples of the options available for the actual journal base, as well as the crazy unlimited ways you can customize the inside pages. Basically, there are as many creative choices for making these art journals, as there are artists themselves! I can’t wait to see what you guys come up with!
By the way, many of the “shopping” links I provide for the various tools and supplies used in my tutorials, are “affiliate” resources. That means companies like Amazon and the other suppliers I refer, pay me a small commission if you click on the links and end up making a purchase at their site. It’s not a lot, but every little bit helps in keeping the cost of my tutorials down. And, the prices for products that you may purchase through my links, are exactly the same as what you would normally pay, even if it is a “sale” price. So please feel free to click whenever you need to pick up a few things for your studio. Thanks so much for your support.
Vol-068: Speed Boat A-Palette (4 Premo Color Recipes)
Filed in 2: Color Recipes,Blue,Neutral, , 11:02 am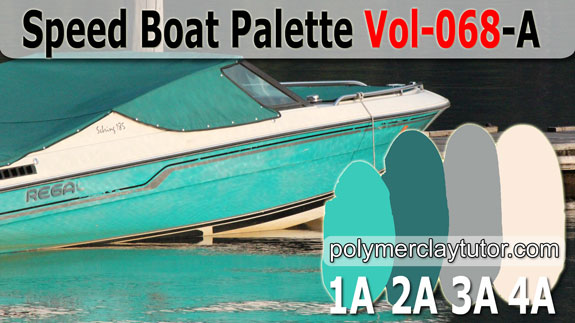 |
1-A: Speed Boat 2-A: Aquamarine 3-A: Pinstripe 4-A: Wake Foam |
Speed Boat is the vibrant turquoise shade of this awesome vintage speed boat, parked at the dock on the lake at a campsite in Cor D’Alene Idaho. Aquamarine is the darker teal color of the tarpaulin, protecting the interior of the vessel from the elements. Pinstripe is the soft gray of the racing stripes down the side of the boat. And Wake Foam is the color of the top side of the pleasure craft, as well as the color of the foamy wake the boat leaves behind as it speeds through the water.
To download the 4 color recipe cards, click here: Speed Boat Palette
Member Benefits 068: Tutoring Support
Filed in 3: Member Benefits,Tutoring Support, , 11:01 am Cindy, I can’t tell you how wonderful your videos have been for me. The course I purchased has launched me into creating beads that are an amazement to me and also to my friends! I love all the videos you send as well as your prompt answers to any questions or concerns. Being able to learn from your mistakes is very, very valuable. Thanks again for all your hard work and willingness to share your knowledge and experience with us. ~Marsha-N >> Original comment was posted here: Polymer Clay Tutorial Videos
Hi Cindy! Have to say, that the video info. was great! I found myself feeling a new found courage. Ahem! Anyway, as usual, want you to know that you are still the top Banana, and I’ve never been disappointed by the information you have shared with me! Right on the dime!!! Appreciate how easy you make it seem for people like myself, and I’m sure others too. Hope that everything is going well for you and your loves. Thank you for sharing a part of your soul!!! Ya gotta know that I appreciate your help immensely, and that I consider you to be one of my many Blessings!! Alot of times, even though people are doing something like this for a business, they tend to hold something back. I’m of the ilk, that when you help someone — you give it your all. I’m a beader, and share my expertise with others. It brings joy to my heart, to see someone smile — when they finally know that they have aced some type of technique! This is the name of the game, and you have it down pat. LUV YA. ~Diana-S >> Original comment was posted here: Polymer Bead Crafts
Cindy, first of all I want you to know, I run to you because your teaching has helped me grow enough for this. I can’t even begin to thank you for your tutoring and all you have done for me! I love you and I’m so glad your April Fools prank was just that… a prank. Thankfully my story below, is not! I went to a local bead store in town this week, and asked if I could show her my beads. I wanted to know if they were up to a level to where I could sell them as simply beads and if there would be a market locally. Before this I had only shown my beads at work, to friends, and a very small craft fair so it was a leap for me. Well, she loved them and wants to buy all the beads I showed her, after the middle of this month… plus she wants to see all my beads and she seemed so excited! I’m just so excited and scared and excited and confused… did I say excited? BTW… with the faux bone beads, I had to convince them they weren’t actually bone but polymer clay and they loved those! Thank you so much again for your teaching and for the opportunity to ramble to you about the little excitements in my life and knowledge that you (and others here in the community) will read this. With lots of love and thanks. ~Melinda-H >> Original comment was posted here: Wholesale Pricing Tips for Your Polymer Clay Beads
Continue reading this entry »
Vol-067: Faux Enamel & Viking Knit (6 Videos)
Filed in 1: Video Tutorials,Techniques, December 5, 2013, 11:03 am| Faux Enamel and Viking Knit Bracelet – So Many Possibilities. Scroll Down For Links To All 6 Videos. |
Vol-067-1: Video #457: Intro (that clip just above): In this 6 part video tutorial series, you will learn how to create a versatile faux enamel polymer clay technique using stencils and liquid polymer clay. You will also learn how to do the ancient wire chain making art of Viking Knit. The ideas and techniques can not only be used for the projects I demonstrate in this tutorial series, but also for other home decor and jewelry projects as well.
Vol-067-2: Video #458: Polymer Faux Enamel Technique: In this video, I show how to make your bracelet component using a faux enamel polymer clay technique. You will learn about the huge number of options for creating your own unique piece. Depending on the colors, the stencil patterns, the shapes and the sizes chosen for your design, you can create an unlimited variety of jewelry designs from this one single technique.
Vol-067-3: Video #459: Baking and Finishing: In this video, I demonstrate the simple techniques and tools needed to bake and finish your polymer clay bracelet component to achieve professional looking results. I’ll be teaching you a neat little trick for making curved baking forms as well as how to drill your polymer clay focal piece, to work perfectly in your bracelet design. The information you learn in this video will cross over to many other polymer clay projects as well.
Vol-067-4: Video #460: Viking Knit: In this video, I show you how to use the Lazee Daizee Viking Knit Wire Weaving Tool to create gorgeous wire weave cording that you’ll be able to use for making the bracelet in this tutorial. You will also be able to use this new wireworking skill to make many other jewelry items including necklaces, earrings and any other place that a thick decorative cording is needed. It is a great look for both women and men’s jewelry designs.
Vol-067-5: Video #461: Drawing Down the Viking Knit: In this video, I teach how to draw down the Viking Knit weave into a more condensed, smaller diameter, flexible cording… by using a draw plate. Included are all kinds of tips and tricks for making this process easier. I also will discuss the different options for your bracelet design so that you can customize the piece to exactly what you are looking for.
Vol-067-6: Video #462: Assembling the Bracelet: In this video, you will learn the finishing tricks that will take your polymer clay and viking knit bracelet from a pile of components to a one-of-a-kind art jewelry piece. I will show you how to custom size your design, and also share a few wire working tricks for making your own clasps and wire wrapped loops. All in all you will learn many techniques that can be used throughout your jewelry making journey… and they are easier than you may think!
By the way, many of the “shopping” links I provide for the various tools and supplies used in my tutorials, are “affiliate” resources. That means companies like Amazon and the other suppliers I refer, pay me a small commission if you click on the links and end up making a purchase at their site. It’s not a lot, but every little bit helps in keeping the cost of my tutorials down. And, the prices for products that you may purchase through my links, are exactly the same as what you would normally pay, even if it is a “sale” price. So please feel free to click whenever you need to pick up a few things for your studio. Thanks so much for your support.
Vol-067: Pine Cone A-Palette (4 Premo Color Recipes)
Filed in 2: Color Recipes,Green,Neutral,Yellow, , 11:02 am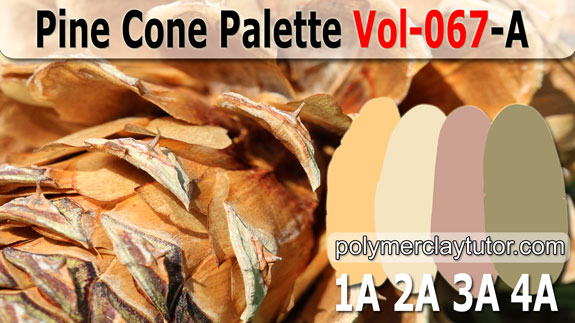 |
1-A: Pine Wood 2-A: Pine Nut 3-A: Pine Cone 4-A: Pine Tree |
Pine Wood is the soft yellow brown found on the inside ‘petals’ of the pine cone. Pine Nut is the pale cream found in the highlights of the cone tips. Pine Cone is the purple brown of the stripes on the petals and is the main color of the pine cone when it is closed. And Pine Tree is not only the color of the tree that this cone fell off of, but also the green color found on the tips of the petals as well.
To download the 4 color recipe cards, click here: Pine Cone Palette
Member Benefits 067: Color Mixing
Filed in 3: Member Benefits,Color Mixing, , 11:01 amWhat wonderful stories that accompany your color palettes! Now this is why you have such a following. Such depth of field in all that you both do. It adds so much color (pun intended) to our lives. Thank you. The palette is lovely, I can see using all the colors over and over. YUM! ~Patt-W >> Original comment was posted here: Union Station Palette | Polymer Clay Tutor Recipes
Hi Cindy. I’ve purchased color palettes in the past from a different website, and I was disappointed because the recipes did not match the colors. As a matter of fact, the colors all came out looking almost the same (i.e. the pinks all looked alike, and so forth). If you do the recipes for us Cindy, I know they will be right. ~Angela-M >> Original comment was posted here: Rusty Oak Palette | Polymer Clay Color Recipes
Cindy, Although I’ve worked in paperclay, I am new to polymer clay and saving my pennies for your membership. Almost there. :) I learn so much from you already. The free color recipe cards took me in an entirely new direction with my work, so I am very excited about next month, when you are in my budget. Thank you for a great website. ~Diana-W >> Original comment was posted here: Viburnum Pod Palette | Polymer Clay Color Recipes
Continue reading this entry »
Vol-066: Polymer & Wood Ornaments (6 Videos)
Filed in 1: Video Tutorials,Bead Projects, November 1, 2013, 11:03 am| Polymer & Wood Ornaments – For Christmas and Home Decor. Scroll Down For Links To All 6 Videos. |
Vol-066-1: Video #445: Intro (that clip just above): In this 6 part video tutorial series, you will learn how to properly add a layer of polymer clay to wooden items such as laser cut frames and ornaments, and wood letters or word cutouts. The ideas and techniques can not only be used for the projects I demonstrate in this tutorial series, but also for other home decor and jewelry projects as well.
Vol-066-2: Video #446: Preparing The Wood Base: In this video I will show you the many types of wood bases that are available in the marketplace today. As well I will demonstrate how to properly prepare your wood by cleaning and pre-baking it. These preparation steps will prevent you clay from bubbling and cracking after it has been applied to and backed on the wooden base surface.
Vol-066-3: Video #447: Making 3D Embossed Ornament: In this video I will demonstrate the simple techniques and tools you will use to create a simple yet elegant 3 Dimensional Ornament, with a polymer clay layer that looks embossed. You can also use this technique in a variety of other laser cut wood projects as well. I think you’ll be pleasantly surprised to find out how easy this project really is!
Vol-066-4: Video #448: Colored Pencil Technique: In this video, I show you how to use colored pencils for adding color to your wood and polymer clay ornaments. Your creations will be a wonderful addition to any Christmas tree, I’m sure. Of course all the tips and tricks you learn in this video can be used in other polymer clay projects as well, making this an awesome tutorial for your polymer clay bag of tricks!
Vol-066-5: Video #449: Ombre Wood Art: In this video, I will teach you how to make a sparkling colored blend of polymer clay that will give any wood decor piece a stunning Ombre effect. Words cut out of wood and covered in polymer clay make a fun and inspiring accent piece for any room. You can also find single letters and monograms to spell out words of your choice.
Vol-066-6: Video #450: Sanding and Finishing: In this video, you will learn some pro level finishing tricks that will take your polymer clay and wood ornaments from JUST OK looking to everyone-wants-one FABULOUS status! It’s all in the finishing baby! As they say, a little bit of elbow grease goes a long way.
By the way, many of the “shopping” links I provide for the various tools and supplies used in my tutorials, are “affiliate” resources. That means companies like Amazon and the other suppliers I refer, pay me a small commission if you click on the links and end up making a purchase at their site. It’s not a lot, but every little bit helps in keeping the cost of my tutorials down. And, the prices for products that you may purchase through my links, are exactly the same as what you would normally pay, even if it is a “sale” price. So please feel free to click whenever you need to pick up a few things for your studio. Thanks so much for your support.
Vol-066: Sunflower Field A-Palette (4 Premo Color Recipes)
Filed in 2: Color Recipes,Green,Orange,Yellow, , 11:02 am |
1-A: Harvest Sun 2-A: Pumpkin Spice 3-A: Rose Hip 4-A: Fall Fields |
Harvest Sun is the soft buttery yellow found on the tips of this happy sunflower’s petals. Pumpkin Spice is the soft spicy orange found where the color shifts on the petals from the yellow tips to the dominant orange ring near the seeds. Rose Hip is the fiery dark orange that still has a softness to it. And Fall Field is the dusty green of the sunflower leaves, as they begin to dry out and fade as the sunflower seeds begin to ripen in the fall sun.
To download the 4 color recipe cards, click here: Sunflower Field Palette
Member Benefits 066: Fun Events Contests
Filed in 3: Member Benefits,Fun Events Contests, , 11:01 amJust enjoyed your whole trip and as I had been away from my own area (Astoria, Oregon) for about 10 years and am trying to get to know what all is here again. I was in search of fellow polymer clay artists, low and be hold you gave me a start with local folks. Thanks again for your great videos of our area and our locals and of course their work from your tutorials. Now to go surfing (internet that is). ~Karen-H >> Original comment was posted here: PcT Roadtrip Wrapup Video
I love it! This is a fantastic contest for everyone! For the contestants, you’ve made it pretty easy — we make what we like, based on your tutorials, postings, or even the inspiration we get from this blog and community. It’s great for you and this blog too! More people will come and see what a huge benefit membership and watching your videos can be. At least I hope that’s what happens. You and your tutorials can really help take someone from beginner to awesome polymer clay artist! Thanks! ~Phaedrakat >> Original comment was posted here: Polymer Clay Bead Contest
Beautiful necklaces everyone! I can’t believe this month’s contest is coming to an end. It has been great to see everyone’s beautiful work. All the beautiful colors, texture, and designs. WOW! I agree with Carole, I am grateful for this contest. Thanks, Cindy for challenging each one of us to step up to the plate. I am looking forward to see what we can accomplish as a community… what each us can accomplish on our own. Thanks, Cindy, for letting us stretch our wings! ~Lupe-M >> Original comment was posted here: Polymer Clay Tutor Contest
Continue reading this entry »
Vol-065: Faux Abalone Paua Cuff (6 Videos)
Filed in 1: Video Tutorials,Cane Topics, October 3, 2013, 11:03 am| Faux Abalone Paua Cuff – Simple Cane Technique That Anyone Can Do. Scroll Down For Links To All 6 Videos. |
Vol-065-1: Video #439: Intro (that clip just above): In this 6 part video tutorial series, you will learn techniques and tricks for creating a realistic looking (though easy to do) Faux Abalone Paua Shell Polymer Clay Cane design, as well as use it to construct a stunning Brass and Polymer Cuff of the quality that you can be very proud of. The ideas and techniques can not only be used for this particular bracelet design, but for many other polymer clay and jewelry projects as well.
Vol-065-2: Video #440: Mixing and Blending the Colors: In this video I will help you to create your own custom color mixes and blends that will create the perfect Abalone Paua Shell look alike! I use Premo Accents Clay for this project because of the rich sparkly metallic colors available with this brand.
Vol-065-3: Video #441: Making Faux Abalone Paua Cane: In this video I will demonstrate the simple techniques and tools you will use to mimic the wonderful layers and rings found in the shell of the amazing Abaolone or Paua shellfish. I think you’ll be pleasantly surprised to find out how easy and forgiving this technique really is!
Vol-065-4: Video #442: Building the Cuff Bracelet: In this video, I show you how to properly prepare your Brass or Copper Metal Cuff Blank and add the layer of polymer clay. Your creation will not only be gorgeous to look at, but will also be professionally constructed in a way that will stand the test of time.
Vol-065-5: Video #443: Sanding and Finishing: In this video, you will learn some pro level finishing tricks that will take your piece of jewelry from JUST OK looking to everyone-wants-one FABULOUS status! It’s all in the finishing baby! As they say, a little bit of elbow grease goes a long way.
Vol-065-6: Video #444: Polishing and Waxing: In this final video of the series, you will discover the tips and techniques to finishing your metal and polymer cuff, so that it is comfortable to wear, feels like luxury in your hands and looks like a million bucks! Remember, people judge value not only by what they see, but by how it feels when they hold it in their hands. Make sure it feels amazing and you’ll not only “Love What You Make”… but so will anyone who owns your work!
By the way, many of the “shopping” links I provide for the various tools and supplies used in my tutorials, are “affiliate” resources. That means companies like Amazon and the other suppliers I refer, pay me a small commission if you click on the links and end up making a purchase at their site. It’s not a lot, but every little bit helps in keeping the cost of my tutorials down. And, the prices for products that you may purchase through my links, are exactly the same as what you would normally pay, even if it is a “sale” price. So please feel free to click whenever you need to pick up a few things for your studio. Thanks so much for your support.
Vol-065: Early Morn A-Palette (4 Premo Color Recipes)
Filed in 2: Color Recipes,Neutral,Orange, , 11:02 am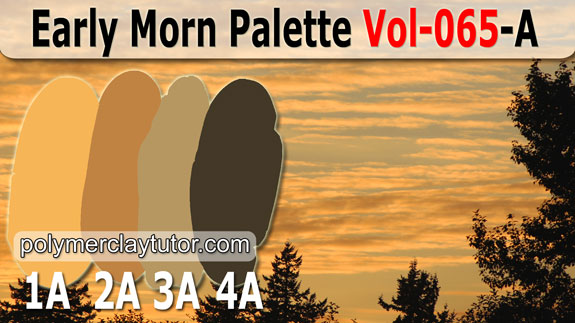 |
1-A: Sunrise 2-A: Crack of Dawn 3-A: Early Morn 4-A: Cup of Joe |
Sunrise is a soft, gray orange shade that rims the edges of the clouds in the dawn sky. Crack of Dawn is the darker tan of the shadows, where the sun has not yet burst through the cracks. Early Morn is the gray blue of the early morning sky, as it struggles to wake from its deep slumber. And Cup of Joe is the dark brown black of the tree silhouettes and the fresh brewed coffee in our mugs.
To download the 4 color recipe cards, click here: Early Morn Palette
Member Benefits 065: Video Learning
Filed in 3: Member Benefits,Video Learning, , 11:01 amCindy Lietz provides a brilliant tutorial site at absolutely minimal cost. Okay, there are plenty of free tutorials on the web… but if you want real quality, easily understood videos, wonderful projects and lots of free info, Cindy is the one to follow! It costs so little… and every month there is so much to learn. Cindy is an inspiration, as proved by her thousands of followers. Free is not always the best! ~Lesley-S >> Original comment was posted here: Polymer Clay Instructions
Hello, dear Cindy: I just wanted to tell you how fantastic YOU are. I was intrigued by an offer from another polymer clay instructor and paid $36 for a 40 minute video… which YOU would have easily, and I mean easily, covered in 9 minutes flat. WOW, what a value YOU offer!!!! Then I tried a PDF lesson, which, fortunately cost “only” $12. Well, maybe I am really stupid, because I was not able to follow the instructions. I think I’ll just stick with YOU! And that’s that! YOU are fabulous, your instructions are clear, precise and to the point and can be easily followed. Thank you and Doug, YOU ARE THE BEST!!!!! With very best regards, Gratefully. ~Christl-P >> Original comment was posted here: Leopard Cane Tutorial Video
I began beading about 7 years ago with a love for natural stone beads and jewelry making. I recently developed an interest in polymer clay as a way to enhance my jewelry designs. The versatility of polymer clay and the endless possibilities for color blends and designs are truly unique to this medium. I have also been very fortunate to find talented polymer clay artists such as Cindy Lietz who graciously share their skills by teaching new artists the basics and beyond to make learning new techniques fun and easy. I look forward to sitting at my computer every Friday to see my new video tutorial and color recipes and refer back to the tutorials often when starting new projects. My inventory of polymer clay and clay tools are quickly growing to match my bead collection! ~Ann-P >> Original comment was posted here: Polymer Clay Color Recipes
Continue reading this entry »
Vol-064: Owl Charm Necklace (6 Videos)
Filed in 1: Video Tutorials,Bead Projects, September 5, 2013, 11:03 am| A Wise Bird Of Many Faces. Scroll Down For Links To All 6 Videos. |
Vol-064-1: Video #428: Intro (that clip just above): In this 6 part video tutorial series, you will learn techniques and tricks for creating darling little owl beads, with feather cane wings… as well as a time-worn faux leather book bead… a stamped metal charm… and a charm hanger and clasp to put the whole thing together. The ideas and techniques can not only be used for this particular necklace design, but for many other polymer clay and jewelry projects as well.
Vol-064-2: Video #429: Owl Wing Cane: In this video, you will learn how to create a polymer clay cane that mimics the striped feathers of a Gray Owl’s wings. You will then take slices from the cane to instantly add detailed wings to each of your Owl bead creations, without having to start from scratch for each new bead. I think you will love how simple this cane is to make!
Vol-064-3: Video #430: Sculpting The Owl Bead: In this video you’ll learn how to use some simple clay sculpting tools to create the most darling little owl beads! Depending how you make his shape and features, and how you apply the wings, your little friend can take on a variety of different personality styles!
Vol-064-4: Video #431: Bound Leather Book Bead: In this tutorial I will show you how to make a rustic, time-worn, faux leather Book Bead that looks so tiny and real. You’ll swear it came directly off the library shelf of the wise old owl himself… since everyone knows that owls love to read.
Vol-064-5: Video #432: Hand Stamped Metal Charm: In this video, you will learn some neat little tricks for using metal letter stamps on small metal blanks, to make wordy charms for your Wise Owl Charm Necklace… or for any charm jewelry project you like. You’ll also learn how to antique your beads and charms to make the texture really stand out. And you will find out which are my favorite products that I use for Antiquing Mediums.
Vol-064-6: Video #433: Charm Holder and Clasp: Lastly, in this final video of the series, you’ll learn how to make your own custom hammered Charm Holder and clasp for your necklace, so that you can interchange your Owl Bead, Book Bead, and Charm, with any other charms of your choice. This is a simple, practical and beautiful design you can use for many different jewelry projects.
By the way, many of the “shopping” links I provide for the various tools and supplies used in my tutorials, are “affiliate” resources. That means companies like Amazon and the other suppliers I refer, pay me a small commission if you click on the links and end up making a purchase at their site. It’s not a lot, but every little bit helps in keeping the cost of my tutorials down. And, the prices for products that you may purchase through my links, are exactly the same as what you would normally pay, even if it is a “sale” price. So please feel free to click whenever you need to pick up a few things for your studio. Thanks so much for your support.