Vol-064: Nightshade A-Palette (4 Premo Color Recipes)
Filed in 2: Color Recipes,Orange,Purple,Red, September 5, 2013, 11:02 am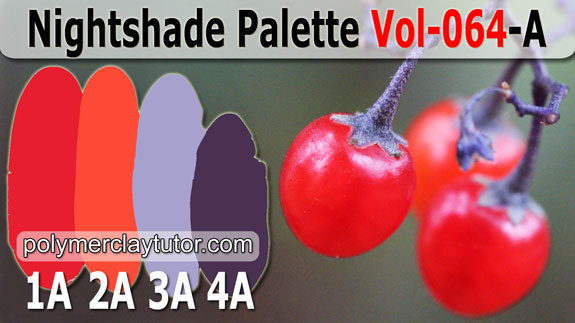 |
1-A: Nightshade Berries 2-A: Poison 3-A: Deadly 4-A: Nightshade  |
Nightshade Berries is the rich vivid red of the lethal ripe fruit of the Nightshade plant. Poison is the acid orange color of the berry as it begins to ripen on the deadly vine. Deadly is the mysterious ghostly purple of the tiny hairs that stand up on the necks of the toxic tendrils. And Nightshade is the dark purple black of the Halloween-witch-like hats that the poisonous berries cling to.
To download the 4 color recipe cards, click here: Nightshade Palette
Member Benefits 064: Sculptural
Filed in 3: Member Benefits,Sculptural, , 11:01 am Cindy and Doug, Thank you so much for featuring my work. I’m honored to be here and thanks again for all your inspirational tips and techniques that you share with us weekly. I refer back to your tutorials more than any other reference materials that I use, well maybe I use anatomy references more when I began a sculpt, but when I’m ready to finish, you are the site I go to and mull over the effect that I want. Most of my sculpts are figurative and I can’t use this with them, but I’m having so much fun doing these that I may focus on this type sculpt for awhile.I have visions of other animals and people, too. And, I want to make some drop dead beads also. When I first thought about an elephant, the crackle paint thingy was in my mind for his skin, but then I remembered the Raku technique, and I couldn’t wait to get to the point of making his skin. I can tell you, I had more fun making this elephant than any sculpture that I’ve ever made. ~Lynda-D >> Original comment was posted here: Faux Raku Elephant by Lynda Dunham-Watkins
Hi Cindy, I wanted to say thank you for helping me with my library account. I also want to thank you for your excellent tutorials. I have been a model maker for 18 years but somehow polymer clay flew under the radar (Kid stuff LOL). I have stopped a while ago but came upon an art piece which was made from polymer clay reigniting my model maker passion and since I needed a way of making some extra income I started to do research. Your site cut the time I need to get up and running and recently I sold my first batch of cute ear studs on my market stall. I’m fascinated by the sheer chameleon qualities of this stuff and since I’m easily bored that is a big bonus. Yesterday I build the mother of all buffing tools for my dremel thanks to your tutorial and am buffing the hundreds of beads that I have made over the last two months finally seeing the true beauty of them all and can’t wait to get into necklace making. Kind regards from New Zealand. ~Evelien-G >> Original comment was posted here: Polymer Clay Tutor Videos
You most seriously want to think about joining Cindy’s tutorials. I have learned so much in the short time I have been here. I too was hesitating about joining but it was the best thing I ever did. I’m sure there are a whole lot of members out there who will tell you the same thing. Never have I experienced great teaching methods and the best tips as I have from Cindy. My frustration level went from 10 down to practically nothing. I am now starting to sculpture flowers and smaller things with a great deal more confidence. You will find a big family of wonderful Clayers here in all different levels. ~DixieAnn-S >> Original comment was posted here: Polymer Clay Library
Continue reading this entry »
Vol-063: Cone Flower Canes (6 Videos)
Filed in 1: Video Tutorials,Cane Topics, August 3, 2013, 11:03 am| Unique Design Shifts Color Along Length of the Cane. Scroll Down For Links To All 6 Videos. |
Vol-063-1: Video #416: Intro (that clip just above): In this 6 part video tutorial series, you will learn techniques and tricks for creating unique and stunning color changing cone flower canes. Use them in jewelry making projects like beads, charms, decorative headpins, earrings, bracelets, pendants, pins, brooches and more. These beautiful polymer clay flowers can also be used in a variety of mixed media art projects including, buttons, bookmarks, scrapbooking, art journals and other great looking polymer clay projects.
Vol-063-2: Video #417: Creating the Teardrop Blends: In this video you will learn the tips and tricks for making custom color teardrop blends that will make your cone flower canes gorgeous and arty looking. The neat thing about my secret blend is that it is super easy and it will have you looking like a pro, the first time you try it! This custom blend will be used for both canes (the seed head and the petals) that are used in this tutorial.
Vol-063-3: Video #418: Sead Head Cane: In this video you will take a section of the teardrop blend which you created in the last video and build a cane that resembles the cone or seed head of the cone flower. You’ll love how the colors are laid out to create the shading in the cone, making it dimensional and realistic looking.
Vol-063-4: Video #419: Petal Cane: In this video you will take the remaining sections of your custom teardrop blend and build them into a color shifting petal cane. What’s is great about the way this cane is made, is that each slice that you cut from the cane will be a slightly different color. This means that you can build several different cone flowers in all the colors from a bright sunny yellow, to a deep dark purple… just like real cone flowers!
Vol-063-5: Video #420: Making the Cone Flowers: In this video, everything you have learned so far, starts coming together into beautiful polymer clay cone flowers. I will also show you how to securely embed a wire to create an awesome decorative headpin that you can use as a headpin… or you could shape the wire into a bale so your flower could be used a charm or other types of jewelry items.
By the way, many of the “shopping” links I provide for the various tools and supplies used in my tutorials, are “affiliate” resources. That means companies like Amazon and the other suppliers I refer, pay me a small commission if you click on the links and end up making a purchase at their site. It’s not a lot, but every little bit helps in keeping the cost of my tutorials down. And, the prices for products that you may purchase through my links, are exactly the same as what you would normally pay, even if it is a “sale” price. So please feel free to click whenever you need to pick up a few things for your studio. Thanks so much for your support.
Vol-063: Pink Sedum A-Palette (4 Premo Color Recipes)
Filed in 2: Color Recipes,Green,Pink, , 11:02 am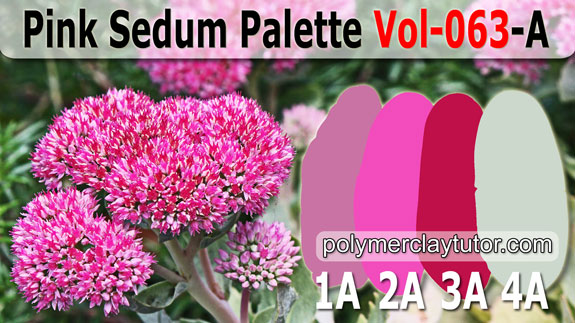 |
1-A: French Lilac 2-A: Pink Sedum 3-A: Raspberry Tea 4-A: Vintage Coke Bottle |
Vetch is a soft blue lavender found on the petal of the Vetch Flower. Fetching is the name given to the muted fuchsia pink, that graces the center of the flower. Coastal Breeze is the dusted blue of the surrounding background that opens to the ocean. Pastoral is the softest gray green of the grasses, that peacefully accompany the tiny Vetch blossoms, as they sway and dance in the salty air.
To download the 4 color recipe cards, click here: Pink Sedum Palette
Member Benefits 063: Tips Baking
Filed in 3: Member Benefits,Tips Baking, , 11:01 amCindy, Thank you for the very informative video on the glass ball ornament baking. I can see now that it could also smash and cause injury if not done carefully. I always like your way of giving information in a way that you are trying to convey as much information as possible and never in an attempt to be condescending. Excellent information. ~Joy-C >> Original comment was posted here: Mistletoe Ornament Polymer Clay Tutorial
I love the community here… I wish I would have discovered you guys sooner! I have found SO much information on this website! Last night I sat here and read for probably 6 straight hours (do I know how to party on a Saturday night or what?). At one point I just buried my face in my hands and just started laughing because one thread lead to another suggestion on another thread, which lead to another video on another thread and before I knew it I had 9 (!) tabs open on my web browser all from this site pertaining to some sort of question I had, or a question that I didn’t have but now do. I’m finding some great answers, though, and will soon be lining my oven with ceramic tile to help stabilize it. ~Karen-R >> Original comment was posted here: Selling Polymer Clay Jewelry at the Public Market
Joining Cindy’s clay family in 2008 is something I am very thankful for. Because of this, my granddaughters were able to make some charms while visiting over the holiday and I had a chance to use my new Kitchen Aide counter oven. It worked like a charm and held the heat. I only had to reduce it a bit to keep it between the 265-275 temperature needed. I purchased it two years ago when Kohl’s had it on sale at 50% off. A little pricey but worth every penny. It is going to be wonderful not to have to worry every time I bake some clay pieces . These are only two of the items of a long list that could have each and every name in our clay family. It is so wonderful to hear from each of you every time you pop in. And so it all started with Cindy, Doug, Willow and Fisher…..Many Thanks to ALL. ~Joyce-F >> Original comment was posted here: Polymer Clay Tutor
Continue reading this entry »
Vol-062: Micro Mosaic Polymer Pins (6 Videos)
Filed in 1: Video Tutorials,Bead Projects, July 4, 2013, 11:03 am| Intricate Detail, Easy To Do. Scroll Down For Links To All 6 Videos. |
Vol-062-1: Video #404: Intro (that clip just above): In this 6 part video tutorial series, you will learn techniques and tricks for creating unique and stunning Micro Mosaic Polymer Clay Projects. Use the techniques to make polymer clay pins or brooches, as well as come up with some of your own ideas for jewelry making, scrapbooking, art journals, picture frames, home decor and other great looking polymer clay projects.
Vol-062-2: Video #405: Extruding the Tiles: In this video you will learn a little bit about best practice design techniques for creating balanced designs that are aesthetically pleasing to look at. You will also learn how to create your own teeny tiny mosaic pieces using a unique color blend and your ever so versatile extruder tool.
Vol-062-3: Video #406: Laying the Tessarae: In this video you will learn the basics of creating your micro mosaic pin design, learning some of the principals of the flow of mosaic pieces (the opus). As well, you will discover the secret to cutting your micro mosaic ’tiles’ and building your mosaic pin design, with the addition of a small mirror. There are a lot of cool tips in this one!
Vol-062-4: Video #407: Grouting: In this video you will be mixing your own custom polymer grout and learning the in’s and out’s of creating a durable polymer clay mosaic pin. It will end up looking like you used real glass tiles, and real sanded grout.
Vol-062-5: Video #408: Textured Pin Back: This video you will learn the techniques for adding a pin back and textured polymer clay backing for your brooch, that gives it a professional and durable result. You can use the tricks and tips learned in this section for any polymer clay brooch or pin you like… not just for micro mosaic pins.
Vol-062-6: Video #409: Finishing Your Polymer Pins: In this final video of the six part series, you’ll learn how to sand, buff and polish your micro mosaic polymer pin to a gorgeous professional finish. I use Renaissance wax to give the clay a beautiful, classy looking sheen.
By the way, many of the “shopping” links I provide for the various tools and supplies used in my tutorials, are “affiliate” resources. That means companies like Amazon and the other suppliers I refer, pay me a small commission if you click on the links and end up making a purchase at their site. It’s not a lot, but every little bit helps in keeping the cost of my tutorials down. And, the prices for products that you may purchase through my links, are exactly the same as what you would normally pay, even if it is a “sale” price. So please feel free to click whenever you need to pick up a few things for your studio. Thanks so much for your support.
Vol-062: Fetching Vetch A-Palette (4 Premo Color Recipes)
Filed in 2: Color Recipes,Blue,Green,Pink,Purple, , 11:02 am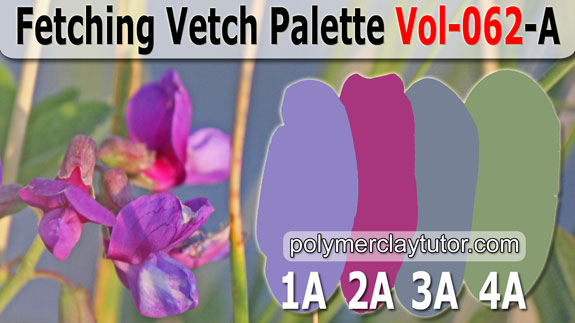 |
1-A: Vetch 2-A: Fetching 3-A: Coastal Breeze 4-A: Pastoral |
Vetch is a soft blue lavender found on the petal of the Vetch Flower. Fetching is the name given to the muted fuchsia pink, that graces the center of the flower. Coastal Breeze is the dusted blue of the surrounding background that opens to the ocean. Pastoral is the softest gray green of the grasses, that peacefully accompany the tiny Vetch blossoms, as they sway and dance in the salty air.
To download the 4 color recipe cards, click here: Fetching Vetch Palette
Member Benefits 062: Sand Buff Shine
Filed in 3: Member Benefits,Sand Buff Shine, , 11:01 amCindy – With your guidance, I am changing how I make my polymer clay beads beads. I have made Jupiter Beads that are smooth. I have also made Rocker Beads that feel like butter, but I didn’t buff them. Now I know after your last Faux Jasper Video that they could have had a shiny finish without varnish. I have a Dremel and a table top buffer that I will be using more often now. ~Cindy-P >> Original comment was posted here: Polymer Clay Tutorials
Proper finishing is sooo important. I am a huge fan of Project Runway, they are all fantastic designer and judges often talk about a designer not looking finished. Cindy’s Tute emphasizes little things like making sure the knots in the front are the same direction, sanding the holes in the heart, etc. It is tempting to want to wear something right away but these steps take a piece from being really nice to being SPECTACULAR!!! ~Anna-S >> Original comment was posted here: Celtic Heart Necklace Video
Oh, oh Cindy you have started a whole new revolution in finishing our Polymer Clay. I had looked at Jool Tool Months ago but could not justify the cost over getting a flex shaft tool for my dremel. The tool didn’t seem “soft” enough to work on clay beads. I was kind of on the fence like Sue F. However, now that you have demonstrated the tool for the buffing it got me more excited about it. I would be very anxious to see the sanding side of it especially for Round Beads and odd shaped pieces. A video using the different attachments for sanding and a kit to put it all together would be a clincher for me. I hope you plan on doing this soon because I think you have got most of us drooling over this new invention and may have opened a door into the next generation of working with polymer clay. ~DixieAnn-S >> Original comment was posted here: JoolTool Introduction – Buffing Polymer Clay
Continue reading this entry »
Vol-061: Liquid Polymer Transfers (6 Videos)
Filed in 1: Video Tutorials,Bead Projects, June 6, 2013, 11:03 am| Endless Possibilities. Scroll Down For Links To All 6 Videos. |
Vol-061-1: Video #392: Intro (that clip just above): In this 6 part video tutorial series, you will learn techniques and tricks for creating unique and stunning Liquid Polymer Clay Image Transfers and Faux Encaustic Techniques. Use them in jewelry making, scrapbooking, art journals and other great looking polymer clay projects.
Vol-061-2: Video #393: Image Transfers: In this video you will learn the technique of creating an image transfer sheet using liquid polymer clay and the paper image of your choice. This will work with pictures from magazines, books and laser printer copies.
Vol-061-3: Video #394: Paper Removal: In this video you will learn the tricks for removing the paper backing from your transfers, so that you are left with only the translucent sheet of polymer clay that has the image embedded within. It is a very forgiving process that anyone can do with ease.
Vol-061-4: Video #395: Hand Cutting & Die Cutting: In this video I’ll show you how to cut the polymer image sheets into any shape or design that you choose, either by hand, or using a machine die cutter. I also will give you tips on how you can alter your cutouts with inks, glitter, resin and a host of other cool materials to make your pieces works of art.
Vol-061-5: Video #396: Faux Encaustic Technique: Faux Encaustic Technique: In this video I demonstrate how you can mimic the mixed media art technique of Beeswax Encaustic. You’ll learn tips and tricks to make your liquid polymer clay look just like beeswax and how to give texture and an aged finish to your pieces.
Vol-061-6: Video #397: Adding Transfers to Clay Base: Adding Transfers to Clay Base: In this final video of the tutorial series, I will teach you how to add your liquid polymer clay image transfers to a base piece of polymer clay, so that you can use it for pendants, charms, scrapbooking embellishments, and other cool polymer clay projects.
By the way, many of the “shopping” links I provide for the various tools and supplies used in my tutorials, are “affiliate” resources. That means companies like Amazon and the other suppliers I refer, pay me a small commission if you click on the links and end up making a purchase at their site. It’s not a lot, but every little bit helps in keeping the cost of my tutorials down. And, the prices for products that you may purchase through my links, are exactly the same as what you would normally pay, even if it is a “sale” price. So please feel free to click whenever you need to pick up a few things for your studio. Thanks so much for your support.
Vol-061: Fisher’s Plaid Shirt A-Palette (4 Premo Color Recipes)
Filed in 2: Color Recipes,Blue,Pink,Purple, , 11:02 am |
1-A: Watermelon Slush 2-A: Grape Popsicle 3-A: Blueberry IceCream 4-A: Faded Jeans |
Watermelon Slushee is not only a refreshing frozen drink, but also the lively coral color found on the collar of Fisher’s Plaid Shirt. Grape Popsicle is the vibrant purple color found in the squares where the red and blue intersect in the pattern. Blueberry Ice Cream is the bright clear blue found in the squares right next to the purple. And Faded Jeans is both the name of the faded blue shade found in the mid-toned squares on his shirt, and in the jeans that Fisher was wearing that warm Summer afternoon while loading firewood into the back of our pickup truck.
To download the 4 color recipe cards, click here: Fisher’s Plaid Shirt Palette
Member Benefits 061: Jewelry & Projects
Filed in 3: Member Benefits,Jewelry & Projects, , 11:01 amI love the idea of the baby necklace, I used to work in a Neonatal Intensive Care Unit and know many nurses who would love to have one made for the parents of their little patients. ~Katina-K >> Original comment was posted here: Photo Transfer Bead Project Baby Keepsake Necklace
I love how the foil tape finishes the whole look. I love working with copper so this will add to my finished pieces and link it with the copper wirework. Cindy, I finally put some things up for sale and sold four pairs of earrings last week. And have orders for several more pair. I am so happy. I could not have ever had the assurance that they were good enough without your tutorials. I have been wanting to sell some of them for awhile but could not think that my minor attempts at making something they would like would be worthwhile. ~Karonkay-C >> Original comment was posted here: Pendants Wrapped with Copper Foil
Yup… another “AHA! Now why didn’t I think of that?” moment for me! I thought about bending the wires to the side, but didn’t think that would be sturdy enough, so I wasn’t satisfied enough to attempt it. Cindy, you’ve done it again! Absolutely loved the colors of the beads in the bracelet you showed and that silvery/pearly/mauvey/pinkish heart! Everything else, too, of course. I always do. Great job on video as always Doug! Where else can we get so much for so little? A great BIG thank you to both of you for another job well done. There’s so much here that we can all take away from this and use – my wheels are spinning and I haven’t even finished my first cup of coffee! Have a great weekend guys! ~Tanya-L >> Original comment was posted here: Polymer Clay Library
Continue reading this entry »
Vol-060: Faux Burl Wood Pens (6 Videos)
Filed in 1: Video Tutorials,Techniques, May 2, 2013, 11:03 am| Built With Quality Metal Components. Scroll Down For Links To All 6 Videos. |
Vol-060-1: Video #376: Intro (that clip just above): In this 6 part video tutorial series, you will learn techniques and tricks that will have you creating stunning, unique and professional looking Faux Burl Wood Pens as well as jewelry and other great looking polymer clay projects.
Vol-060-2: Video #377: Faux Burl Wood Cane: In this video I will show you how to create your own one-of-a-kind Faux Burl Wood Cane in the colors of your choice. This cane mimics the swirling knots and the sparkling grain that is so distinctive in real Burl Wood specimens.
Vol-060-3: Video #378: Creating Burl Wood Sheets: In this video I will show you how to manipulate slices taken from your Faux Burl Wood Cane, and create sheets of clay that mimic sheets of real Burl Wood Veneers. These sheets can then be used to make a wide variety of polymer clay projects.
Vol-060-4: Video #379: Covering The Pen Blanks: Here I will show you the tips and tricks for wrapping the Burl Wood sheets around the brass pen blank barrels, in an easy yet flawless manner so that your pen is not only durable and well made, but gorgeous looking too.
Vol-060-5: Video #380: Sanding And Finishing: Whether you’re making pendants or pens with this Faux Burl Wood technique, you are going to want to give them a beautiful, professional finish. You do that through proper sanding, buffing and waxing your piece. In this video I will show you how!
Vol-060-6: Video #381: Assembling The Pen: This is where the whole thing comes together! In this video I will show you how to properly assemble your pen parts into a gorgeous pen. And it is easy with my secret trick… even if you don’t have one of those cool pen press machines! I will also share some other options should you choose not to use the pen kits that I suggest for the tutorial. So even if you don’t want to make a pen with your Faux Burl Wood technique, you will still have tons of cool ideas to play around with!
By the way, many of the “shopping” links I provide for the various tools and supplies used in my tutorials, are “affiliate” resources. That means companies like Amazon and the other suppliers I refer, pay me a small commission if you click on the links and end up making a purchase at their site. It’s not a lot, but every little bit helps in keeping the cost of my tutorials down. And, the prices for products that you may purchase through my links, are exactly the same as what you would normally pay, even if it is a “sale” price. So please feel free to click whenever you need to pick up a few things for your studio. Thanks so much for your support.
Vol-060: Barnacle A-Palette (4 Premo Color Recipes)
Filed in 2: Color Recipes,Green,Neutral,Orange,Purple, , 11:02 am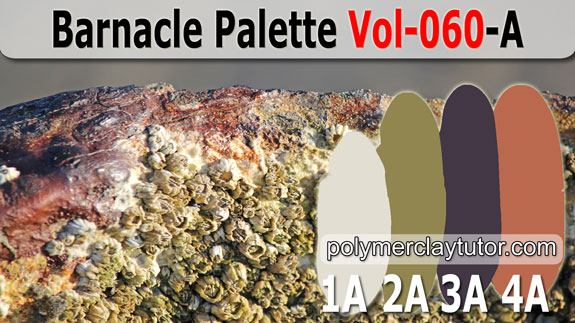 |
1-A: Barnacle 2-A: Algae 3-A: Purple Sea Star 4-A: Oxidation |
Barnacle is the grayish, putty colored white of the barnacles encrusted on the rocks and the chunks of rusty shipwreck remains lying on the sandy beach. Algae is the dusty olive green of the algae growing on the barnacles hard exterior shell. Purple Sea Star is the deep dark purple found in the weathered rusted parts of the metal. And Oxidation is the soft muted orange shade of the ships metal as it rusts away in the salty marine environment.
To download the 4 color recipe cards, click here: Barnacle Palette