Vol-077: David Russell Battery A-Palette (4 Premo Color Recipes)
Filed in 2: Color Recipes,Blue,Green,Neutral,Purple, October 3, 2014, 11:02 am |
1-A: Military Green 2-A: Fatigues 3-A: Somber 4-A: Peacetime  |
Military Green is the dark olive green found in the algae covered concrete of the historic Military Battery. Fatigues is the soft tan color of the aged walls. Somber is the moody soft purple of the patina caused by the salts in the sea air reacting with the metal support beams and the minerals in the cement. And Peacetime is the peaceful soft blue in the highlights of the purple patina.
To download the 4 color recipe cards, click here: David Russell Battery Palette
Member Benefits 077: Tips Baking
Filed in 3: Member Benefits,Tips Baking, , 11:01 am Cindy’s latest stuff on baking clay properly sets the standard, one of the best sources of info on the web, so use the search engine on the site. There is a ton of information contained within all Cindy’s blogs, tutes, and commentaries, and it is an amazing resource. Thanks Cindy. You do not know how much I appreciate it. ~Jocelyn-C >> Original comment was posted here: Selling Polymer Clay Jewelry at the Public Market
I want to thank you all for your great suggestions that complemented the video on baking polymer clay beads. As I said I finally gave in and bought the Beginner course. I made some more snowmen letter pendants using some translucent clay, another pair of prayer hands… put them on a bed of corn starch, lightly covered them, tented it, baked it at 255 in my convection oven (did not want to go crazy watching it in the toaster oven. Baked them for 1 hour..took them out to cool off and then baked them again for 30 minutes..and wow they came out great. It is a pain in the neck getting off the corn starch but I would rather do that then have to make them over for the fourth time. I can not thank you and everyone else enough for all your help. I took pictures of the finished projects and will ask my hubby to help me send them so everyone one can see how they have helped me. Again thank you all so very much… including Cindy for her great tuts and patience with me… as we get older it takes us a little longer, at least for me, to say that I do not know everything (even though I have done so much reading and research on the internet about polymer clay… only with Cindy’s easy explanation and video and everyone elses help have I been able to have such success with the least amount of stress. ~Natalie-H >> Original comment was posted here: Snowman Beads for Christmas
This was very helpful, my polymer clay creations always ended up looking darker when I baked it and I couldn’t find a way to stop that from happening. Now its not a problem :) ~Lillith-S >> Original comment was posted here: Tent Polymer Clay While Baking To Avoid Scorching
Continue reading this entry »
Vol-076: Tornado And Torpedo Beads (6 Videos)
Filed in 1: Video Tutorials,Bead shapes, September 4, 2014, 11:03 am| A Perfect Blend of Polymer and Stormy Wire. Scroll Down For Links To All 6 Videos. |
Vol-076-1: Video #562: Intro (that clip just above): In this 6 part video tutorial series, you will learn how to make two awesome bead shapes… the twisted torpedo polymer clay bead and the wirey tornado bead. They are used together to create a gorgeous pair of dagger style earrings. Included are many tips, tricks and techniques that you can use to create these stunning beads in the colors and styles I suggest, or your own. Truly a one-of-a-kind polymer clay project. These gorgeous Tornado and Torpedo Beads can be used to create gorgeous earrings, pendants, bracelets, toggles, necklaces and other jewelry pieces. Plus these beads are great for making whatever other beaded creations you can dream up!
Vol-076-2: Video #563: Twisted Oval Beads: In this video I will show you how to use a bead roller tool to create twisted oval beads using scrap polymer clay. Having the bead roller, as you will see, is not necessary for creating the final product in this tutorial. But the clear see-through design of this tool, makes it easy to observe what is happening as your pattern takes shape. This exercise will help you to understand how to create twisting patterns under your palm, when you hand roll some torpedo beads in the next Part 3 video in this series!
Vol-076-3: Video #564: Rainbow Torpedo Beads: In this video I will show all the tips and tricks needed to make perfectly shaped twisted torpedo beads by hand rolling them. You can scrap clay again if you like, as shown in the previous Part 2 video. Or you can use a section of Rainbow Cane which I demonstrate how to make in the following 3 free videos: (1) Rainbow Teardrop Blend; (2) Square Polymer Clay Rainbow Cane Skinner Blend Plug; (3) Reducing Square Polymer Clay Canes. When making the torpedo beads, I’ll show you how it matters which direction the colors go when using a skinner blend cane, and the different effects you can get when you switch those directions around.
Vol-076-4: Video #565: Planned Torpedo Beads: In this video I show you how to control the pattern that is created on your torpedo beads by adding stripes of different clays before the hand rolling begins. There are many different types of surface techniques that can be included on these beads, including solid clays, Skinner Blends (Teardrop Blends), painted clays, crackled leaf clays, inclusion clays etc., etc. By controlling the amounts of each clay that is used, you can also create beads that will have a more predictable pattern than if you were to just use a collection of scrap clays. Each set of beads you create can be one of a kind if you choose, or they can be almost identical, depending on how you put your bead together before rolling. You are going to love the variety of options here. I know you’ll be delighted by how wonderful your beads turn out!
Vol-076-5: Video #566: Baking Finishing Drilling: In this video, I show you how to make your own special bead rack, perfect for this style of bead, and how to bake them to a strong and durable finish. I will also share my tips and tricks for waxing and drilling the beads, depending on what you plan to use them for. You will learn my simple technique for getting a nice clean flat surface for drilling into the end tips of the beads, should you want to make the long dagger style earrings which I show how to make in the next Part 6 video in this series.
Vol-076-6: Video #567: Making Tornado Torpedo Earrings: In this last video of the series, you will learn how to add and shape the ear wires to your torpedo beads, and how to finish the ends so they are safe for your ears. I also teach you how to make a funky bead known as a tornado bead, which incorporates fine wire and glass seed beads. These beads are excellent for using up scrap wire and random beads, making them a skill that you will want to add to your jewelry making bag of tricks. It is in this Part 6 video of the full Vol-076 series, that your two (Tornado and Torpedo) twisted beads come together into a perfect storm set of earrings!
By the way, many of the “shopping” links I provide for the various tools and supplies used in my tutorials, are “affiliate” resources. That means companies like Amazon and the other suppliers I refer, pay me a small commission if you click on the links and end up making a purchase at their site. It’s not a lot, but every little bit helps in keeping the cost of my tutorials down. And, the prices for products that you may purchase through my links, are exactly the same as what you would normally pay, even if it is a “sale” price. So please feel free to click whenever you need to pick up a few things for your studio. Thanks so much for your support.
Vol-076: Corsage A-Palette (4 Premo Color Recipes)
Filed in 2: Color Recipes,Green,Purple,Yellow, , 11:02 am |
1-A: Corsage 2-A: New Life 3-A: Grad Dress 4-A: Golden Future |
Corsage is the lovely light purple where the sun hit the open petals of the Iris Blossom Corsage. New Life is the bright fresh green of the fern symbolizing Willow’s venture into a new life. Grad Dress is the deep indigo purple of not only her gorgeous grad dress, but also the color of the closed buds of the Iris sitting on her wrist. And Golden Future is the rich amber gold of the speckled throat of this flag iris, and a wonderful nod to her promising life ahead.
To download the 4 color recipe cards, click here: Corsage Palette
Member Benefits 076: Techniques Tools
Filed in 3: Member Benefits,Techniques Tools, , 11:01 amI also have to comment on the tile to get a triangle. What a GREAT idea! This is just another example of why I love your tutorials. You show us techniques that may seem simple, but make a WORLD of difference in the ease of the work and end result of the piece. THANK YOU so much (again! LOL). ~Dawn-B >> Original comment was posted here: Easy Kaleidoscope Canes Tutorial
Cindy has some great flower tuts here on the site. That is a great beginning, what I have discovered is that almost, not quite all, but most flowers can be made using the basics of what Cindy teaches us. A few tweaks and you have a different flower. I could never have completed this project if Cindy had not stepped up and said “yeah I know how to do that”. We would have had to change the course of the whole project if she had not helped me out. And the end result would have been changed and the whole project would have lost the sense of coming together. I think that the blog here also has benefited from that same “we can do it attitude” of the Lietz family. The road trip certainly will bring all the members closer as a clay family. And I bet someday even far reaching places will get a visit. How I would look forward to that! ~Karonkay-C >> Original comment was posted here: Polymer Clay Flowers
It is so great when you have good tools to work with and I love that Cindy uses and shows us all her gizzmos and gadgets. I would never have drempt the uses for the “card making” equipment so really looking forward to learning more with Cindy. ~Elaine-F >> Original comment was posted here: Rose Brain Cane Polymer Clay Tutorial
Continue reading this entry »
Vol-075: Cymbidium Orchid Pendant (6 Videos)
Filed in 1: Video Tutorials,Bead shapes, August 3, 2014, 11:03 am| Sculpted Flowers for Summer Jewelry Projects. Scroll Down For Links To All 6 Videos. |
Vol-075-1: Video #550: Intro (that clip just above): In this 6 part video tutorial series, you will learn how to create my original Cymbidium Orchid Pendant design. Included are many tips, tricks and techniques that you can use to create this stunning flower in the colors and style I suggest, or your own. Truly a one-of-a-kind polymer clay project. This gorgeous Cymbidium Orchid Flower design can be used to create gorgeous pendants, brooches, hair bands, pins and other jewelry pieces. Plus these flowers are great for making home decor items and whatever other polymer clay creations you can dream up!
Vol-075-2: Video #551: Orchid Petals: In this video I will show you how to create a pearly color blend that is the perfect base for your Cymbidium Orchid Flowers. I will then show you how to use the petal cutters from the Wilton Gum Paste Flower Cutter set to create the three specially shaped petals. I will also show you a trick for using the same cutters to create much smaller petals, so that you can make a smaller flower if you wish. And should the Wilton cutter set not be available to you, I will share with you an alternative method of cutting out each petal by hand. So you will never be stuck without the right tools!
Vol-075-3: Video #552: Texture & Wire: In this video I will show all the tips, tricks and tools needed to make perfectly shaped orchid flower petals, including how to add a wire to hold its shape and texture to make it look real. You’ll learn how to give the petals a lovely ruffled edge that takes it far beyond, just a cut out petal of clay. This segment also teaches you how to create the perfect stamen for the flower center. Plus some easy tricks for shaping the orchid flower throat.
Vol-075-4: Video #553: Color Dusting: In this video I will first show you how you can give your petals texture by hand if you don’t have the texture plates I use. Then we move on to giving color to your Cymbidium Orchid Petals, using a combination of chalk powders and mica powders. This is where your own creativity can really shine through. Go to Google and search for Cymbidium Orchids to find color inspiration, or use my custom color shades to recreate some beautiful orchids of your own. Of course you don’t have to use realistic colors if you don’t want to. This is your art after all! Also included in this video is a neat little structural support item that you can make, to support your delicate flower petals while they are baking in the oven. Plus tips creating pieces with lasting durability and beauty!
Vol-075-5: Video #554: Wire Wrapped Bail: In this video, the petals come together to become a beautiful flower. The wires are wrapped and twisted into a unique bail. Then, this roomy bail can be hung from a chain, a cord or it could even be strung artfully onto a scarf. As an alternative to making a wire bail for your flower, you could use floral tape and wrap the stem as you would wrap a silk flower stem. Then the Cymbidium could be wrapped onto a headband, clipped onto a shoe, made into a hat pin, added to a picture frame, or put into a vase as a home decor piece. Anywhere you want a tropical flower, you can use this polymer clay orchid design!
Vol-075-6: Video #555: Painting and Finishing: In this video you will learn how to hand paint the spotted throat of your cymbidium orchid using a selection of acrylic paints. I will share with you my tips and tricks for getting the distinctive patterning. You will also discover the secrets to for making your own custom metallic paints and everything you need to know for creating a lasting finish on your piece. All the knowledge you will gain in this tutorial, will not only have you mastering the art of making polymer clay cymbidium orchids, but will also inspire you with ideas to use in many other types of polymer clay projects in your future. So enjoy!
By the way, many of the “shopping” links I provide for the various tools and supplies used in my tutorials, are “affiliate” resources. That means companies like Amazon and the other suppliers I refer, pay me a small commission if you click on the links and end up making a purchase at their site. It’s not a lot, but every little bit helps in keeping the cost of my tutorials down. And, the prices for products that you may purchase through my links, are exactly the same as what you would normally pay, even if it is a “sale” price. So please feel free to click whenever you need to pick up a few things for your studio. Thanks so much for your support.
Vol-075: Dodge Pickup A-Palette (4 Premo Color Recipes)
Filed in 2: Color Recipes,Blue,Neutral,Orange, , 11:02 am |
1-A: Dodge Pickup 2-A: Tinted Windshield 3-A: Chrome Trim 4-A: Blinkers |
Dodge Pickup is the wonderful sky blue of this old vintage truck. Tinted Windshield is the soft green blue of the glass windshield. Chrome Trim is the color of the old pitted chrome trim along the sides, in the grill and on the bumper of this ol’ gal. And Blinkers is the awesome bright orange of the signal lights… the perfect pop to the soft blue palette.
To download the 4 color recipe cards, click here: Dodge Pickup Palette
Member Benefits 075: Tutoring Support
Filed in 3: Member Benefits,Tutoring Support, , 11:01 amDear Cindy, Thank you for all the wonderful tutorials you provided us with last year. I had a blast watching this volume, especially the shaded rose cane. You always manage to make complicated thinks look so much easier. Can’t wait to see what you’ll come up with this month. Have a beautiful week! ~Andrea-I >> Original comment was posted here: Polymer Clay Videos
Hi Cindy and all, Wow Cindy this colour shift using the Lietz Teardrop Blend is a wonderful extension of the original Teardrop blend you had taught us earlier. I just love it and was fascinated by it, and can see so many possibilities to use it. I have sometimes included one of the colours that had got lost, but never ever thought to change, or as you say shift the blend. Wow that’s great! Loved the pastel version. Thanks for another Friday night fun video. You come up with such new and interesting lessons every week, just don’t know how you do it, but that’s what makes you the great teacher that you are. Thanks again Cindy and Doug, you’ve made my day. ~Elizabeth-K >> Original comment was posted here: Lietz Teardrop Blend Color Shifts
Cindy, you have taught me to really LOOK at the technique you are teaching. It has helped me figure out HOW things are made. I thank you for that – but that’s not all. The tutes drive me outside my comfort zone. Isn’t that great? I am much more serious about my art – but know about myself. I am growing old, but not growing UP. LOL ~Patt-W >> Original comment was posted here: Gingham Cane Extruder Project
Continue reading this entry »
Vol-074: Reptile Pattern Hollow Lentils (6 Videos)
Filed in 1: Video Tutorials,Bead shapes, July 3, 2014, 11:03 am| Big Light Beads On A Neckwire. Scroll Down For Links To All 6 Videos. |
Vol-074-1: Video #539: Intro (that clip just above): In this 6 part video tutorial series, you will learn how to create my original Reptile Hollow Bead Neckwire design. Included are many tips, tricks and techniques that you can use to create this cool cane in the colors and style I suggest, or your own. Truly a one-of-a-kind polymer clay project. This stunning reptile patterned cane design can be used to create gorgeous bracelets, earrings, pendants, and other jewelry pieces in addition to the Neck Wire design included in this tutorial. Plus the cane is great for making home decor items and whatever other polymer clay creations you can dream up.
Vol-074-2: Video #540: Reptile Pattern Cane: In this video I will show you how to create a sparkling and dimensional reptile patterned cane using a just a few colors and some inexpenisve. It is an easy cane to accomplish and the results turn out wonderful every time. You will use this cane to create patterned polymer clay sheets, which will then be used for constructing the hollow lentil beads. You can choose the colors that I have used in the tutorial or easily adapt them to whatever color combination that you choose. Don’t limit yourself to only using this Reptile cane for beads though… this cane has endless possibilities in all kinds of polymer clay projects!
Vol-074-3: Video #541: Hollow Beads: In this video I will show all the tips, tricks and tools needed to make perfectly shaped hollow lentil beads. You will learn what thickness of clay works best. Plus I’ll share my techniques that will help you way to avoid having to do a lot of extra work when it comes time to finishing the beads. Also, if you don’t have access to the special tools used in this tutorial, I will show you alternatives that you probably already have in your home right now.
Vol-074-4: Video #542: Baking Shaping Gluing: In this video you will learn all about shaping, baking, cutting, fitting, gluing and re-baking your bead halves to form the perfect hollow lentil beads. There are important steps that you need to do, so that your beads fit properly together, and end up with beautiful crisp edges that look very professional. If you don’t do these steps, your beads will look clunky and homemade, instead of the gorgeous art jewelry quality that I’m sure you prefer. And achieving these results is not that hard to do either… not when you know exactly what to do!
Vol-074-5: Video #543: Sanding Finishing Drilling: In this video you will learn how to properly sand, buff and finish your gorgeous reptile patterned hollow lentil beads to perfection. I’ve got a really neat trick for drilling the holes in your lentil beads too. If you don’t do this simple extra step, it can be tricky to get the bead holes straight and in the right spot along those skinny edges… I’m sure you have seen poorly drilled lentil beads before. You be really surprised how much easier it is to drill holes after watching this video.
Vol-074-6: Video #544: Making the Neckwire: In this final video of the series, you will learn how to create a beautiful, clean lined necklace using a single piece of heavy gauged wire. I will show you how to measure, cut and form your neck wire so that it lays beautifully, and displays your incredible hollow reptile beads with perfection. You’ll be walking around with this eye catching piece of statement jewelry, like a mobile art gallery… or at least that is how I feel when I wear mine ;-)
By the way, many of the “shopping” links I provide for the various tools and supplies used in my tutorials, are “affiliate” resources. That means companies like Amazon and the other suppliers I refer, pay me a small commission if you click on the links and end up making a purchase at their site. It’s not a lot, but every little bit helps in keeping the cost of my tutorials down. And, the prices for products that you may purchase through my links, are exactly the same as what you would normally pay, even if it is a “sale” price. So please feel free to click whenever you need to pick up a few things for your studio. Thanks so much for your support.
Vol-074: Maple Samara A-Palette (4 Premo Color Recipes)
Filed in 2: Color Recipes,Neutral,Pink, , 11:02 am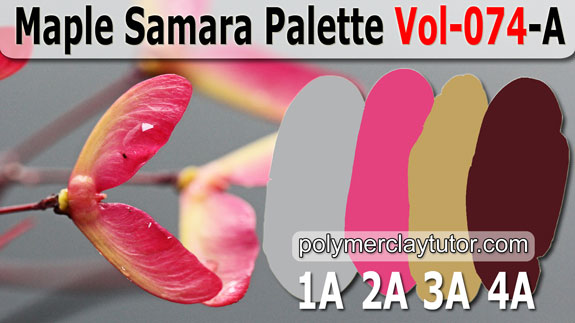 |
1-A: Helicopter 2-A: Maple Samara 3-A: Winged Seed 4-A: Maple Fruit |
Helicopter is the beautiful soft gray of the background in this photo. Plus it seemed like an appropriate name for this color since these little seeds make great helicopters and a lot of helicopters are gray… makes sense right? Maple Samara is a gorgeous soft pink found on these newly formed Maple Samaras. Winged Seeds is a neat greenish tan that rims the edges of these flora & fauna beauties. And Maple Fruit is the rich brown color of the branch that binds the tiny copter to the Maple Tree until it is fully ripened and dried and ready to be released in the Fall.
To download the 4 color recipe cards, click here: Maple Samara Palette
Member Benefits 074: Fun Events Contests
Filed in Fun Events Contests, , 11:01 amThankfully I have a big house and I have a room all for my crafts. I call it my shop, after I did an inventory I was shocked! The suppliers have NO excuse for not sponsoring you, Cindy and Doug! They are getting rich from PCT members!! I make polymer clay beads for jewelry. I also do Sculptures of mermaids, dragons and dolls. Hope to see you guys come to Indiana on your Roadtrip. ~Debi-S >> Original comment was posted here: PcT Roadtrip Virtual Petition
How awesome it was to meet and spend a few hours with the Lietz family. But of course it was much too quickly time to say goodbye. It was like meeting family we so loved having them here. I am looking forward to seeing the rest of their trip as they post it here. They are a happy talented family. I hope that in the future we will be able to create a gathering of all the clayers in the group I would so love to meet each of you and spend a day or two together. It was soooo much fun. I watch all of your projects as you share and try to keep up on the tuts… sometimes I haven’t much time. What an awe inspiring group that has gathered at this site. Cindy & Doug thank you for the great video of the flowers, and for sharing your trip with my family. Hugs. ~Karonkay-C >> Original comment was posted here: Polymer Flowers Spokane Washington
I love your site and would hate to lose even one of the e-mails and tutorials. I am enjoying seeing the people you are seeing across the country. It is so much better when you have the face to go with the names. Thanks Cindy, I have gotten so many great ideas from you. Aloha from Hawaii. ~Norieta-K >> Original comment was posted here: Roadtrip Wrapup Video
Continue reading this entry »
Vol-073: Happy Camper Cane (6 Videos)
Filed in 1: Video Tutorials,Cane Topics, June 5, 2014, 11:03 am| Featuring Polka Dot Extruder Technique. Scroll Down For Links To All 6 Videos. |
Vol-073-1: Video #526: Intro (that clip just above): In this 6 part video tutorial series, you will learn how to create my original Happy Camper Polymer Clay Cane design. Included are many tips, tricks and techniques that you can can use to create this cool cane in the colors and style I suggest, or your own, to make truly one-of-a-kind polymer clay projects. These adorable and funky looking complex canes, can be used to create cute bracelets, earrings, pendants, and other jewelry pieces. Plus the design is great for making crafty fridge magnets and buttons too. This project will appeal to all ages, as it makes you smile, dreaming about the happy times, hitting the road in a cute little camper.
Vol-073-2: Video #527: Polka Dot Cane: In this video, I demonstrate how to make a retro looking polka dot cane using an extruder tool and one of the disks from Cynthia Tinapple’s new extruder disk set. I also show you how to make the polka dot cane by hand, just in case you aren’t able to pick up Cynthia’s new product at this time. The polka dot pattern is not only a great design element for today’s Happy camper cane, but it also works with many other jewelry projects as well. Of course if you prefer to not have a polka dot section on your Happy Camper Cane… that is totally up to you!
Vol-073-3: Video #528: Planning Building Trailer Design: In this video, you will use the polka dot cane from the second video to create the top portion of your trailer design. I will show you how to tweak your design; How to add an element such as a pinstripe; How to add the bottom section; and How to map out the rest of your cane design. These techniques can be used in future canes of your own design, and can be adapted to your own personal taste. Once you have made this cane once, you will understand how all complex cane patterns are just a series of parts… much like putting together the pieces of a puzzle.
Vol-073-4: Video #529: Cutting Out The Window And Door: In this lesson, you will learn some unique techniques for spacing the components of your cane design, such as the window and door. The tips and techniques you learn here can be transferred to other cane projects that you may create in the future. I will show you how the careful removal of excess clay is critical to avoiding distortion and broken or wiggly lines in your cane design. Things that are not that noticeable before reduction of the cane, can look very off when compressed smaller. It’s all in the details!
Vol-073-5: Video #530: Window Door Tire Doorknob: In this video, you will learn about important information about the proper way to make and add several of the smaller cane elements that need to be incorporated into the main design of your cane (i.e. the windows, door, tire and doorknob elements). Although the overall cane project may seem complex, once broken down into it’s individual components, you will find that the parts are quite simple to make. There are some cool tricks to getting the pieces to all fit together properly that I think you will really appreciate.
Vol-073-6: Video #531: Completing The Cane: In this video, the cane really starts to come together! The tire and doorknob are added, and the overall cane is wrapped and reduced to a usable size. I will give you pointers for reducing the cane successfully, but for more in depth info you can refer to this Free Video Tutorial: Reducing Square Polymer Clay Canes. You can use this cane for making tons of funking polymer clay projects, such as earring, pendants, beads, bracelets, buttons, magnets and so much more. This tutorial is a technique tutorial and not a project one. So if you need more help with how to actually use your Happy Camper Cane, do a search on my Polymer Clay Tutor Blog for more info about baking, sanding, polishing and creating jewelry projects. I think you are going to love making this adorable Happy Camper Cane and will be itching to create all kinds of cute trailer designs of your own, once you’re done making this cutie!
By the way, many of the “shopping” links I provide for the various tools and supplies used in my tutorials, are “affiliate” resources. That means companies like Amazon and the other suppliers I refer, pay me a small commission if you click on the links and end up making a purchase at their site. It’s not a lot, but every little bit helps in keeping the cost of my tutorials down. And, the prices for products that you may purchase through my links, are exactly the same as what you would normally pay, even if it is a “sale” price. So please feel free to click whenever you need to pick up a few things for your studio. Thanks so much for your support.
Vol-073: Dragon Fly A-Palette (4 Premo Color Recipes)
Filed in 2: Color Recipes,Blue,Green,Neutral,Purple, , 11:02 am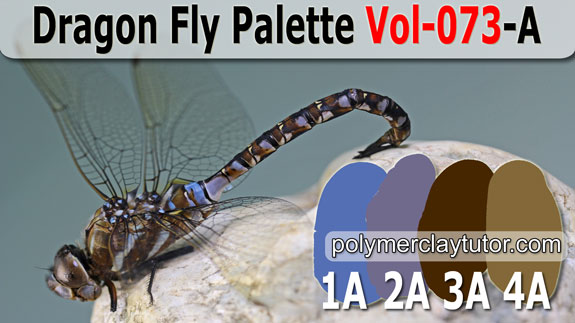 |
1-A: Blue Dragonfly 2-A: Twilight 3-A: Tilled Earth 4-A: Rushes |
Blue Dragonfly is the Soft purple blue found in the tail of this magnificent creature. Twilight is the soft purple shade on the tail and the color of the sky as it turns from day to night. Tilled Earth is the rich warm brown on the head of the dragonfly, and the color of the freshly tilled soil of the garden he flies through in the evening. And Rushes is a soft greenish tan found on the insects thorax… so similar to the rushes that grow along the ponds edge.
To download the 4 color recipe cards, click here: Dragon Fly Palette