Vol-081: Graffiti Style Street Hearts (6 Videos)
Filed in 1: Video Tutorials,Bead Projects, February 5, 2015, 11:03 am| Perfect For Valentines Or Any Other Day As Well. Scroll Down For Links To All 6 Videos.  |
Vol-081-1: Video #622: Intro (that clip just above): In this 6 part video tutorial series, you will learn how to use polymer clay, paints, stencils and other cool stuff to create an awesome graffiti style polymer clay surface technique to make Street Hearts for Valentines, pendants, magnets, earrings, buttons or whatever you want. And if heart shapes aren’t your thing, then you can use this urban style technique to make any design or project you can imagine! It is a wide open palette so to speak.
Vol-081-2: Video #623: Reverse Stenciling: In this video, I’ll teach all about the cool products you will get the chance to explore in this tutorial… and also get you started on the first of many layered paint techniques to come. You will also learn what I call, reverse stenciling where color is removed using a stencil rather than applied. You are going to look at stenciling in a whole new way after this.
Vol-081-3: Video #624: Crackle Paint: This video is all about the crackle! Lots of very easy and cool crackle paint stenciling tricks in this part… and I have a tip for getting two prints out of one application… no paint goes to waste, and better yet, two totally different looks can be made with one stencil. How cool is that!
Vol-081-4: Video #625: More Paint: In this video you will learn even more stenciling tricks by adding yet another layer to your graffiti design. It will seem as though someone started painting a wall… then another artist came along and left their mark… then along came another with even more to add. Your mind will be spinning with all the creative things you can do with this great layering technique! Then you’ll cut and pop your cool street art pieces into the oven for their first bake. Don’t worry… I’ll show you exactly what to do.
Vol-081-5: Video #626: Baking and Bezel: In this tutorial I will guide you through the process of creating your own unique clay backed bezels, that not only support your funky graffiti clay piece, but frame it and give it that finished look it deserves. You can actually use this trick to back any polymer clay veneer or thin polymer piece that needs a little more rigidity or strength.
Vol-081-6: Video #627: Finishing: In this video you will find out what’s needed to finish your piece professionally. From giving it a quick sand that will make your piece feel good in your hands… and antiquing it so that the texture stands out and the piece has a beautiful finished look. I’ll also share with you the right way to glue on a metal bail to your polymer clay pendants… it’s probably not the way you’ve been doing it! When the project is all completed, you will have a handful of one of a kind graffiti style artworks that you will be proud to give away, sell, or keep for yourself. Talk about giving it your whole heart!
By the way, many of the “shopping” links I provide for the various tools and supplies used in my tutorials, are “affiliate” resources. That means companies like Amazon and the other suppliers I refer, pay me a small commission if you click on the links and end up making a purchase at their site. It’s not a lot, but every little bit helps in keeping the cost of my tutorials down. And, the prices for products that you may purchase through my links, are exactly the same as what you would normally pay, even if it is a “sale” price. So please feel free to click whenever you need to pick up a few things for your studio. Thanks so much for your support.
Vol-081: Columbine Bud A-Palette (4 Premo Color Recipes)
Filed in 2: Color Recipes,Blue,Green,Neutral,Purple, , 11:02 am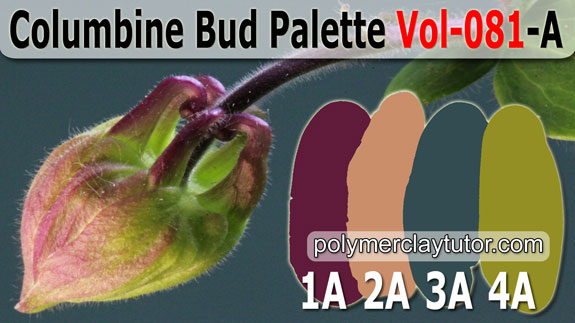 |
1-A: Elderberry Wine 2-A: Vintage Peach 3-A: Blue Dusk 4-A: Columbine Bud |
Elderberry Wine is the gorgeous purple berry color found on the petal edges and the little pointy tendrils of this Columbine Hybrid created by the bees in my garden. Vintage Peach is the dusty peach color that the purple fades to, as it mixes and blends with the green of the unopened bud. Dusk Blue is the almost old fashioned teal blue of the background of this photo. And Columbine Bud is the yellow green color of the petals before they mature and fade to a pale almost white when the blossom opens fully.
To download the 4 color recipe cards, click here: Columbine Bud Palette
Member Benefits 081: Beginners
Filed in 3: Member Benefits,Beginners, , 11:01 am Thanks, Cindy! As a new polymer clay artist, It’s such a jump start to be able to learn from your videos. ~Thalia-K >> Original comment was posted here: Polymer Clay Library
Hi Cindy, Your expertise, cheery disposition, and enthusiasm stand you in very good stead. When I was first beginning my stumble through how to use this medium, you (of all the myriad of resources I sussed out on both the internet and in print), provided a clear step by step and exciting window into the world of polymer clay. I thank you for sharing your kind and informative insights. Your moto re: ‘I made the mistakes so you don’t have to’ is the perfect welcome mat for any beginner or seasoned enthusiast. Thank you. ~Linda-F >> Original comment was posted here: Beginner Polymer Clay Notes
Hi Cindy, I just subscribed to PCT last week. I bought the beginner lessons, 3 of the back issues and the monthly service. I was a stone-cold beginner and don’t consider myself very crafty, but after watching the beginning videos, I gathered my courage together and made your red clover flower design… and it turned out spectacularly! ~Heather-P >> Original comment was posted here: Red Clover Flower Beads
Continue reading this entry »
Vol-080: Faux Fordite Wire Weave Pendant (6 Videos)
Filed in 1: Video Tutorials,Bead Projects, January 3, 2015, 11:03 am| A Faux Of A Faux. Also Known As The Detroit Agate. Scroll Down For Links To All 6 Videos. |
Vol-080-1: Video #609: Intro (that clip just above): In this 6 part video tutorial series, you will learn how to use polymer clay to mimic the layered look of real Fordite cabochons. Fordite is a man-made material that was actually a paint over-spray byproduct from the vintage automotive industry when Ford cars (and other brands as well) were all painted by hand. You will also learn how to cut, shape and polish your piece so that it will be difficult to tell the difference between your Faux Fordite and the real thing. Plus you’ll learn how to create a gorgeous wire weave bezel to capture and dip lay your faux stone in a lovely pendant.
Vol-080-2: Video #610: Prepping The Clay: In this video you will learn about the polymer clay colors you will need to mimic the original paint colors used on Vintage Ford Vehicles. Then you will discover the tricks to recreating the baked paint layers by forming a slab of polymer clay colors into a convincing chunk of Fordite material.
Vol-080-3: Video #611: Cutting The Cabochon: In this video you will learn my tips and tricks for transforming the faux Fordite slab into a triangular cabochon shape. You will learn how to expose the stripy layers and how to cut the material to exactly the size and shape you need. You will also create a bake for the cab so that it has a professional looking finish from all angles.
Vol-080-4: Video #612: Shaping And Polishing: In this video we will bake, sand and polish our Faux Fordite Cabochon into a beautiful stone that will later be used in the wire woven pendant design. I will teach you about the proper shaping and finishing so that you can be proud of your final results. The trick in this technique is to make sure that you follow through and do a great job with the finishing work… don’t worry how it looks when it comes out of the oven. That is not how it will look in the end. Just like any stone in it’s raw form… it is the shaping and polishing that brings out the real beauty.
Vol-080-5: Video #613: Wire Weave Bezel: In this video I will show you some awesome tips for making a wire woven bezel for your faux Fordite stone. You will learn about which wire gauges and tempers to use for this wire weaving technique, and how to cut and weave your bezel to fit the stone perfectly. It is a simple process, but like all good things, takes some time to create. Once you are done though, you’ll be amazed how intricate it looks and how easy it truly was.
Vol-080-6: Video #614: Wire Wrapping The Pendant: In this video you’ll learn how to wrap your wire woven strip around your Faux Fordite Cabochon to create the form fitting bezel with a triple loop bail on the top. You’ll discover the techniques for bending and shaping the wires for a perfect fit, so that your pendant showcases your stone beautifully and securely. This way you get to see the most area possible of your stone, without worrying that it will fall out of the wire cage. everything you learn in this tutorial can be tweaked to your own designs, including your own choice of colors for the faux fordite, the shape you cut it and how or if you use the wire weaving techniques to accent it. This tutorial is jam packed… so prepare to learn a lot!
By the way, many of the “shopping” links I provide for the various tools and supplies used in my tutorials, are “affiliate” resources. That means companies like Amazon and the other suppliers I refer, pay me a small commission if you click on the links and end up making a purchase at their site. It’s not a lot, but every little bit helps in keeping the cost of my tutorials down. And, the prices for products that you may purchase through my links, are exactly the same as what you would normally pay, even if it is a “sale” price. So please feel free to click whenever you need to pick up a few things for your studio. Thanks so much for your support.
Vol-080: Winter Scarecrow A-Palette (4 Premo Color Recipes)
Filed in 2: Color Recipes,Green,Neutral,Pink, , 11:02 am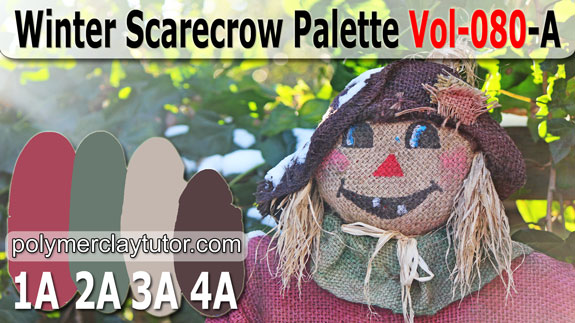 |
1-A: Raspberry Patch 2-A: Green Burlap 3-A: Gunny Sack 4-A: Scarecrow Hat |
Raspberry Patch is the dusty berry pink of this Scarecrow’s faded burlap shirt… and possibly the same color as the Raspberries he stood and protected in the patch over the Summer and Fall. Green Burlap is a muted dark gray green of the sun bleached and rain washed burlap collar, adorning his shirt. Gunny Sack is the dirtied, natural color of the Burlap that wraps his adorable smiling face. And Scarecrow Hat is the soft dirty brown of his floppy bedraggled hat.
To download the 4 color recipe cards, click here: Winter Scarecrow Palette
Member Benefits 080: Video Learning
Filed in 3: Member Benefits,Video Learning, , 11:01 amHi Cindy, I have just been viewing some of your video tutorials and I think I have learnt more in 15 minutes than the last 15 months since I started to play with polymer clay. ~Kathleen-J >> Original comment was posted here: Beauty On The Beach Color Palette
Cindy, I have been buying a few back issues here and there to get various techniques. But – of course – there is always something else that I would love to learn that is part of a different back issue. I’m sure others have said – I don’t need 3 out of 4 of those topics in that issue, but oh that 4th. And then interest changes, and the other topics become relevant. By the way, it will probably sound kinky, but the best thing about your videos is watching your hands. I can read descriptions of how to do things, but it makes SO much more sense when I see you do it. Of course your verbal description really helps too, but I love being able to see you work. Thanks so much. ~Beth-W >> Original comment was posted here: Owl Charm Necklace Polymer Clay Tutorial
Cindy, I think your subscription videos and past-purchasing of videos is very reasonably priced. There is 1 PC “tutor” who charges much, much, much more and I had bought from her in the past. I am not knocking her at all, I do love her work and originality, but even without access to all past videos you are still a great bargain and the BEST teacher. I will be with you forever, God willing. You AND Doug are the best (along with the kids, too!)!!! ~Becky-C >> Original comment was posted here: Cone Flower Canes Polymer Clay Tutorial
Continue reading this entry »
Vol-079: Christmas Sweater Cane (6 Videos)
Filed in 1: Video Tutorials,Cane Topics, December 4, 2014, 11:03 am| A Classic Knitting Pattern That Never Gets Old. Scroll Down For Links To All 6 Videos. |
Vol-079-1: Video #597: Intro (that clip just above): In this 6 part video tutorial series, you will learn how to create the nostalgic look of a vintage Christmas Sweater out of polymer clay using a micro-caning technique. This uniquely designed cane can then be used to make all kinds of wonderful Christmas jewelry and decor items such as bracelets, pendants, napkin rings and glass candle holders. You’ll love making this cane into gifts and for treasured holiday decorations for yourself and your friends and family. Happy Holidays!
Vol-079-2: Video #598: Prepping The Clay: In this video you will learn about the tools needed for this project… which ones will make the process easier… what type of clay to use… why consistency is important… how to prep your clay… tips for using the extruder… what size and length of pieces you will need to build your canes… and much, much more.
Vol-079-3: Video #599: Following The Pattern: In this video you will learn my tips and tricks for following the gridded pattern and building your micro cane design. The pattern is provided for you as a downloadable PDF. We will get things started by building the foundation row and I’ll show you how to make sure that your rows are not only the right size, but that the pattern has been put together correctly. Much like doing needlepoint, following the pattern is easy, but it takes time to put together. The results are definitely worth it!
Vol-079-4: Video #600: Putting It All Together: In this video we will finish up the Poinsettia cane and combine it with the other canes (made the same way) into the larger Christmas Sweater Cane. I will teach you all kinds of neat information on the various ways you can combine and use these fabulous canes… plus unlimited options for projects that you can create with them. Get ready to learn some cool stuff in this one!
Vol-079-5: Video #601: Slicing And Using The Cane: In this video I will show you some awesome tips for reducing, cleaning up, slicing and using your Christmas Sweater Canes for some great Christmas Projects. I will show you my own idea for slicing the bigger canes all to the same thickness, and for getting a professional end result. I’ll even teach you how to add your clay slices to glass objects so that they survive the baking process and turn out beautiful rather than broken.
Vol-079-6: Video #602: Finishing Tips Napkin Rings: In this video you’ll learn how to reduce your cane so it is just the right size for making napkin rings and other holiday projects. I’ll show you how to get a professional edge, so that your piece looks classy and not hokey. You’ll also learn more about baking, sanding, buffing and finishing your pieces so you can be proud to keep them as your treasured family decorations and for giving as awesome Christmas gifts. Your friends and family will be amazed that you created this highly intricate design, using tiny little dots of colored polymer clay. You’ll see… all the love and care that you put into creating this great looking cane will give you joy for many years to come!
By the way, many of the “shopping” links I provide for the various tools and supplies used in my tutorials, are “affiliate” resources. That means companies like Amazon and the other suppliers I refer, pay me a small commission if you click on the links and end up making a purchase at their site. It’s not a lot, but every little bit helps in keeping the cost of my tutorials down. And, the prices for products that you may purchase through my links, are exactly the same as what you would normally pay, even if it is a “sale” price. So please feel free to click whenever you need to pick up a few things for your studio. Thanks so much for your support.
Vol-079: Falling A-Palette (4 Premo Color Recipes)
Filed in 2: Color Recipes,Neutral,Orange,Red, , 11:02 am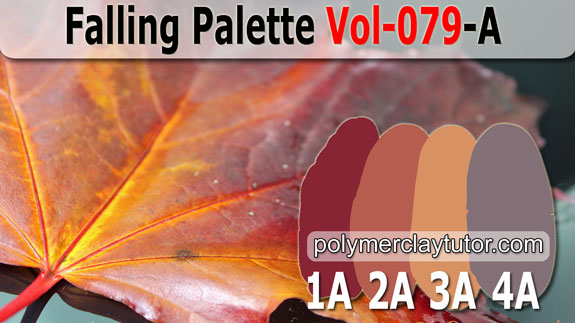 |
1-A: Falling 2-A: Changing 3-A: Shifting 4-A: Drifting |
Falling is a deep maroon red, changed by the dropping temperatures imposed on the fallen leaf. Changing is a dusted red-tan neutral shade of nature giving in to the cold. Shifting is the paler shade of dusted peach as it shifts from youth to old age. And Drifting is the soft gray purple hue of the late season light on the surface of the leaf as it drifts to the ground and returns to the Earth.
To download the 4 color recipe cards, click here: Falling Palette
Member Benefits 079: Cane Making
Filed in 3: Member Benefits,Cane Making, , 11:01 amI made the butterfly cane for the first time today. When I sliced into it, I yelled because I was amazed it was so pretty. My hubby came in to see what I was yelling about, LOL. ~Joyce-R >> Original comment was posted here: Blue Morpho Butterfly Wing Cane
Cindy, the Holly Berry Cane came out terrific! I watched your video so many times and went back over all your instructions, I added translucent and very carefully and patiently got it down to about the size of a quarter, nickel and dime size canes. It turned out GREAT! I think the light bulb came on during this process and I am in clay heaven. Thank you, thank you, thank you for all your guidance, I am so pumped up now to tackle the next one! ~DixieAnn-S >> Original comment was posted here: Budding Artist Palette
I just had a go at this ikat cane, what a wonderful tute! I have tried making this kind of cane before but I couldn’t get it right. So thanks Cindy for another wonderful way of doing things. ~Sandra-J >> Original comment was posted here: Diamond Pattern Ikat Cane
Continue reading this entry »
Vol-078: Faux Raku Macrame Bracelet (6 Videos)
Filed in 1: Video Tutorials,Techniques, November 6, 2014, 11:03 am| Looks Just Like Real Ceramic Rainbow Raku. Scroll Down For Links To All 6 Videos. |
Vol-078-1: Video #587: Intro (that clip just above): In this 6 part video tutorial series, you will learn how to recreate the look of real ceramic rainbow raku, using polymer clay and some simple supplies. You will then incorporate your faux raku beads into a hand knotted, beaded macrame bracelet. Although this may look complicated, it really is easy to do. The end result is an organic and stylish looking jewelry piece, suitable for both men and women (depending on the findings you choose). Both the raku technique and the macrame can be used in other crafting projects as well, making this a very versatile polymer clay class to have in your “skills” tool box.
Vol-078-2: Video #588: Faux Raku Texture: In this video you will learn how to take simple lump of polymer clay, and create a textured and patterned bead, that not only looks like a real ceramic raku fired bead, but also feels pretty close to identical. You’ll also start the process of giving the beads its unique rainbow patina.
Vol-078-3: Video #589: Coloring Baking Drilling: In this video I will show you how to finish the realistic coloring, using chalk pastels and liquid polymer clay. I’ll also share with you the tips and tricks for proper baking, finishing and drilling your beads so that they are durable and professional looking. Ready for creating your awesome macrame bracelet.
Vol-078-4: Video #590: Set Up for Knotting: In this video you will get all set up for knotting your faux raku macrame bracelet. I’ll show you how to use a Mini-Macrame Board… or you can use just a regular clip board instead. I’ll show you how to measure and cut your cording… how to add the cords to your clasp… and how to pre-string your beads in preparation for knotting the pattern.
Vol-078-5: Video #591: Beaded Macrame Knots: In this video you will learn just how easy it is to do the basic macrame knots, and how simple it is to incorporate your polymer clay raku beads and some tiny accent beads into the design. If you have every macrame’d in the past, you will find it a breeze. And if not, you will still find it easy, when you follow my clear and simple instructions. Once you master this knot, you will be able to move on to more complicated designs in the future. Perhaps even on to Micro-macrame!
Vol-078-6: Video #592: Additional Ideas: In this final video of the series, I will show you a last minute idea for making a pair of earrings with the leftover cord and beads from your project. Plus, I will go through the many options you have for creating several different bracelet designs. Depending on your choice of findings… or lack of findings, you can make a unisex bracelet design for many different styles and personal preferences. This project can made to look elegant and classic, or chunky and rustic. The design is all up to you.
By the way, many of the “shopping” links I provide for the various tools and supplies used in my tutorials, are “affiliate” resources. That means companies like Amazon and the other suppliers I refer, pay me a small commission if you click on the links and end up making a purchase at their site. It’s not a lot, but every little bit helps in keeping the cost of my tutorials down. And, the prices for products that you may purchase through my links, are exactly the same as what you would normally pay, even if it is a “sale” price. So please feel free to click whenever you need to pick up a few things for your studio. Thanks so much for your support.
Vol-078: Rock Crab A-Palette (4 Premo Color Recipes)
Filed in 2: Color Recipes,Blue,Neutral,Pink,Red, , 11:02 am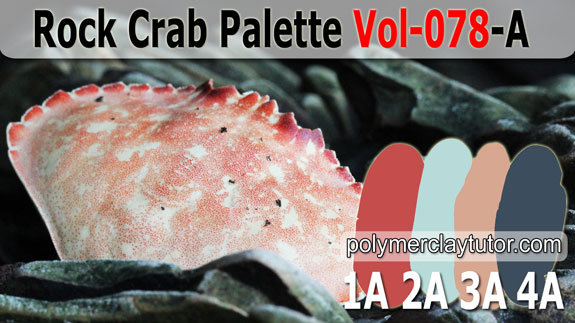 |
1-A: Rock Crab 2-A: Beach Glass 3-A: Seashell 4-A: Rocky Shore |
Rock Crab is the cool rusty red color found on the tips of the ragged edges of the Rock Crab Shell. Beach Glass is the pale blue green of the light as it hits the black rocks in the early morning light. Seashell is the neutral peachy sand color of the faded blotches on the crab shell. And Rocky Shore is the bluish black gray of the angular rocks, covering this rocky shoreline.
To download the 4 color recipe cards, click here: Rock Crab Palette
Member Benefits 078: Course Feedback
Filed in 3: Member Benefits,Course Feedback, , 11:01 amHi, Cindy, I just finished going through your beginner’s course. I am new to polymer clay. I have purchased books before but could get just so far. The course was great. The videos were the right amount of time for me and your instruction was very clear. It’s nice to know that I can go back to review. I appreciated the tips/suggestions. ~Deborah-P >> Original comment was posted here: Perfect for Polymer Clay Beginners
Hi Cindy, Thank you so much for the additional videos you sent out with the course. Who knew that plastic wrap was not all the same?! Or that you can sharpen blades or use color crayons. And, I’m getting some dry-wall sandpaper today. I so enjoy your on-going creativity and enthusiasm. I really appreciate your clear instructions and clear photography. I first got exposed to polymer clay in a metal-smithing class. We made pendants with bezels and filled the bezels with polymer clay. I was intrigued, and loved the colors. I took a one day workshop on polymer clay. It was a pretty slap-dash affair. I know people want to go home with something after a workshop, and one day is not much time to get into the details. But, I left with a couple of distorted canes, a few beads appliqued with canes, and not much else. There was definitely not enough information to keep going. I tried, with sadly disappointing results, a few things on my own, and knew I needed help. I checked books out of the library and started trolling You Tube. That’s when, thank goodness, I found your videos. The basics classes were just what I needed. I could see you doing what the books described and doing it step by step and explaining why. Now I feel confident enough to play and experiment and my results have much improved. Thank you! I also want you to know that I appreciate your business reliability. You respond to emails and phone calls. The videos and the payments come out when promised. I feel very fortunate to have found you. ~Judy-F >> Original comment was posted here: Polymer Clay Canes
Dear Cindy, I wanted to thank you so much for being my polymer tutor. First off, I feel like you are speaking directly to your students in a friendly and professional way, never condescending or patronizing. You speak in a very conversational manner, and it is greatly appreciated. In your Polymer Clay Beginners Course, I like the way you have set up your videos and the production quality is excellent. Your explanation and demonstrations are very thorough and I know if there are questions I can look on the blog or email you. Thank you for your ongoing support. I like buying the back issue videos and appreciated the discount you gave. I am a big knitter but feel that I was not actualizing my creative self with just following patterns, now with my idea to create complementary buttons, I feel much more of my creative spirit. I have slowly been amassing my clay and tools and feel ready to go, but it is great knowing I can just log on and refresh myself with your videos and tutoring. Much better for me than books. Thanks again. ~Leigh-B >> Original comment was posted here: Making Polymer Clay Buttons For Sewing, Knitting & Scrapbooking
Continue reading this entry »
Vol-077: Polymer Clay Fairy Doors (6 Videos)
Filed in 1: Video Tutorials,Bead Projects, October 3, 2014, 11:03 am| Enchanting Miniature Decor For Your Home And Yard. Scroll Down For Links To All 6 Videos. |
Vol-077-1: Video #572: Intro (that clip just above): In this 6 part video tutorial series, you will learn how to make a wonderful full sized fairy door with a faux brick surround, a faux wooden door, faux stone entrance and creative accessories such as a whimsical lantern and post of miniature sweet pea vines. Included are many tips, tricks and techniques that you can use to create an adorable project in the colors and styles I suggest, or your own. Truly a one-of-a-kind polymer clay project. This project would make a great gift for yourself, a friend or a child. Plus all the techniques are great for making whatever other polymer clay creations you can dream up!
Vol-077-2: Video #573: Faux Brick: In this video you will learn how to take some scrap polymer clay, and create a base that will become your fairy door with a faux brick surround. I will show you some neat tricks for laying out your design and how to make your own grout/mortar tool out of a popsicle stick. You’ll also learn the techniques you need to get a realistic texture on your faux brick, that will have you swearing that the tiny replica’s are actually real!
Vol-077-3: Video #574: Coloring Brick & Faux Wood Door: In this video I will show you the tips and tricks for creating the awesome texture for the faux wooden door, and then how to give the brick and the wood it’s realistic coloring using chalk pastels. With the right tools and techniques, you’ll be surprised just how quickly and easily the polymer transforms from a hunk of random bits of clay, to the realistic look of brick and wood.
Vol-077-4: Video #575: Faux Stone and Accessories: In this video you will use the skills learned while making the brick, and transfer them into a faux stone entrance way for your lovely fairy door. This faux stone technique can not only be used as the flooring for your tiny front step, but can be also be used in place of the brick that surrounds your small little door (if you like). In addition, you will learn how to take common jewelry findings and household items, and combine them to make door handles, windows, hinges and house lights. Let your junk drawer and your imagination run wild, and see what kind of creative accessories you can come up with for your little gnome home entryway!
Vol-077-5: Video #576: Flower Pots Sweet Pea Vines: In this video you will learn how easy it really is to fashion the worlds tiniest sweet pea vines that climb the brick and wind their way around the door to your fairy house. Even though they are incredibly tiny and very detailed, that doesn’t mean they are hard to make. You just have to know the tricks on how to make them. They do take awhile, but they are well worth the effort, for the resulting looks you’ll get from your admiring friends (and the appreciation from the Fairies you planted them there for).
Vol-077-6: Video #577: Baking Finishing Antiquing: In this final video of the series, you will receive the knowledge of exactly how to bake, finish and antique your creation to perfection. I’ll also share with you some unique ideas for modifications and personalization, so that you can truly feel proud of the this project for many delightful years to come!
By the way, many of the “shopping” links I provide for the various tools and supplies used in my tutorials, are “affiliate” resources. That means companies like Amazon and the other suppliers I refer, pay me a small commission if you click on the links and end up making a purchase at their site. It’s not a lot, but every little bit helps in keeping the cost of my tutorials down. And, the prices for products that you may purchase through my links, are exactly the same as what you would normally pay, even if it is a “sale” price. So please feel free to click whenever you need to pick up a few things for your studio. Thanks so much for your support.