Please Remember…
Filed in Uncategorized, June 4, 2015, 11:04 am Members: In order to view the the videos and recipes that are available to your level of membership in this library, please remember to login with your correct Username and Password.
Vol-085: Nautical Anchor Cane (6 Videos)
Filed in 1: Video Tutorials,Cane Topics, , 11:03 am| A Sailor Theme That’s On Trend with the Latest in Fashion. Scroll Down For Links To All 6 Videos.  |
Vol-085-1: Video #668: Intro (that clip just above): In this 6 part video tutorial series, you will learn all the techniques needed to create this awesome nautical anchor cane. You’ll learn how all the clay needs to be the same softness/firmness… and what to do if it isn’t. You’ll also learn some neat tricks for creating a Skinner blend that goes from dark to light to dark, and how to roll it just right so it will become the shaded lines in your design. You’ll also master the techniques of packing the background, shaping it into a round cane and wrapping the design with a blue and white stripe border. This tutorial is jam packed adventure… so get ready to set sail!
Vol-085-2: Video #669: Supplies and Blends: In this video, you will learn about the supplies and tools needed to create this fun project. Then you will learn my Lazy Skinner Blend method, that I use when making larger blends instead of cutting triangles of clay or using teardrops like I would with smaller blends. I think you’re going to love how pretty this simple blend turns out! [Please Note: In the this Part 2, I mention that you will need just under two 2oz blocks of Premo Pomegranate clay… but you will actually need just under 3 blocks].
Vol-085-3: Video #670: Skinner Blend Plug: In this video I will demonstrate how to create a complex Skinner Blend Plug that shifts from navy blue to white, and then back to navy blue again. It is this shading that will give dimension and interest to your anchor design. Far more interesting than just navy or white. You can use the ideas from this video in your other polymer clay and caning projects as well. Lots of useful skills to keep handy in your back pocket.
Vol-085-4: Video #671: Planning The Anchor: Now in this video, you will learn my secret tips for laying out the anchor design using a long strip of blended clay cut into exactly the right lengths, shaped into the corresponding parts and pieced together into the anchor design. The concepts you learn in this video are the exact techniques you can use to make just about any picture cane design. Definitely a stepping stone for other projects that you may want want to create in the future!
Vol-085-5: Video #672: Refining Anchor Shape: In this video you’ll start tweaking and manipulating the cut pieces into the shapes needed for the anchor design. You’ll be amazed how the short little pieces cut from the long blue Skinner Blend strip, will be used for each part of the anchor design… from the ring at the top, right down to the and the arrow hooks at the bottom. Plus the lines are dimensional too… all due to the special dark-light-dark Skinner Blend we made in the third video.
Vol-085-6: Video #673: Background and Border: In this final video of the exciting series, you will learn my simple background packing ideas for this intricate cane. This trace-and-cut puzzle piece method, will give you the least amount of distortion in your final design. I’ll also show you a neat trick for using a Scrapbooking die to use as a template for cutting the perfect circle shaped background. Then we will wrap things up by using the remaining blue blend tape as our stripe border. I think you will love how it pulls the whole look together. This cane has many steps, but the results are well worth the effort. Now go ahead and make this cane and some awesome jewelry for your upcoming Summer festivities. You’ll be the hippest Sailor on the docks!
By the way, many of the “shopping” links I provide for the various tools and supplies used in my tutorials, are “affiliate” resources. That means companies like Amazon and the other suppliers I refer, pay me a small commission if you click on the links and end up making a purchase at their site. It’s not a lot, but every little bit helps in keeping the cost of my tutorials down. And, the prices for products that you may purchase through my links, are exactly the same as what you would normally pay, even if it is a “sale” price. So please feel free to click whenever you need to pick up a few things for your studio. Thanks so much for your support.
Vol-085: Little Becka Sunflower A-Palette (4 Premo Color Recipes)
Filed in 2: Color Recipes,Neutral,Orange,Red,Yellow, , 11:02 am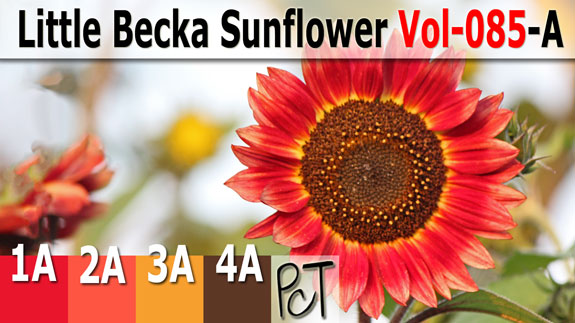 |
1-A: Little Becka 2-A: Warmth 3-A: Sun On My Face 4-A: Sunflower Seeds |
Little Becka is the beautiful watermelon red of the pretty petals surrounding this sunflower’s face. Warmth is the tangerine orange of the tips of the petals that are absorbing the warmth of the sun. Sun On My Face is the rich dark yellow of the fiery ring around the sunflower seed head. And Sunflower Seeds is the warm nut brown of the sunflower seeds growing and maturing in the warm summer sun.
To download the 4 color recipe cards, click here: Little Becka Sunflower Bark Palette
Member Benefits 085: Sculptural
Filed in 3: Member Benefits,Sculptural, , 11:01 am Love the dimensional look with the mold thingy. Might have to get that too. Once again you make it easy peasy. ~Pollyanna >> Original comment was posted here: Poinsettia Charms for Christmas
Aren’t these cup cakes the cutest things? I’ll be unscrewing a knob for this – teehee. I have a 14 year grand daughter who would love a necklace and earrings of cup cakes. They are all the rage, you know. Again, I am not a cutsie person but, the birdhouses and now the cup cakes are on my list for sure. Thanks, Lietz team. ~Patt-W >> Original comment was posted here: Miniature Beads Polymer Clay Tutorials
Cindy, Thank you for making your tutorials available online. I may not make everything you share but usually pick one or two things up from each tutorial. Recently I decided to sculpt a shoe and have been using your technique you demonstrated for clover flowers. I have taken your idea and adapted it to create purple loosestrife. I hope to get it all done soon and submit it to a local art show. This is my first real sculpture and so far so good. Thanks again. ~Shelley-L >> Original comment was posted here: Red Clover Flower Bead Tutorial Continue reading this entry »
Vol-084: Fuchshia Flower Fairy Lights (6 Videos)
Filed in 1: Video Tutorials,Bead shapes, May 3, 2015, 11:03 am| LED Lights Decorated With Translucent Polymer Clay. Scroll Down For Links To All 6 Videos. |
Vol-084-1: Video #655: Intro (that clip just above): In this 6 part video tutorial series, you will learn how to mix your own custom polymer clay colors, cut and shape the most delicate and realistic fuchsias, torch your own flame dipped rosy headpins and string them all together on a strand of LED Fairy Lights to create a super pretty decor accent for your home or office space. You’ll also be able to create stunning fuchsia beads that can be used in jewelry projects such as earrings and pendants. There is a ton of great info in this tutorial that you are just going to love!
Vol-084-2: Video #656: Recipes And Supplies: In this video, you will learn about the supplies and tools needed to create this fun project. You’ll find out just what kind of lights to purchase, the type of forms and tools required to create the flowers… and even the color recipes for creating your realistic looking fuchsia flowers. There is a lot of info packed into this video.
Vol-084-3: Video #657: Making The Flowers: Although these delicate polymer clay fuchsia flowers are not difficult to make, others will be amazed when they see what you have created! In this video you’ll master the process of making the frilly layers of these fuchsia flowers. And you will also learn how to make them look natural and beautiful… just like the real thing. Once you start making these pretty little flowers, you’re not going to want to stop.
Vol-084-4: Video #658: Baking The Flowers: Now in this video, you will learn my secret tip for pre-curing the flowers so they can bake to a durable finish in the exact form that you intended. Get this wrong, and you could end up with misshapen, brittle and/or broken petals that will leave you sad and disappointed. But if you do it my way, you’ll have the perfect shaped fuchsia blossoms that will look like they were freshly picked from the garden. And they’ll be tough and durable too!
Vol-084-5: Video #659: Flame Dipped Headpins: In this video, you will learn how to set up a safe metal torching station so that you can make your own, artisan torched copper head pins. You’ll learn about the important step in the process that creates that red rosy color which looks so nice on the tips of the headpins. And I’ll show you how to prevent your head pins from looking lopsided. Although caution and safety is required for this step, I think you will be surprised just how easy it is to make your own flame dipped head pins. Making your own custom head pins on demand, is definitely a good skill set to have in your tool box.
Vol-084-6: Video #660: Attach Flowers To Lights: In this final video of this exciting series, you will learn my simple ideas for wiring your gorgeous fuchsia flowers to the string of lights, in a way that would delight any fairy. The technique works great… looks great, is simple to do… and can be ‘undone’ should you want to change or add different flowers to your string of twinkle lights. I’ll also explain how you can adapt these ideas to create jewelry items as well. This jam packed tutorial will light up your senses and is sure to delight. Do enjoy!
By the way, many of the “shopping” links I provide for the various tools and supplies used in my tutorials, are “affiliate” resources. That means companies like Amazon and the other suppliers I refer, pay me a small commission if you click on the links and end up making a purchase at their site. It’s not a lot, but every little bit helps in keeping the cost of my tutorials down. And, the prices for products that you may purchase through my links, are exactly the same as what you would normally pay, even if it is a “sale” price. So please feel free to click whenever you need to pick up a few things for your studio. Thanks so much for your support.
Vol-084: Arbutus Bark A-Palette (4 Premo Color Recipes)
Filed in 2: Color Recipes,Green,Neutral,Pink, , 11:02 am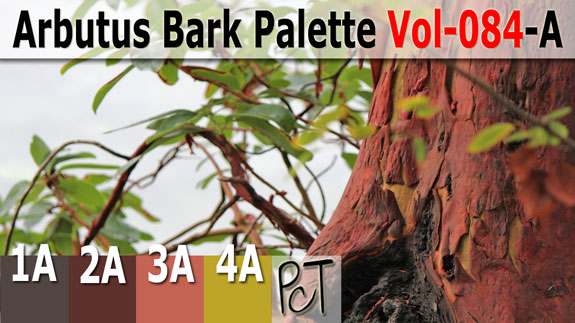 |
1-A: Gnarled 2-A: Arbutus Bark 3-A: Peeling Arbutus 4-A: Arbutus Wood |
Gnarled is the soft dark shade of brown found in the gnarled knot of this beautiful Arbutus tree. Arbutus Bark is a deep red brown found along the edges of the flaky curled bark. Peeling Arbutus is the almost coral orange shade of the highlights in the bark. And Arbutus Wood is the dusty yellow green of the wood revealed underneath the peeling skin of the arbutus.
To download the 4 color recipe cards, click here: Arbutus Bark Palette
Member Benefits 084: Jewelry & Projects
Filed in 3: Member Benefits,Jewelry & Projects, , 11:01 amUsing Cindy’s Faux Raku method was a lot of fun and I got some really cool results :D (just posted pics at Cindy’s FB page). This was made for a really sweet lady at our local dr’s office — she wanted something in red and black, the rest was up to me. It took about a week to focus in on a technique and then another week to make the beads and get it all strung up. BTW the latest video showing how to use bead cones really took the fear out of making this a two strand necklace. Thank you Cindy for all you do ~Tantesherry >> Original comment was posted here: Faux Raku Polymer Clay Tutorial
Okay, so your little story inspired me… I completely ran out of time and energy this year and didn’t get anything made for my co-workers, no fudge, no chocolate covered cherries, no cookies… very bad friend… so I saw this and thought… I have a huge amount of beads, I have a lot of key rings… I made 25 key rings in an hour that I can now take to work this afternoon as gift for everyone… Whoo Hoo… Melinda can give out gifts this year! Thank you dear! ~Melinda-H >> Original comment was posted here: Polymer Clay Gifts
Hi Cindy, I think the reason I wanted to make polymer clay beads is because I wanted my jewelry pieces to truly be one of a kind. Plus, I love the idea of taking a lump of clay and making something that doesn’t look anything like the original product it came from. Polymer clay is challenging for me also. It’s like a new art form to try and master. I’m certainly not there by any means, but I enjoy the journey. ~Kim-C >> Original comment was posted here: Your Reasons For Making Polymer Clay Beads Continue reading this entry »
Vol-083: Polymer Clay Landscape Painting (6 Videos)
Filed in 1: Video Tutorials,Bead Projects, April 2, 2015, 11:03 am| How To Paint With Polymer On Tiny Stretched Canvases. Scroll Down For Links To All 6 Videos. |
Vol-083-1: Video #645: Intro (that clip just above): In this 6 part video tutorial series, you will learn how to use some polymer clay colors, a tiny stretched canvas, some glaze and a couple of simple tools, to create wonderful textural landscape paintings… using polymer clay as your medium instead of traditional paints. You will be thrilled at the new possibilities… from making painterly blended backgrounds… to mixing your own polymer paints… to creating dimensional elements… and even making your own custom glazes. There is definitely a lot packed into this awesome tutorial.
Vol-083-2: Video #646: Landscape Blend: In this video, I’ll teach you how to create a fantastic color blend that looks exactly like a landscape. Depending on the colors you choose, your landscape could be rolling hills, a sunset at the beach, an Arizona desert… it really is up to you. And the whole thing is done with just a couple tablespoons of polymer clay! It doesn’t have to be new clay either it can be done in scrap bits of clay, in the colors of your choice.
Vol-083-3: Video #647: Clay On Canvas: In this video, you will learn the tips and tricks for adding your landscape blends to a miniature stretched canvas. I’ll share with you the secrets of getting seamless edges where the design wraps sound the outsides of the canvas, as if you had laid the strokes there with a brush or a palette knife. You will also learn the correct baking process for these tiny polymer paintings, and why it’s important to bake for less time than what I normally recommend for polymer clay. These techniques will work on any size canvas or canvas board. Other surfaces such as boxes, frames and jewelry would be a fun option as well.
Vol-083-4: Video #648: Polymer Painting: In this video, I’ll show you a neat way to mix up your own polymer paints, using both solid and liquid polymer clay. Then I’ll demonstrate how to apply the paint with proper contrast, shading and highlights, just like you would do with a painting done in traditional oils or acrylics. You will also learn how to use an artists palette knife… and how to bake the elements or layers of your painting that you do like… so that you can easily remove what you don’t like… without actually damaging what you do like. It will all become clear when you watch the video.
Vol-083-5: Video #649: 3Dimensional Elements: In this video, you will learn how to add 3D sculptural elements to your polymer clay paintings. I will show you how to form these elements and attach them to your canvas. I’ll also discuss the importance of making barrier layers, so that mistakes can safely be erased if necessary. You’ll learn how to make an abstract spring tree in this lesson… but the ideas and techniques can be extended to all kinds of different features and embellishments depending on the theme of your landscape painting. Again, the options are only limited by your own imagination!
Vol-083-6: Video #650: Glazing And Highlighting: In this video, You’ll learn how to bring your polymer clay landscape painting to life, using your own custom made glazes and proper finishing techniques. Layers of glazing medium bring a lovely sheen and depth to the piece, while giving a rich tone to the colors and an overl all professional look. You are going to love what you learn in this action packed tutorial series! I can’t wait to see your inner Rembrandt revealed!
By the way, many of the “shopping” links I provide for the various tools and supplies used in my tutorials, are “affiliate” resources. That means companies like Amazon and the other suppliers I refer, pay me a small commission if you click on the links and end up making a purchase at their site. It’s not a lot, but every little bit helps in keeping the cost of my tutorials down. And, the prices for products that you may purchase through my links, are exactly the same as what you would normally pay, even if it is a “sale” price. So please feel free to click whenever you need to pick up a few things for your studio. Thanks so much for your support.
Vol-083: Seaweed A-Palette (4 Premo Color Recipes)
Filed in 2: Color Recipes,Green,Neutral,Pink, , 11:02 am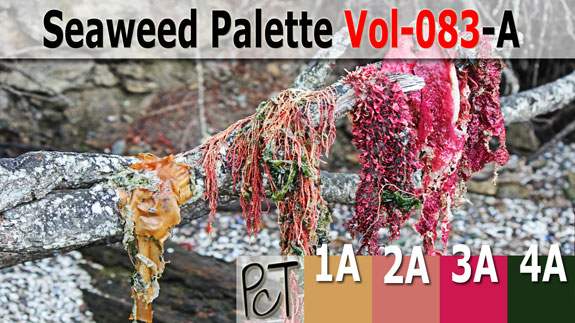 |
1-A: Kelp 2-A: Pikes Weed 3-A: Coralina 4-A: Seaweed |
Kelp is the golden brown color of the wavy sheets of kelp seaweed first up from the left, on the branch of driftwood. Pikes Weed is the name for the dusty coral pink of the seaweed next in line, with the long pearly strands. Then comes Coralina which is the ruffled bright pink clumps of Red Algae (not technically a seaweed at all). And Seaweed is the dark green color of the Sea Lettuce seaweed chunks, intertwined amongst the other more colorful varieties.
To download the 4 color recipe cards, click here: Seaweed Palette
Member Benefits 083: Sand Buff Shine
Filed in 3: Member Benefits,Sand Buff Shine, , 11:01 amBeautiful!! … thanks so much for using a piece of tape on the back of the bead to sand it – I have tried sanding flat like that more than once, and the piece won’t move. I feel like having a duh moment because you make so much sense. ~Beth-W >> Original comment was posted here: Reptile Hollow Lentil Bead Tutorial
In the past, I’ve never been a fan of sanding and would rather take a beating than sand LOL . Cindy did the tute showing the AWESOME sanding square pad thingies (can’t remember what they are called), and sanding has been so much easier. They are easy on the hands, color coded for each grit, and over all, just make sanding something that I don’t mind at all anymore. Thanks Cindy for finding these great sanding pads and making the life of sanding so much easier :) ~Susan-R >> Original comment was posted here: Sanding and Buffing Your Polymer Clay Is Worth It
Cindy, your way is always so much easier with even better results. I have made faux abalone with the translucent and pearl ex powders before. You have to make thin slices then lay over base color. I never like the results I got so I just made a few pieces and gave up on it. Your tutorial is so much easier to follow and I love the way you use the thick slices. You can sand it to perfection without worrying about going through to your base color. Then your results are so much richer. Thank you Cindy for giving me another chance to try to make some beautiful faux abalone. Your way is the best way for me every time. Another wonderful tutorial you and Doug have created for all of us to enjoy. Many Uuugggs. ~Peggy-B >> Original comment was posted here: Faux Abalone Paua Cuff Polymer Clay Tutorial Continue reading this entry »
Vol-082: Fire & Ice Kitchen Utensils (6 Videos)
Filed in 1: Video Tutorials,Techniques, March 5, 2015, 11:03 am| A Home Decor Project Perfect For Gift Giving. Scroll Down For Links To All 6 Videos. |
Vol-082-1: Video #633: Intro (that clip just above): In this 6 part video tutorial series, you will learn how to use translucent and metallic polymer clays, inks, and metal leaf to create two different exciting techniques. One that looks like fire, and the other like ice. Then you will use these fire and ice clay blocks to create colorful translucent sheets of polymer that you can wrap around glass salt and pepper shakers, kitchen utensils or whatever else you would like to use these cool looking surface techniques (bottles of hope maybe). The things you learn in the tutorial can also be transferred to other projects such as home decor items and jewelry. You’ll be surprised how much is packed into this awesome tutorial.
Vol-082-2: Video #634: Ink And Leaf: In this video, I’ll teach all about how to make the mokume gane style polymer clay fire and ice cane, or slab as some call it, by blending alcohol inks into translucent polymer clay and layering with metal leaf and metallic clays. The colors choices will give the warm look of fire, as well as the cool look of ice. But you could use any color combination you choose, to come up with your own look as well!
Vol-082-3: Video #635: Cutting, Stacking & Rolling: In this video, I will teach you how to impress your stacks of layered clay, using inks and metal leaf, to create the unique look of fire and ice. I will then show you how to compress, shape, slice and roll your stack until you have a workable sheet of color, design and dimension. These neat looking sheets of clay will be used to make the kitchen utensils and accessories shown in the intro video, but can also be used in many other projects as well. Lots of options here.
Vol-082-4: Video #636: Covering Glass Shakers: In this video I will share with you the secrets to adding a paper thin sheet of polymer clay to a glass salt and pepper shaker, or any other glass item you desire. I’ll show you tips and tricks for creating a seamless, bubble free, and blemish free piece, that will not only turn out beautiful, but professional looking as well. When done using these simple techniques, your glass shakers will look as though the design was painted or enameled right onto the surface of the glass.
Vol-082-5: Video #637: Covering Utensil Handles: In this video you will discover the right way to add polymer clay to metal cutlery and utensils. The first step is to learn why it is important to build the right base for your piece, and to make sure that it is properly shaped and finished before even adding your special clay veneer. You will then understand why multiple baking steps will be necessary. Next you will learn the tips and tricks for adding a flawless layer of colored translucent clay to your utensil, and you will find out how to baking your pieces to achieve professional looking results every time.
Vol-082-6: Video #638: Sanding And Finishing: In this video you will find out what’s needed to beautifully finish your pieces. From giving it a good sanding and buffing… to using Renaissance Wax as a final coating. Your guests will be impressed with the kitchen accessories that you create. These are items that you will definitely be proud to give away as gifts to your friends and relatives. I’ll also talk about the proper care and washing instructions for these polymer clay utensils, so they will be last for years to come. Now you can always use these techniques for jewelry projects, but won’t it be nice to finally bring some of your your polymer into the kitchen? I hope yo have fun with this one… and please do share your pictures with me!!!
By the way, many of the “shopping” links I provide for the various tools and supplies used in my tutorials, are “affiliate” resources. That means companies like Amazon and the other suppliers I refer, pay me a small commission if you click on the links and end up making a purchase at their site. It’s not a lot, but every little bit helps in keeping the cost of my tutorials down. And, the prices for products that you may purchase through my links, are exactly the same as what you would normally pay, even if it is a “sale” price. So please feel free to click whenever you need to pick up a few things for your studio. Thanks so much for your support.
Vol-082: Sugar Rose A-Palette (4 Premo Color Recipes)
Filed in 2: Color Recipes,Blue,Green,Neutral,Orange, , 11:02 am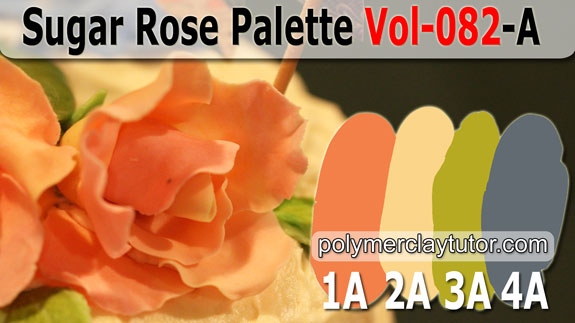 |
1-A: Sugar Rose 2-A: Buttercream 3-A: Sugar Leaf 4-A: Gumpaste Hydrangeas |
Sugar Rose is the soft pastel coral color of the delicate petals of the sweet Gumpaste rose. Buttercream is the soft creamy beige of the buttercream frosted cake. Sugar Leaf is the light yellow green found in the sugary rose leaf accenting the cake. And Gumpaste Hydrangeas is the smoky blue shade of the blue hydrangea blossoms behind the roses (hiding under the top title bar in the photo) and falling down the backside of the flower adorned birthday cake.
To download the 4 color recipe cards, click here: Sugar Rose Palette
Member Benefits 082: Friends Stories
Filed in 3: Member Benefits,Friends Stories, , 11:01 amAHA LIGHTBLUB MOMENTS: Cindy, thanks for re-running Rose’s comment, since I did miss it the first time around. Rose, not only did I not think “duh,” but my reaction was more along the “aha!” line, with that all-too-usually dark lightbulb over my head finally lighting. Thanks to your comment, I started thinking that the only way I’ll get better at creating with polymer clay is to create with polymer clay, and I don’t need a purpose. Thank you! Even though I promised myself that I wouldn’t make any resolutions this year, I think I have one now. ~Linda-D >> Original comment was posted here: Making Polymer Clay Beads
A LITTLE PIECE OF THE WORLD: Cindy, I don’t post much here at the blog, but wanted to let you know how much I appreciate You and Doug for the time you all put into the blog and videos. I look forward to every Friday when I grab my coffee and head to the computer first thing for the weekly video tutorial. Your stories and Doug’s pictures give me a little piece of the world that I will probably not see. Thanks. ~Barbara-C >> Original comment was posted here: Polymer Clay Library
BRAIN DEAD SIMPLE: Hey Cindy. you continue to be amazing. I have made about 20 troll beads today. I had to laugh when you commented on how hard it is to make things “brain dead simple” Amen to that! In the Occupational Therapy world that is called Activity Analysis. The ability to have a perfect understanding of every step of an activity, every skill it takes to complete it and how to “adapt” it for someone with a particular problem. Darned if I know how you break these activities down so that the whole wide world can do them successfully. Beautiful job. Thank You. ~Cassie-C >> Original comment was posted here: Pandora Style Beads Polymer Clay Tutorial