Purchase Vol-084 Back Issue package | $9.95 (US) One Time Fee
| In This Vol-084: Fuchsia Flower (LED) Fairy Lights (6 Videos) Plus: |
***************************************************************************************************************************************
 |
|
.
***************************************************************************************************************************************
Vol-084-1: Video #645: Introduction: In this 6 part video tutorial series, you will learn how to mix your own custom polymer clay colors, cut and shape the most delicate and realistic fuchsias, torch your own flame dipped rosy headpins and string them all together on a strand of LED Fairy Lights to create a super pretty decor accent for your home or office space. You’ll also be able to create stunning fuchsia beads that can be used in jewelry projects such as earrings and pendants. There is a ton of great info in this tutorial that you are just going to love!
Vol-084-2: Video #646: Recipes And Supplies: In this video, you will learn about the supplies and tools needed to create this fun project. You’ll find out just what kind of lights to purchase, the type of forms and tools required to create the flowers… and even the color recipes for creating your realistic looking fuchsia flowers. There is a lot of info packed into this video.
Vol-084-3: Video #647: Making The Flowers: Although these delicate polymer clay fuchsia flowers are not difficult to make, others will be amazed when they see what you have created! In this video you’ll master the process of making the frilly layers of these fuchsia flowers. And you will also learn how to make them look natural and beautiful… just like the real thing. Once you start making these pretty little flowers, you’re not going to want to stop.
Vol-084-4: Video #648: Baking The Flowers: Now in this video, you will learn my secret tip for pre-curing the flowers so they can bake to a durable finish in the exact form that you intended. Get this wrong, and you could end up with misshapen, brittle and/or broken petals that will leave you sad and disappointed. But if you do it my way, you’ll have the perfect shaped fuchsia blossoms that will look like they were freshly picked from the garden. And they’ll be tough and durable too!
Vol-084-5: Video #649: Flame Dipped Headpins: In this video, you will learn how to set up a safe metal torching station so that you can make your own, artisan torched copper head pins. You’ll learn about the important step in the process that creates that red rosy color which looks so nice on the tips of the headpins. And I’ll show you how to prevent your head pins from looking lopsided. Although caution and safety is required for this step, I think you will be surprised just how easy it is to make your own flame dipped head pins. Making your own custom head pins on demand, is definitely a good skill set to have in your tool box.
Vol-084-6: Video #650: Glazing And Highlighting: In this final video of this exciting series, you will learn my simple ideas for wiring your gorgeous fuchsia flowers to the string of lights, in a way that would delight any fairy. The technique works great… looks great, is simple to do… and can be ‘undone’ should you want to change or add different flowers to your string of twinkle lights. I’ll also explain how you can adapt these ideas to create jewelry items as well. This jam packed tutorial will light up your senses and is sure to delight. Do enjoy!
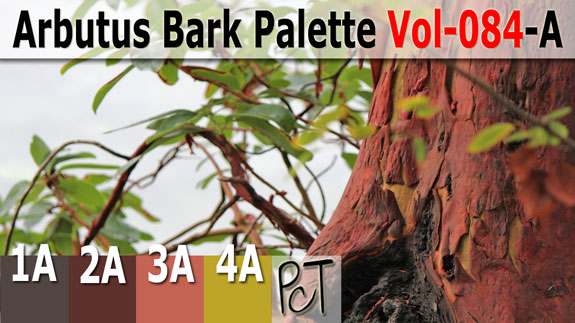 |
1-A: Gnarled 2-A: Arbutus Bark 3-A: Peeling Arbutus 4-A: Arbutus Wood . . . |
Gnarled is the soft dark shade of brown found in the gnarled knot of this beautiful Arbutus tree. Arbutus Bark is a deep red brown found along the edges of the flaky curled bark. Peeling Arbutus is the almost coral orange shade of the highlights in the bark. And Arbutus Wood is the dusty yellow green of the wood revealed underneath the peeling skin of the arbutus.
***************************************************************************************************************************************
|
|
.
***************************************************************************************************************************************
Customer Reviews: Fuchsia Flower (LED) Fairy Lights (6 Videos):
- Unreal. Such a great idea!!! How cool is this? Morning glories. Or your Sweet Peas, climbing a trellis. ~Jocelyn-C
- Fabulous, fantastic, Fuchsias looking just like a fairy ballerina. Love this tute Cindy and for once I have all the supplies including my LED lights, to start making them straight away. Fuchsias are one of my favourite flowers and come in such beautiful two tone colours. So will get conditioning my clay right now……… cheers! ~Elaine-F
- Dear Cindy, Thank you soooo much for your wonderful videos!!! You are amazing. They are so easy to follow. I especially loved this one, because I have always wanted to know how to do the torch work. it is surprisingly easy to do. Thanks to you. :) I am one HAPPY GIRL. ~Rosalyn-H
- Hi Cindy and Doug, This is one of the neatest tutorials and I just squealed with delight when I saw what you were using the LED’S for. Oh the possibilities! I made a whole bouquet of Fushia flowers last year but never would have thought to add these tiny little lights. Excited all over again now to make more of these flowers and several more now that will be so pretty strung in different areas of my studio! Time to run to Michaels! ~DixieAnn-S
- Another Super Duper tute! My Dad used to grow Fuchsias. They are so dainty. I do want to add other flowers too… now to find the time to play. Thank you so much for all your talent, time, and energy! So glad I belong to your family. ~Patt-W
- Very cool idea! I am not a Fuchsia fan, but I am probably going to try this with some other flowers. I think a Plumeria strand or jasmine on tiny tiny lights would be neat. Or fantasy flowers on tiny lights set around the rim of a tea cup planter with a faery world that includes a faery door … So many ideas, not nearly enough clay, and even LESS TIME!! ARRGGHH! :) ~Doreen-N
- Thank you so much Cindy and Doug, what a fabulous tutorial! And a special thank you for showing us how to make the ‘stamens’, I’ve always been nervous of wire work with a torch, but I’m ready now to give this a go! ~Marion-R
- I love the Fuchsia lights! You are so creative! ~Tammy-O
- I can only say WOW!!! I’ve been pondering a similar project for a while now …. so I’m super excited about this tutorial. Thank you so much, Cindy and Doug, as always! And for anyone thinking about signing up ….. really, it’s a no-brainer! :-) ~Lesley-S
- Wow Cindy, I know how sore your fingers must feel. The strand of led fairy lights I unearthed from my box of Christmas decorations has 35 little lights, so glad you showed how they look strung on every OTHER one. It’s taken me two days to make the flowers (with lots of rests in between). Now got to don my safety gear to torch 85 copper flamed torched head pins. Hope my can of Butane will last out ha ha. When I have finished them they will adorn my stall in the marquee at Abridge Village Craft and Antiques fair. A two day event on the 6th and 7th June. Back when you showed us the parrot tulip cane I fell in love with this cane and made the earrings. So think that idea of using these pretty flowers on fairy lights will look very special. Just hope my local store has fairy lights in their sale isle. (Think I will stick some fun foam on the handle of my ball tool and see if that helps)….cheers..xx ~Elaine-F
- Hello Cindy. I just wanted to say that I love how your videos are quick and to the point – both the beginner course lessons and the monthly video tutorials. You can get through them very quickly and start practicing the techniques. Thank you. ~Nanette-B
- YES!!!! (punching the air) You made it!!!!! You made the fuchsia flowers!!!! I can’t say how happy I am! I wanted to know how to build this flower for years and I was always on the lookout for tutorials just in case somebody did it already. It is even better that you were the person who made it! Loooooove it! Thank you, thank you, thank you!!!!!! ~Helena-B
- Hi Cindy, I have now watched several of your excellent videos and wanted to I thank you for speaking directly to me in your videos, at least that’s the way you make me feel. ~Nancy-B
Customer Reviews: Arbutus Bark A-series Color Palette (4 Recipe Cards):
- Another stunning palette. Thank you Cindy and Doug. I love your recipes inspired by the best color palette Nature! ~Cheryl-H
- What a interesting palette. I know this tree as a Madrone. (Originally from northern Calif, myself). This would be a palette I would use to make Mokume Gane. ~Patt-W
- Cindy this is an awesome palette. I love these deep rich colors. Thank you for creating this one. I do have a suggestion. Since we have so many people from around the world, it would be nice to do color palettes that represent things in other countries besides our own. Doesn’t that sound like a grand idea? With your talent for creating such beautiful palettes, I am sure it would be appreciated all around. ~DixieAnn-S
- Cindy, I have a pretty strong background in art and color… but still feel that I have a lot to learn. Please make more of these very informative color recipes. They are of great help and a great reference point! I think it’s very important for an artist to have access to this kind of information for future projects and I can’t think of a better starting point for any project than color! I can’t get enough of your informational videos. Be well. ~Joy-D
- For those of use who really don’t have an easy time figuring out how to arrive at just the right color yet, these recipes are a real helper! ~Cynister
- Can you say MUD!! I have had my fair share of mixing the wrong colors together. I have never had a course in color theory and learned pretty quickly that is is difficult to always get the desired result. But thanks to your color recipes I’m doing a lot better now! ~Katina-K
- Love the colours! What’s great about being on the other side of the world to you guys is that when it is our autumn (fall) and winter, it is your spring and summer and all the beautiful colours that you guys have come out to play (especially in Cindy’s clay!!) ~Sandra-J
- Hi Cindy: How you see COLOR… and describe it – is remarkable! You challenge us to work with Nature around us, and IMHO – that is God’s Palette. Keep your palette colors coming Cindy, you are a gifted woman. You see things that most people do not even take the time to see, and you are sharing and teaching us to do that simple task. Sincerely. ~Pauline-D
- I have often looked at the “natural palette” of the Rocky Mountains where I live – azure sky, forest greens and deep clay reds – and thought that the combination was inspiring…but I didn’t let it inspire ME to actually reflect these hues in a piece of art. I am very new to polymer clay, but mixing colors and learning to select meaningful palettes for my bead projects are first and second on my list. I hope to keep an open mind to unexpected color combinations, but also to look to nature for some “tried and true” ideas. Thanks! ~Sue-P
- Recipes that someone has already taken the time to figure out are WONDERFUL! Thank you Cindy. ~Kim-C
- Color mixing is one of my biggest challenges. Your recipes are fantastic and I print them all out and keep them in a binder for future reference. I have done the Maggie Maggio course but still have trouble “seeing” which color to use to match a particular palette. Thanks so much for sharing your knowledge and experience. Hugs. ~Sue-C
- Hello Cindy, funny how your story brought back memories to all of us… it’s true we are all different, but thru your colors we stand on the same ground… I live far, so far from the sea… I was born in the Mediterranean sea… have so many good memory’s, and I miss it so much. I agree with Doreen-N and her idea for a color pallet and to honor your Dad’s life on the sea he loves so much. Have a nice week! ~Marina-S
***************************************************************************************************************************************
|
|
.
- Did You Know… that by purchasing an ongoing membership to this Polymer Clay Library, you will save over 66% on all future Videos/Recipes. Full details here: Become-A-Subscriber-Member
- Link To Go Back To Top Of This Page: Volume-084 Back Issue Package
- Purchase Other Single Volumes Here: Polymer Clay Tutor Back Issues