Purchase Vol-072 Back Issue package | $9.95 (US) One Time Fee
| In This Vol-072: Shoreline Bracelet (6 Videos) Plus: |
***************************************************************************************************************************************
 |
|
.
***************************************************************************************************************************************
Vol-072-1: Video #512: Introduction: In this 6 part video tutorial series, you will learn how to create my original Polymer Clay Shoreline Bracelet design. Included are many tips, tricks and techniques that you can use to create cool color blends in the colors I suggest, or your own, to make truly one-of-a-kind Beach Jewelry. These pretty and stylistic looking landscape tile components can then be used to create gorgeous bracelets, earrings, pendants, and other jewelry pieces. As well, you will learn how to make your own twisted wire jump rings and wire clasps, to use in this project, and with many other jewelry making projects that you may have on the go.
Vol-072-2: Video #513: Shoreline Blend: In this video, I show how to make the custom color blends using several Premo Polymer Clay Colors, as well as some of your old dried out polymer clay… even your scrap clay. You will be surprised with just how simply these complex designs come together… like magic! It so addictive that you’ll find yourself coming back to create more and more, one-of-a-kind beachy blends. It’s fun too! You and your friends will end up saying things like, “I can see an island and birds in the background,” or “I love that part, it looks like a pile of rocks in a tidal pool.”
Vol-072-3: Video #514: Cutting, Baking and Finishing: In this video, you will use the blend created in Part 2, and start making your tiles for the bracelet project. Here you will learn the tricks of cutting, baking and finishing your polymer clay pieces so that they will be strong and professional looking. Depending on the size of your original blend, you can create a variety of different polymer clay jewelry pieces from the tiles. If you make a bracelet and have a few pieces left over, you can use them to create a matching pendant or a pair of earrings.
Vol-072-4: Video #515: Twisted Wire: In this lesson, you will learn some unique techniques for creating hand twisted wire strands, that can be used to make jump rings, clasps and a variety of other jewelry making findings. You will learn tricks for choosing the correct wire… measuring the correct amount of wire for a project… and wrapping the wire to create your own custom jump rings. The stuff you learn in this part of the video series will come in handy with many other jewelry making projects as well. If you don’t want to do you own wirework, there are lots of of options available for using more standard findings purchased from your favorite jewelry supply store.
Vol-072-5: Video #516: Cutting Jump Rings Drilling Tiles: In this video, you will learn some interesting information about the proper way to cut jump rings using flush cutters. As well, I will show you how to measure and mark your tile pieces for drilling. It is important that the holes are drilled in the correct location on your pieces so that they are strong and the bracelet is properly aligned. I’ll demonstrate some neat little tricks to do these jobs, quickly, easily and precisely.
Vol-072-6: Video #517: Twisted Wire Clasp: In this video, the Shoreline Bracelet project comes together! You will learn how to make a handmade wire clasp that not only suites this jewelry project beautifully, but can also be custom fitted to your bracelet sizing needs. I’ll share with you my little tips and tweaks, so that your clasp fits your tiles perfectly and can be sized exactly how you need it. This unique hook and bar design has a great nautical looking style, and it is strong and easy for the wearer to use. So let’s making this bracelet and head off to the beach!
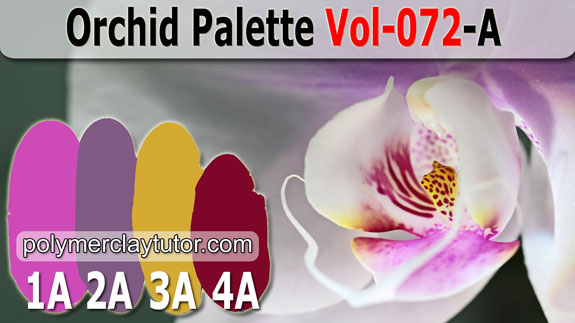 |
1-A: Orchid 2-A: Phalaenopsis 3-A: Nectar 4-A: Exotic Flower . . . . |
Orchid is a gorgeous purple pink found in the throat of this gorgeous flower. It’s a very close match to the Pantone 2014 Color of the Year, which was named Radiant Orchid. Phalaenopsis is the amazing soft purple found on the sepals of this Orchid blossom. Nectar is the soft sweet yellow found in the center lip of the flower. And Exotic Flower is the deep wine red of the spotted column.
***************************************************************************************************************************************
|
|
.
***************************************************************************************************************************************
Customer Reviews: Shoreline Bracelet (6 Videos):
- Get a patent on that – quick! That is the coolest, prettiest, jewelry idea that I have seen in years – maybe ever – I am a beach/ocean lover – so naturally I would love those! ~Annie-H
- Loving the FEEL of the pattern… does that make sense? After living on the gulf coast of Texas, I can relate to the patterns… You have a WINNER for sure!!! Thank you Cindy (and Doug) so much for such an interesting and fun tute!! LOVE LOVE LOVE. ~Patt-W
- Wow Cindy, On this wet wet grey day here in the UK you have taken me to my favorite place on this Earth. THE BEACH. Love the whole concept of this stunning tute. Just right to put some sunshine back in my life. The wire twists look so cool, do not think I will be doing anything other than creating my own shoreline. LOVE how this looks. Clay at the ready, one two three… jump… the water is fffine but fffreezing… cheers xx. ~Elaine-F
- What a gorgeous project! ~Jill-V
- Beautiful clasp and jump rings!! Cindy this is the tutorial that finally convinced me to buy a pair of 6-step pliers – you get so much use out of yours — and I’m tired of not getting the same results each time with the regular round nose ones I have. ~Tante-S
- Being raised on the eastern tip of L.I. N.Y. this really appeals to me. ~Connie-T
- Love the bracelet, Cindy!!! ~Dotty-C
- I was so delighted when I found out what this tutorial was. I have wanted to do a landscape for a very long time. This one is just awesome and the perfect starting place… thank you for your wonderful tute and filming. The two of you (Cindy and Doug) are still the best team out there and I feel so blessed to be a part of your journey. ~Peggy-B
- Cindy, I LOVE this tutorial! My brain is just spinning with ideas – sunsets, mountains, desert, pastures! Thanks for all the work you put into these weekly tutorials – LOL – It’s not work when you love what you are doing, is it? ~Gayle-T
- I love this… I’ve been meaning to make some seaside jewellery for a long time, and this is just the kickstart I needed ….. lots of ideas bubbling up! Cindy, I can honestly say I’ve learned more from you than from anyone else! … another great one!! Thanks to you both for great tutorials and excellent video quality! ~Lesley-S
- What a lovely bracelet. I can see where many colors can be used to represent different scenes. I have never made twisted chain before but you make it look easy Cindy and I love the jump ring effect. Fortunately I have just the wire from Wire Sculpture too! Am 3 or 4 tutorials behind due to so much illness this spring but look out when I get my strength back there will be no stopping me. There is something about being on a beach or next to the water that seems to lift one’s spirit. ~DixieAnn-S
- We live just 2 hrs from the beach. I love the Oregon Coast and the beach is so peaceful. I am going to give this a try. I have painted this type of scene before with watercolors so this is something I love. ~Cindy-P
- I grew up close to a beach in India. It’s my favorite place, a place I used to walk to whenever I felt down. I’ve had a very hard year and few months, starting with surgery on both my eyes, a broken back that still causes a lot of pain because of nerve damage and now losing my Mom. I planned to get back to making jewelry but was just not able to get down to it. I think this tutorial will help; the sand and the sea so soothing. Thanks Cindy & Doug! ~Cherie-H
- Cheers Cindy you’ve done it again! ~Elaine-F
The washing needs doing
There’s fluff on the rug
But oh! Cindy dear
I could give you a hug.Dishes are starting to pile up in the sink
The lawn needs a’ mowing
But no. I’m not going
To stop, with my chopping and blending
I’m now on the brink.These sky and sand colours
Are awesome to see
Sure Cindy’s new tute
Was made especially for me!Now look very closely
Behind that big rock
I saw something moving
I’m sure it was moving
It gave me a shock.Must go and look
To see what’s to find
But the tides coming in
(Think I’m losing my mind)The sea’s changing colour
There’s black clouds in the sky
It’s gone very dark
(There’s a storm nearby)So I’ll dust off the sand
(Just look at that SEA)
I’m not staying here
Going home to my Tea - Ha ha ha Elaine, that really made me laugh could have been written for me! … cos here I am, still in my pjs, lots of other stuff I should be doing … chopping and blending like a madwoman and making a real old mess, but … ‘ooooooooh, love this one … just like a summer beach!! Fabulous tutorial!!! ~Lesley-S
- While driving to the vet’s office yesterday, I found my self looking at the “view” with this new technique in mind :) ~Sherry-L
- Cindy, I started my journey with you – and this great community. My finger hesitated for a second over the “buy” button, because money is a very limited commodity around here. But I haven’t regretted it for a single moment. As everyone knows, on the web there are hundreds (thousands?) of videos and tutorials about claying, many of them free. I have watched lots of them, and still do: seeing lots of different ways of doing things is a great way to learn. And while I have occasionally seen a great tutorial on other sites, no one has ever come close to what you provide. Your videos are consistently good, and in a depth of detail rarely seen elsewhere. Your manner is a large part of what made me choose to buy the video in the first place. You know what you are talking about, and you make it interesting and easy to watch and learn from you. You are relaxed and open, there is always a sense of ease about you. Your voice is easy to listen to. (That may seem trivial, but there are some videos I have seen where I cannot stand to watch because the voice is harsh, or the person chatters on interminably. I even listened to one where the dog was snoring in the background.) You seem like someone I would like to know personally. And that is important, because by now I have so many of your videos it seems I invite you into my home every day! I almost want to make you tea while you’re here ;) I think you are a natural teacher. You know what people need to learn to do the thing you are teaching about, and you get it across clearly and simply. You motivate and encourage, you make me curious. You keep great track of where you are in your discussions. Whenever you say “I’ll get to that in a minute’ you DO. You keep a good balance between telling us exactly how to do something and encouraging our own creativity. You have such a good sense of what to teach. So thank you. ~Fran-V
- I cut a row of round buttons down the centre of the strip – all the same but different. Worked beautifully. Just be sure to make enough at once, because you will never be able to repeat the pattern (which is a good thing!) ~Jan-G
- I really love this beachy bracelet idea, it has sparked a few newer ideas in my head. Here on a coastal area, the beachy look will make perfect gifts and even tourist attractants. Keep up the great work, I love to watch your videos, they are informative and inspiring. Thank you. ~Shane-C
- Wow! What a novel idea! I enjoyed my first attempt at this project, but I had to do it a second time. I didn’t quite use enough clay the first time around, but the second one came out great! Thank you ever so much Cindy (Doug too)… So happy for this tutorial, and just in time for Mother’s Day too! Have a great Mother’s Day in advance, and thanks again :) ~Marianne-O
- Hi Cindy – just returned from a few days away to find your fabulous ‘sea-view’ video waiting! What a treat! You have such a wonderful imagination and so many other tips as well. I never cease to be amazed at the way you find new things to show us. I was particularly interested to see jump rings formed out of twisted wire. This is something I thought you had to buy, I never thought they could be produced so simply, and they look fantastic! Thank you again for all you share with us! ~Marion-R
- Cindy – Your technique with the beach scenes, absolutely genius I must say. ~Maggie-K
- I am still totally addicted and obsessed with your wonderful beach scene tute, but, have moved to all sorts of locations….mountains, valleys, lakes, rivers, both desert and lush. THE BOMB! ~Jocelyn-C
- Hi Cindy, What a fabulous tutorial and technique! I have only just found your tutorials but I am so glad I did. On another cold wet “spring” day here in the UK your tutorial has transported me to a sunnier warmer place! I’ve been working with polymer clay for about two years now and I am always playing with scrap clay and exploring new ways to use it up in ingenious ways but this is just something else completely! Truly inspiring – I am hooked. Thank you for sharing this with us. ~Fiona-P
- Hi Cindy, I am new to membership and haven’t used polymer clay a whole lot, but I just loved this bracelet. It MADE ME have to become a member. I really enjoy all your YouTube tutorials. My “go of it” with the bracelet is on my blog. Thanks so much for the wonderful inspiration. I am soooo looking forward to future months of membership in this community. ~Maria-S
- A lot of people thought I had painted the ocean inspired bracelet I made from this tutorial, and could not believe it was only polymer. LOVE IT. Thanks from the Other Cindy. ~Cindy-P
- Hi Cindy I have subscribed to your videos for over a year now I think, and I really love all the great information that you share. This is the first time that I have actually commented on anyone’s online site but I had to comment on this one. I have done the Shoreline Blend and have fallen in love with this technique. I have done this several times and am amazed each time at the results. I am always surprised at how each comes out. I got so excited about this technique that I have used the blend to make pendants of mini beach scenes. I have covered one of the pen kits you use in your Faux Burl Pen tutorial in place of the burl wood look and I love that look as well. Thank you so much for all your work and help. As I plan to post at least a couple of the items I made with this technique to my Etsy site, I want to be sure to give credit for the Shoreline Blend Technique to you and your site. I love this! ~Nancy-D
- Just another update – I have tried the technique to create a mountain look and it is really cool as well. I have cut out smaller pieces of the blends and put in bezels and have resin over the clay. They look great, I think anyway! Thanks. ~Nancy-D
- Hi Guy’s, I think I’ll start calling you “The Team” lol… I absolutely love this series… and once more you amaze me with your precision and creativity! Brilliant… Here’s a thought, A farm scene, blue sky, green pastures, red barns white fences… A cityscape, it’s really endless, of course who doesn’t love the beach! Thanks so much, what did I do before Cindy and Doug??? ~Joy-D
- Cindy, Thanks for the great tutorials each month. So far this Vol-072 Shoreline technique is my a favorite. I’ve added small shells to the sand area and put in some seagulls too. I even used the same technique to create flower fields. Great fun and so cool that it is always a different surprise with each batch. I work with two handicap individuals and it’s an easy and fun process for them too. I belong to a local clay guild and found many of our members subscribe to your site. I’ve pushed many of our members your way after they see a few of my beach earrings. Happy claying. ~Pat-G
- This tutorial series is wonderful. I’m originally from the seaside (Scarborough, England) and this design brings the beach to life. ~Rosie-M
- Love this project. I’m a member but missed this tute so had to purchase as a back issue and it’s well worth it. You can use this same technique with different clays to get completely different effects. ~Mama-H
Customer Reviews: Orchid A-Series Color Palette (4 Recipe Cards):
- Oh wow, those colors are so pretty. ~Tantesherry
- I didn’t know you were such a tease!!! What a beautiful set of colors, Cindy. I can’t wait! And Doug, such amazing photos, they’re splendid, really capture the delicate beauty of the orchids. Thank you both. (Cindy, you folks sound like me with plants. Before a new plant comes into my house i have to let it know it’s in for a rough ride. If it survives, it’ll be among the toughest in the universe!) ~Fran-V
- Hi Cindy :) I’m new to your web community and I only wish I had found you sooner! I’ve learned so much in the short time I’ve been here. Okay, that out of the way, I really love your new Orchid color palette for a couple reasons. One, I love polymer flowers, Donna Kato’s first book with the beautiful florals on the cover was my introduction to PC. Until I saw your tutorial, I didn’t think I’d be able to make realistic ones myself. Second, I’ve been daydreaming in earnest about making flower earrings after seeing some PC floral sculptures online. (And your work). Once I make some flowers from your tutorial, I want to try and do orchid earrings because the orchid is the national flower of the Cayman Islands where I am from! So I log on and see your palette today and I was like Wow. That’s a cool coincidence. ~Karen-L
- Hi Cindy. I just love the way you described each of these colors. I felt so inspired after reading it. You are unbelievable and so talented in so many different things. ~Helen-S
- Cindy, this new palette is gorgeous. I love the way you key your selections to the natural world. Thank you for sharing them! ~Jocelyn-C
- I love how you put so much effort into your colors, making them so accurate. This really saves alot of time, and no weird heap of poo colored clay at the end which you aren’t able to do nothing much with. ~Shirley-L
- Thanks for the great tips and color recipes Cindy. You’re the best!!! ~Andrea-R
- Cindy, I just love the way your color pallets are based on nature – God’s natural color combinations. We really can’t improve on that, but you do a superb job of capturing the colors that we might not really notice otherwise. Thank you so much! ~Carolyn-F
- WOW – Your inspiration not only comes across in my clay world but in my world of color too. I’m not very disciplined when it comes to making my own colors even though you have it all layed out for us. Once again, thank you for being you Cindy. You not only ROCK MY WORLD with creativity you COLOR MY WORLD. You definitely have inspired my inner me. Love and Uuuuugggggggs, ~Peggy-B
***************************************************************************************************************************************
|
|
.
- Did You Know… that by purchasing an ongoing membership to this Polymer Clay Library, you will save over 66% on all future Videos/Recipes. Full details here: Become-A-Subscriber-Member
- Link To Go Back To Top Of This Page: Volume-072 Back Issue Package
- Purchase Other Single Volumes Here: Polymer Clay Tutor Back Issues