Purchase Vol-056 Back Issue package | $9.95 (US) One Time Fee
| In This Vol-056:
Faux Flaking Rust (6 Videos) Plus: Vega Gull A-Series Color Palette (4 Recipe Cards) |
***************************************************************************************************************************************
 |
|
.
***************************************************************************************************************************************
Vol-056-1: Video #327: Introduction: In this 6 part video tutorial series, you will learn how to master my Faux Flaking Rust Technique, which can be used in many different projects, including the Steampunk Bracelet I show in this series. I think you’ll be pleasantly surprised by how much you will learn in this Faux Flaking Rust project series.
Vol-056-2: Video #328: Creating Faux Rust Slab: In this video you will learn how to make your own custom rust color blend, as well as creating the Faux Flaking Rust slab, using interesting inclusions and my own special layering technique.
Vol-056-3: Video #329: Flaking and Baking: This video teaches you how to get the perfect flaky and peeling pieces of rust and how to bake them to perfection. I will share with you tips and secrets to getting a durable and awesome looking Faux Rust components for your jewelry pieces.
Vol-056-4: Video #330: Antiquing and Drilling: In this video you will learn how to enhance your rust pieces by giving them a realistic looking antique finish. As well, I’ll show you how to seal them to ensure durability and comfortable wear. Plus, we’ll be drilling the hole using a special tool that gives a clean professional finish every time.
Vol-056-5: Video #331: Adding the Gears: Here’s where you add the gears and other found or purchased objects that will make your bracelet, one of a kind. This is the step where you can let your Steampunk creativity run wild.
Vol-056-6: Video #332: Making Jumprings and Clasp: Finally I will show you how to make your own professional quality jumprings and clasp so that you can have control over the material, size and number of findings you need, when you need them!
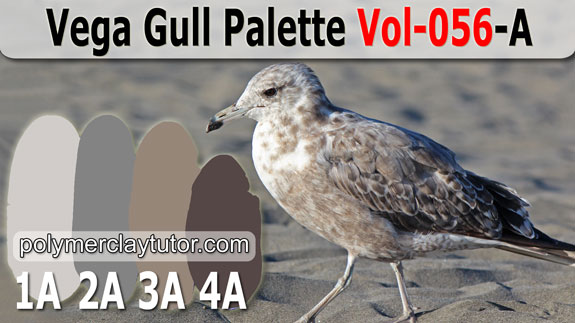 |
1-A: Seagull 2-A: Monsoon 3-A: Vega Gull 4-A: Gull Wing . . . . |
Seagull is a light blue gray neutral found in the soft head and belly feathers on this coastal sea bird. Monsoon is the deeper blue gray found in the speckled feathers on his wing. Vega Gull is the soft mushroom taupe which sets this variety apart from most other more gray and white seagull varieties. And Gull Wing is the deep brown gray found on the tips of the wing feathers.
***************************************************************************************************************************************
|
|
.
***************************************************************************************************************************************
Customer Reviews: Faux Flaking Rust Bracelet (6 Videos):
- Wonderful tutorial. I just love it. I’m a retried operating engineer and worked around equipment that had rusted to the point of peeling. I would dread it but was always fascinated by the colors and process. Thank you for turning my dread into excitement. I have had a mid winter block until now. I can’t wait to get home and try this making my own rust. I could also see this in dark greens with paprika, pepper, and turmeric. I am really enjoying all of you tutorials. Great camera work also. Please Thank Doug also. ~Denise-O
- Cindy – You’re simply the best :) Steampunk being one of my most favorites to create. I always knew there was more out there than just watch parts (although taking apart old watches is quite fun and relaxing:), keys, hearts, etc, etc. I was missing something…. RUST!! You have found my missing object to complete the look. Is there “anything” you cannot think of to do? LOL. Keep on cranking out the great ideas and passing them on. Thanks again for all of the hard work that you and Doug put into every tutorial. ~Susan-R
- Faux flaking rust… awesome! :D Thank you very much for investigating this technique, Cindy! Luckily I have a relatively free weekend for claying coming up, otherwise I’d be *most* frustrated! LOL When I try this out I’ll probably go for an industrial-theme look with combinations and layers of various faux rusted metals (no steampunky bits on hand). I love the idea of combining it with rivets too. ~Sue-F
- I am soooo super duper excited about this series!!! I just about squealed watching this. LOL! Too excited for words!!! ~Hope-M
- Will absolutely make a bunch of rusty stuff! This right down my alley! Love RUSTIC jewelry. ~Patt-W
- Cindy – Just finished watching this set of tutes. My mind is racing with ideas. You are so inventive. Cannot wait to try it later tomorrow. I loved those shipwreck pics Doug took while you were on the road, and with my Dad, collecting metal for use in the future and all the gadgetry, my head is filled with color and design possibilities. Thank you so much!!!!! ~Jocelyn-C
- Hey, Cindy! What a beautiful set of tutorials! I just was swamped with ideas for using this technique. I also appreciated seeing how you made the findings. You always keep us so excited! Also will look on Pintrest. Thank Doug, too! Love ya! ~Andrea-P
- This sounds cool. I think I would use this technique on a clock face. I have been looking for an idea to make a clock with and this might be it! ~Catalina-L
- Just watched all the tutes and I am so excited to try this. Cat has an awesome idea about using this technique for a clock. I can’t wait to see what she comes up with. My grandson wants a bracelet. It should make some really cool jewelry for guys so that will be my first attempt. Men’s jewelry. Hopefully I will be able to work on some next week. Then I think I am going to take a piece of my barn siding I have been wanting to make a name plaque for our new TV room. I think the letters for our last name would look totally cool in this technique. Cindy the inspiration you have sent my way is just a flying through my head. I am so looking forward to working on these ideas. You and your artistic talent and Doug’s filming. It just doesn’t get any better than this. Thank you once again for another A+ #1 tutorial. Pure Genius!!!!!!!!! ~Peggy-B
- Dear Cindy, love this project, I made a pendant came out grate, but on the step of putting the black acrylic paint I added at the end a drop an I mean very little of the Metallic copper, mixed with the black , loved the result… Keep up the good work , we learn a lot. ~Idita-L
- Love your site and am amazed by all the info!!!!! Should have joined a long time ago..!!!! ~Andrea-S
- Loved the tutorial and had a duh slap myself on the forehead moment when you made the jump rings!!!! I never thought to turn my flush cutters around to get the smooth end on the other side of the ring! I could never figure out why my jump rings wouldn’t come out right, lol. Thanks for the wonderful project. ~Michelle-A
- Michelle – Me too! I was like ‘well duh’. Could not believe with all the reading I do – that one Important tool move Never sank in to this old brain. ~Tantesherry
- Thank YOU, Cindy, for developing the technique and sharing it with us! It was really fun. :) It’s also really versatile, and I can think of loads of things to try, e.g. using the rusty look in nautical, marine and even country themes, or veering off in the slate-like direction and making faux shale slabs “split apart” to reveal faux fossils (although mine would probably look like aliens :D). There’s a lot more I want to try with an industrial theme too… maybe even some decorator items, which I’ve never done in polymer clay before. I think I’ll keep my paprika in the studio rather than the kitchen from now on! (It’s smokey paprika which has a lovely smell, and it made me rather hungry when I was applying it! LOL). ~Sue-F
- Oh wow, I cheated and got up at 3:30 am to watch the video series and love it! You can’t make it look bad and the dark green from Denise’s suggestion sounds wonderful. Maybe I could add some crustaceans to that color and give it more of a deep sea effect, who knows, it will be fun just to explore. I love the clock face with the very rustic look though and will definitely be making that. By the way Sue F. thanks for that in depth explanation you put out there. I just love the exchange of information on this blog. It was really a fascinating read especially the way you disassembled the information and then kind of built it back together again. Good Job! ~DixieAnn-S
- Another thank you for these videos … I look with great pleasure, even if sometimes I do not understand everything! But the fact that you speak slowly it helps tremendously. See you soon. ~Rosa-P
- Ahaha, sooooo Cindy I love this technique. Just grabbed some silver I had around in the binder, slung it through it threw with some transparent and black patches, used black pepper, poppy seeds and some black mica. Then the toothbrush and fingernail brush (lol, all I could find), and some black antiquing, a dab of canuba wax and a quick buff. Wow!!!! Very versatile, cannot wait to try it with deep reds/transparent/brown and see how that turns out. Doesn’t need to scream rust to be gorgeous. ~Jocelyn-C
- Best Internet polymer clay tutorials. If you can’t make something based on one of Cindy’s tutorials, then maybe polymer clay isn’t your thing. ~Jill-V
- As I get to know more and more about you, Cindy, and all the folks in this group and all the PC artists all around the world, there is something I cannot get over no matter what — you are all such generous, supportive, happy, creative people! You are ALL sweethearts and I really needed you all in my life! Thank you so much and pardon my gushing but I could not and did not want to help it. Love. ~Andrea-P
- I love this tutorial. I used it to make some faux leather jewelry with the brads like shown in this one. I forgot the peppers so it wasn’t quite rust. Turned out nice tho! Thanks! ~Lisa-Marie-C
- All of Cindy’s tutorials are perfect and so easy to follow, no problems at all. What once seemed impossible is incredible. Inspired from the best. Many Uuuuuggggs. ~Peggy-B
- I have been having lots of fun playing with the faux rust tutorial. Paprika is everywhere. Who knew you could have so much fun with a spice. ~Jocelyn-C
- I’ve been a subscriber for years now and can honestly say that your video tutorials are so exhaustive, that I rarely ever need to ask follow questions. Keep up the great work. ~Vierra-C
Customer Reviews: Vega Gull A-Series Palette (4 Recipe Cards):
- Such a lovely palette. I love these neutral colors; they go with most anything. I just knitted a scarf for my friend as a Christmas present and it has these exact same shades. ~Cherie-H
- Cindy, I’m really liking this gull palette as I was looking for some neutral colors to make a background clay to go with my next project which is transferring a toner design onto a lighter clay and these colors are beautiful. I have never done this technique so am excited to try, that is, after I dig myself out of the blizzard we are having right now! I am going to have to go back though and read all your do’s and don’ts before starting. You always seem to have the perfect names for your color palettes! ~DixieAnn-S
- Cindy, I love these colors from the beach. Clean and soft, fresh and neutral. Cannot wait to try them in their colorway on a project. They soothe me. Freckly birds are almost always immature. Seabirds and raptors can go through many plumages for some years before they reach maternity. Sibley is my bible. And observation. The nieces loved the gulls that swooped in for their held up McD fries, and the younger labeled this stage, “teenagers.” After I watched them interact with their elder flock, lol, I realized she was exactly correct. ~Jocelyn-C
- Aren’t these blues beautiful? Can’t wait to make the recipe cards. Love, love, blue. ~Patt-W
***************************************************************************************************************************************
|
|
.
- Did You Know… that by purchasing an ongoing membership to this Polymer Clay Library, you will save over 66% on all future Videos/Recipes. Full details here: Become-A-Subscriber-Member
- Link To Go Back To Top Of This Page: Volume-056 Back Issue Package
- Purchase Other Single Volumes Here: Polymer Clay Tutor Back Issues