Purchase Vol-054 Back Issue package | $9.95 (US) One Time Fee
| In This Vol-054:
Faux Jasper Cabochon (6 Videos) Plus: Concord Grape A-Series Color Palette (4 Recipe Cards) |
***************************************************************************************************************************************
 |
|
.
***************************************************************************************************************************************
Vol-054-1: Video #309: Introduction: In this 6 part video tutorial series, you will learn how to make beautiful Faux Jasper Cabochons in your own custom color blends that will rival the real thing! These stunning faux stones can then be used to create one of a kind jewelry pieces such as pendants, necklaces, earrings, and more. The videos contain all the information you need, from clay to polished faux stone, so that you can easily create your own focal cabs in any size, color and style you choose. All this to satisfy your inner rock hound desires, without having to invest in the expensive tools and the time it would take to work with actual stones. I think you are going to enjoy the creative freedom of creating your own Faux Jasper Cabochons, using this informative tutorial series!
Vol-054-2: Video #310: Custom Jasper Color Blends: In this video I am going to show you some secret spicy recipes for making realistic faux Jasper Stones. You will also learn how to take your chosen stone blends and layer them into a Faux Jasper Sheet that you will then use to make cabochons, molded pendants, beads and other faux stone projects.
Vol-054-3: Video #311: Forming Your Cabochon Shapes: A cabochon or cab, is a common shape used for cutting stones and other materials used in jewelry making. A cabochon is generally flat on the back and has a domed top surface, but can be almost any shape including round, oval, square, teardrop or free form. In this tutorial I will show you how to create a teardrop cabochon as well as a round cabochon shape, entirely by hand. I will also share tips and tricks for making sure you get the best face of the stone showing in your faux Jasper cab… its much easier to do in polymer than it would be in real stone!
Vol-054-4: Video #312: Faux Carved Leaf Mold: You don’t need to restrict yourself to only making Cabochons and Beads with this Faux Jasper Technique. You can also use your custom clay sheet to create awesome molded pendants, charms and embellishments that have the look of real carved stone pieces. It is easy to do too! Especially when you use the wonderful silicone molds from www.amstamps.com which are available from one of our PcT members, Linda Hanson. She also hosts art retreats at her After Midnight Ranch in Sonoita, Arizona.
Vol-054-5: Video #313: Proper Baking and Sanding: In order for your faux stones to actually look real, you are going to need to properly bake and finish them. A lapidary artist (someone who cuts and polishes real stone), does not simply grab a rock and brush a shiny glaze on it. They carefully cut, grind and polish the stone, sometimes spending hours in order to reveal the beautiful design characteristics of each piece. It is a big part of making the stone valuable. This is also true when creating a faux stone out of polymer clay. You can’t just throw it in the oven… slather on some Future Floor Finish… and expect to be done. You will need to put some love and effort into your Faux Jasper creations. But the work will be worth it! You’ll see what I mean when you take your $5 cabochon to the $40 level, just by following this simple and important advice.
Vol-054-6: Video #314: Waxing, Buffing and Drilling: Let’s take your Faux Jasper Cabochons to the professional level by bringing that shine up to an even higher glossy finish. In this tutorial I will show you how to use a rotary tool to wax and buff your Faux Jasper to a high sheen. I will also give you some low-tech options should you not be ready to invest in power tools quite yet. You will learn the tips and tricks for getting a professional quality finish. And I think you will be surprised at just how easy it is to achieve. Trust me, once you hold that buttery smooth glossy stone in your hands, you’ll never look back… its truly addictive!
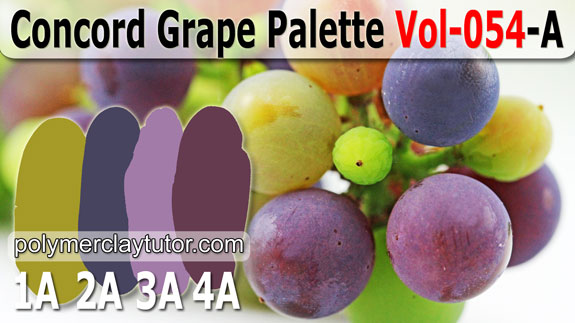 |
1-A: Green Grape 2-A: Concord 3-A: Purple Rain 4-A: Grape Cluster . . . . |
Green Grape is the name I chose for the dusty green shade of the unripe grapes in the cluster. Concord is the deep blue of the fully ripened Concord grape and the future color of the rest of the bunch, should they get the chance to fully ripen. Purple Rain was picked as the name for the hazy lavender powdery color seen in the highlights of the grapes midway through the ripening process. It is also the name of my favorite Prince Album from the 80′s and the only name I could think of that had any relevance to a cluster of grapes. And Grape Cluster is the deep wine purple found in the grape at the back of the bunch.
***************************************************************************************************************************************
|
|
.
***************************************************************************************************************************************
Customer Reviews: Faux Jasper Cabochone Project (6 Videos):
- Fabulous tutorial Cindy! I stayed up to 12:05 a.m. Friday because I was so curious as to how these faux jasper cabs were made. Great stuff you have there! ~Elsie-S
- Ooohhh, they are gorgeous, Cindy. Bliss, bliss, bliss… Thanks to all, Lietz family. I cannot stop rewatching the series, and I see something new every viewing. The tute is fabu! ~Jocelyn-C
- Cindy – Great tutorial this morning! Your first of the month tutorials are my Friday guilty pleasure. I get a cup of coffee first thing in the AM and check them out. Thanks for all of your hard work and dedication to your art. ~Christine-A
- Right up my alley! ~Michelle-L
- I have been subscribed to Cindy for a long time and I have found the information invaluable. It is really worth the price, which is very reasonable. She is really good with her instruction, showing you step by step. With practice I have learned to create all types of stones and other pieces using polymer clay. I love working with polymer clay and Cindy is a great instructor. I get to play the videos over and over until I get it. I give credit where credit is due and Cindy deserves it. ~Ifama-J
- I’ve just finished some projects I made for my friends and family and am so proud… there is so much stuff Cindy teaches and a person could read up on this stuff, but she helps put it all together with her teaching… I love her! ~Patty-J
- I haven’t used any cabs in my designs, but I just love jasper beads in all their array of colours and shapes. ~Monique-U
- Cindy you really are a gem (couldn’t resist that). A big thank you, and I swear I picked up your thoughts a couple of weeks ago as I shopped for black pepper, paprika and other spices (and they were not even on special offer). Love love faux stones and Agate was on my list to do, following written instructions, (not easy). ~Elaine-F
- WOW I love Jasper so I can’t wait to try the tutorials. ~Jeanne-C
- I’m so glad that you covered wet sanding again :) Even though I’ve been doing it for years there has always been this question in the back of my mind ‘do I Really have to get up and rinse the sanding water bowl and beads after each grit’? Truly I’m not being lazy – it’s a pain level thing – So… when you went from 320 to the rust colored pad w/o rinsing was that just for the convenience of filming or is that your normal way? Also wanted to say WOW these are Awesome. Another wonderful reason to read/join this site – you ask a question and…. TaDa you get an answer – Love it! ~Tantesherry
- Wow Cindy the Jasper tute was excellent. I was glad to see you didn’t rinse after each sanding. It was always a pain to run into the other room and get fresh soapy water for each change of grit. Thanks so much for that! I was surprised at how much I learned from this tute in regards to the buffing and sanding, let alone the color combinations of the Jasper which by the way I never had heard of until this tute. I went online and researched them and also checked out Elaines site which was excellent. I fell in love with the Rain Forest Jasper so am going to dive right in and try it. My first priority however is to make that fabulous buffing wheel you had on your dremel. Thank you so much for the link to the Molds. I got the 3 leaves, the oak leaf (or was it maple?) and the 3 different sizes of the Ginko which is one of my favorites and have done a lot of machine embroidery in that design. ~DixieAnn-S
- Loved the tutorial! I’ve made a lot of jewelry with jasper and I love combining them too with other stones etc. The red jasper you made to match the necklace was just gorgeous. I have a few of your tutorials that I just have to get done – they are all wonderful, but I just have to try some of my favorites and this is one of them. ~Cheri-H
- Cindy – Absolutely stunning leaf! And the cabochon with the knitted wire technique – how funny that it looks like a pink sailboat on the sea. Really looking forward to trying this technique. Thanks! ~Maria-C
- Great tutorial – thank you. ~Cara-L
- Wow! Another cool tute!! I will make these for sure. I think once the holidays get behind us I will have a lot of free time to get lost in clay. Going to research the diferent colors of Jasper! ~Catalina-L
- Very, very nice, Cindy! :D I love your faux brecciated jasper: the colours are gorgeous and the patterning is stunning! It’ll be fun to make some donuts using your technique, and I have trouble getting large slab-shaped beads in real jasper so I might make some of them too. I also think I’ll have to try making faux blue impression jasper, as it’s currently my favourite form of the stone. It’ll take a bit of adaptation but you’ve inspired me! A couple of thoughts on sanding… I really like sanding with Micro-Mesh, but NOT(!!!) with the little coloured Micro-Mesh sanding pads as I find them too small, too stiff, and prone to come apart. I like the Micro-Mesh sanding sheets which are available in many different sizes (I buy 150mm x 300mm and cut these into thirds to use, i.e. 150mm x 100mm). They’re big enough to easily sand larger flat items, you can wrap them around curved surfaces for faster sanding of such shapes, and you can fold them around a block sponge or a foam block if you want a firm but semi-pliable flat backing. They’re extremely durable, and they even have the grit number printed on the backing cloth so you don’t need to refer to anything else to make sure you’re using them in the intended order (which was another thing I disliked about the sanding pads; I wrote numbers on those but they washed off). Being an Aussie I get Micro-Mesh sanding sheets locally from The Sandpaper Man (thesandpaperman.com.au/sheets-150-mm-x-300-mm) but they’re not that hard to find. And I’m one of the people who DO change the water with every sanding sheet grit. I hate hand sanding and tend to wait until I have enough pieces to make it worthwhile doing them production line style, so the water is too dirty after each grit to not change it. But it’s not a hassle because I do the sanding in the bathroom! (Great lighting, water and drainage right at hand, and it doesn’t matter if I splash water around the place…). ~Sue-F
- Looooooooved this tutorial! ~Marcela-S
- Cindy, I’ve been busy all day sanding a batch of faux green Australian jasper. Your tutorial on this was outstanding! Thanks so much for all of your wonderful work for us! Now I won’t have to buy my jasper at AC Moore anymore . . . :) ~Michelle-L
- Hi Cindy, I’m loving learning for you. Your way of teaching makes claying fun again. I’m hooked on the best drug around… Polymer Clay and your Tutorials! What a way to live and love live in the South:). Thanks again for your help with getting my account straightened out. You rock! ~Susan-R
- Love the new format of your classes. ~Dorothy-H
- I must say I love your work and the videos, keep the good work going. ~Ida-L
- Cindy – This was the best video and exactly what I have been looking for. You went from start to finish and also included the sanding and buffing which was a great demo. Then you also covered costs when they are not finished and what you can get if you do finish. That was also very helpful. Your other videos were good too and I have learned a lot but this new format is Fantastic. You are a great teacher and mentor. Please keep the videos coming. Thanks. ~Cindy-P
- Cindy, thank you so much for the tutorial on making the Jasper beads. I can’t stop, I’ve made beads, buttons, I love them. So many different looks. Can’t wait for the next batch to come out of the oven. ~Margo-A
- Thank you guys so much for your hard work, I benefit so much from your videos. Your guys are a blessing in my life. Am making lots jasper and in sanding I found that using those rubber finger tips (that you use to sort paperwork with ) really helps. ~Rosy-S
- I have always loved true Jasper, and I felt I should be able to make acceptable polymer look-alikes. Thanks for the confidence you impart by sharing your method. ~Pam-M
- Hey Jocelyn I found some clear shoe polish, and its fantastic such a shine on the clay, thanks heaps. ~Sandra-J
- Hi Cindy, I just purchased a subscription (yay!!) and I have been wanting to do that for awhile. I just finished watching your series of videos on making a faux jasper cabochon. Your videos are phenomenal! You explain things thoroughly and clearly, and you don’t miss or skip any steps. It is an absolute joy to sit and watch you go through the process – I feel like I just attended a class I should have paid $100 for. I am so excited to see what other videos come my way! Thank you for all the hard work you put into making these videos and coming up with color recipes. Your work is truly amazing. ~Karen-R
- Hi Cindy, I recently bought your Faux Jasper #054 video series. This tutorial did strange things to me… it made me so very happy! I have used it two or three times lately and have gotten some beautiful results. You do affect people’s lives in a positive manner. Keep doing it! Sincerely. ~Athalyn-R
Customer Reviews: Concord Grape A-Series Palette (4 Recipe Cards):
- Boy… you sure made me lol!!! If we don’t see Fisher in upcoming videos we’ll know why. Love these color shades. They made me want to go get a glass of wine. I’ll wait until later. Happy claying all. ~Pollyanna
- Beautiful. ~Teresa-D
- Nice colors… and nice photo, too! Makes me hungry for grapes! ~Michelle-B
- Grapes are a real staple here at my house. If I am out of grapes I almost panic. They are a wonder source of antioxidents and are a great source of keeping my blood sugar levels even with less food. I love these colors and I have a feeling Cindy is going to have a gorgeous project coming up in these colors. ~DixieAnn-S
- The color chips for November… Luscious! ~Andrea-P
- What an Edible palette! Purple (and Orange) are my favorite colors. ~Patt-W
- We are a family of grape-lovers here, and hubby makes wine regularly. I am jealous of your mini-vineyard, Cindy, but I can be content just having these great colours in clay to console me LOL. ~Monique-U
***************************************************************************************************************************************
|
|
.
- Did You Know… that by purchasing an ongoing membership to this Polymer Clay Library, you will save over 66% on all future Videos/Recipes. Full details here: Become-A-Subscriber-Member
- Link To Go Back To Top Of This Page: Volume-054 Back Issue Package
- Purchase Other Single Volumes Here: Polymer Clay Tutor Back Issues