Purchase Vol-082 Back Issue package | $9.95 (US) One Time Fee
| In This Vol-082: Fire & Ice Kitchen Utensils (6 Videos) Plus: |
***************************************************************************************************************************************
 |
|
.
***************************************************************************************************************************************
Vol-082-1: Video #633: Introduction: In this 6 part video tutorial series, you will learn how to use translucent and metallic polymer clays, inks, and metal leaf to create two different exciting techniques. One that looks like fire, and the other like ice. Then you will use these fire and ice clay blocks to create colorful translucent sheets of polymer that you can wrap around glass salt and pepper shakers, kitchen utensils or whatever else you would like to use these cool looking surface techniques (bottles of hope maybe). The things you learn in the tutorial can also be transferred to other projects such as home decor items and jewelry. You’ll be surprised how much is packed into this awesome tutorial.
Vol-082-2: Video #634: Ink And Leaf: In this video, I’ll teach all about how to make the mokume gane style polymer clay fire and ice cane, or slab as some call it, by blending alcohol inks into translucent polymer clay and layering with metal leaf and metallic clays. The colors choices will give the warm look of fire, as well as the cool look of ice. But you could use any color combination you choose, to come up with your own look as well!
Vol-082-3: Video #635: Cutting, Stacking & Rolling: In this video, I will teach you how to impress your stacks of layered clay, using inks and metal leaf, to create the unique look of fire and ice. I will then show you how to compress, shape, slice and roll your stack until you have a workable sheet of color, design and dimension. These neat looking sheets of clay will be used to make the kitchen utensils and accessories shown in the intro video, but can also be used in many other projects as well. Lots of options here.
Vol-082-4: Video #636: Covering Glass Shakers: In this video I will share with you the secrets to adding a paper thin sheet of polymer clay to a glass salt and pepper shaker, or any other glass item you desire. I’ll show you tips and tricks for creating a seamless, bubble free, and blemish free piece, that will not only turn out beautiful, but professional looking as well. When done using these simple techniques, your glass shakers will look as though the design was painted or enameled right onto the surface of the glass.
Vol-082-5: Video #637: Covering Utensil Handles: In this video you will discover the right way to add polymer clay to metal cutlery and utensils. The first step is to learn why it is important to build the right base for your piece, and to make sure that it is properly shaped and finished before even adding your special clay veneer. You will then understand why multiple baking steps will be necessary. Next you will learn the tips and tricks for adding a flawless layer of colored translucent clay to your utensil, and you will find out how to baking your pieces to achieve professional looking results every time.
Vol-082-6: Video #638: Sanding And Finishing: In this video you will find out what’s needed to beautifully finish your pieces. From giving it a good sanding and buffing… to using Renaissance Wax as a final coating. Your guests will be impressed with the kitchen accessories that you create. These are items that you will definitely be proud to give away as gifts to your friends and relatives. I’ll also talk about the proper care and washing instructions for these polymer clay utensils, so they will be last for years to come. Now you can always use these techniques for jewelry projects, but won’t it be nice to finally bring some of your your polymer into the kitchen? I hope yo have fun with this one… and please do share your pictures with me!!!
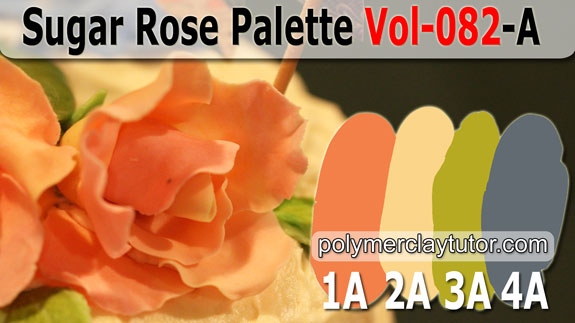 |
1-A: Sugar Rose 2-A: Buttercream 3-A: Sugar Leaf 4-A: Gumpaste Hydrangeas . . . |
Sugar Rose is the soft pastel coral color of the delicate petals of the sweet Gumpaste rose. Buttercream is the soft creamy beige of the buttercream frosted cake. Sugar Leaf is the light yellow green found in the sugary rose leaf accenting the cake. And Gumpaste Hydrangeas is the smoky blue shade of the blue hydrangea blossoms behind the roses (hiding under the top title bar in the photo) and falling down the backside of the flower adorned birthday cake.
***************************************************************************************************************************************
|
|
.
***************************************************************************************************************************************
Customer Reviews: Fire & Ice Kitchen Utensils (6 Videos):
- I’ve talked about doing this, but didn’t know how. Thanks Cindy. ~Peg-C
- Oh boy, beautiful and practical in one go! I am a major fan of tools and utensils, so getting to embellish my kitchen stuff will be fun. I have tried covering some metal things and found that, as Cindy says, this has “some challenges.” ~Fran-V
- OMG, OMG. Cindy this is soooo so beautiful. I love the results. My ice shaker is gorgeous! Oh my goodness how beautiful. This is going to be a favorite. I love it. I can totally see this as votive candles it would be so pretty with the glow of the candle through the translucent. Thanks again for a technique we can use in so many ways. And you solved another issue for me. So great job reading my mind from so far away and coming up with the solution once again. ~Karonkay-C
- Oooooo, cool tutorial or should I say hot, lol. ~Michelle-A
- Wow! I watched the intro very, very late last night. I just love the way these projects look. I was wondering, what about dragging a fork through the fire cane in a squiggle like manner? Would it make it more flame-like? I love the look on your new ones, but the old flame effect on the older salt and pepper shakers is somewhat different. I love it all, but really, they are all truly masterpieces! Thank you again, Cindy and Doug. It has been quite some time since I last touched any clay. Happy Claying!!!! ~Marianne-O
- What a fun tute! I love trans colors – they are so “alive”. I have several glass vases (from flowers sent) to play with. They will be transformed into things of beauty! I have a lavender rose that needs a special vase… now she can have one!! TY for such a neat tute. ~Patt-W
- Cindy, I appreciate all the effort you putting into these tutorials. Sometimes, when we are new to it, we want our product to come out looking exactly like yours does the very first time we make it. Mostly the beginner jewelry makers. Well, I have found out that it does not always look as pretty as yours does, and some feel that they cannot do it. But one thing people must understand is that it is going to take time when working with polymer clay to get it right…. The techniques you are teaching us runs into all of the polymer clay products because of the nature of the clay and it is teaching us to handle it. Main thing, is to stay with it, and if you get discouraged the first time you made it; go back later and do it again as it will turn out differently with more practice. I really appreciate all that you do, and I am learning so much from watching your videos…. Thank you for sharing your knowledge with us, and you are definitely appreciated. ~Suzanne-H
- Hi Cindy, I can’t believe how well timed this video was. I have been covering candle holders that we put our Jewish Shabbat candles in on Friday night. The candle melts down to a clear liquid and looks great with the wrapped polymer clay. I’ve also done mini salt and pepper shakers and they sell very nicely with matching candle stick holders. Thanks for all your inspirational videos and pc tips. ~Natalie-H
- WOW and GORGEOUS. I am not a covering fan (yet), but, oh the possibilities of jewellery are running around in my head. I’m off to the studio to make the canes. I just love, love the effect. Thanks Cindy and Doug for your fantastic videos and commitment to this band of clayers. ~Sandra-J
- Thanks for yet another great tutorial, Cindy! Even when I don’t do the projects exactly as shown, I always love watching the videos. I’m thinking candle holders here … :-) ~Lesley-S
- I must admit, I’m a jar hoarder. I have a gazillion different jars in my clay room. Hubby is always finding empty jars in the sink or dishwasher and asks, “do you want to keep this?” and I always say, “Yeah, I thought I’d try to cover it.” Now I have the PCT techniques to actually try it! Thank you! Poor Hubby, he’s probably afraid I’m going to start buying weird stuff just because it comes in cool looking jars. LOL! I’ve also been meaning to give a big shout out to Team Lietz on your videos. They are so professional. I put them on full screen and they’re so clear and detailed. Even down to Cindy’s shirt fabric. :-) ~Dawne-B
- This is my first full tutorial, as I just joined the paid members set. I paid for a set of tutorials earlier, to get a specific back volume, and that prompted me to join up. Amazing how many people say “This was so timely …” It is for me also, as I have been experimenting with covering glass votive holders. I like what I have done so far, but this is going to take it a step further! Also, the Renaissance Wax looks like a brilliant product. I have been looking for something other than varnish for some of my pieces, and this could be the answer. Thanks SO MUCH, Cindy! This Fire and Ice concept is sparking my brain to look at other colour combinations also. ~Doreen-N
- Hi Cindy, Thank you so much for what you do. You are a great teacher and you keep polymer clay fun for me!!! ~Vivian-B
- You will learn LOADS here. The (PcT) forums are friendly and helpful and Cindy’s videos are outstanding. She’s always very thorough and explains things well. Also props to Doug for all the behind-the-scenes work! ~Karen-K
- Hi Cindy, I just watched your Fire & Ice Utensils videos… Love it! I have so many ideas for this technique. I was thinking of putting them on Christmas ornaments. Thank you for all the videos and tips. Keep up the hard work! Best Wishes. ~Kim-K
- Hi Cindy! With your videos I so often feel as if you are holding my hand as I try to put into effect what you teach me. Thank you. ~Julia-G
- Love this tute. Tried the ice… perfect. Tried the fire…. ummm, not the same as your first shaker. Has anyone tried any tips or techniques that gets the fire closer to the fire shown in the first shaker? Love it if you would share any modifications to get the same effect. Cannot wait to overhaul all the metal cutlery since I hate my wedding pattern. Then on to the rest of the metal kitchen aids. Your color palettes will be invaluable here. So excited. Might even do my toothbrush, heehee. ~Jocelyn-C
- Went and purchased shakers yesterday. Mine are different than typical but think they will work out well. Mine will be the ice as you have done. But am wanting to use fire cane I had to make at Christmas for special order spider. It was for a fireman, they wanted him to look like fire. Thanks for your hard work on these. I appreciate all the time you and Doug put in for us. Hugs. ~Karonkay-C
- Thanks for all your inspirational videos and pc tips over that past 4 years. Can’t believe that I have been doing polymer clay work that long, and with your great tutorials I can see how far I have come. Thank you from the bottom of my heart. The thanks goes to Doug too!!!. ~Natalie-H
Customer Reviews: Sugar Rose A-series Color Palette (4 Recipe Cards):
- After mixing up and baking 422 color recipes, no one appreciates your color recipes and the time consumed to get us the final ones more than I do. It’s like the Neverending Story of Color and I can’t tell you how many times I have ran over to get my recipe books to look up a color combination that would fit the bill for my project. Thank you for all the work you two do. ~DixieAnn-S
- I love the colour pallets and how clever of you to use the “Skinner Blend”, I usually make my petals in four or five separate blends, but you (as usual) think outside the box and find the easier method. Well done Cindy, now all the family will now expect a “Cindy Cake” on their Birthday … cheers. ~Elaine-F
- What a beautiful cake for a beautiful lady! You really out-did yourself Cindy. We didn’t know you were a baker too. Talent galore… Thanks for all the pretty colors in this palette. ~Patt-W
- Dear Cindy – everything looks beautiful and I am sure the cake tasted great. Please tell Harriet that I would love to look like her if God keeps me on this earth until I am 80 ;) ~Constantina-P
- I just wanted to tell you how much I am enjoying the new website and I am finally getting around all the links with ease, thanks for explaining. I am excited to try out all the new color cards and I will definitely tell all my fellow polymer clay guild people about this website especially because that is the number one problem with so many — colors and mixing. I think I am going to start to finally like my finished products enough to put them on Etsy. Thanks again. ~Lupe-M
- Hi I have been doing polymer clay for awhile now and have seen a few color charts but I think your recipes are the best I have seen. A friend of mine had sent me the link to your videos and I have enjoyed every one of them so far. Thanks for being such a great person. ~Linda-G
- Hi Cindy. I was thrilled to discover your site and so happy to see the color recipes. I’m brand new to this and am happily overwhelmed with all the possibilities. Your info and kindness is unbelievable! ~Lucian-T
- I’m still new at mixing colors. I have a few colors to work with and then I see another one in the recipe I don’t have so that’s frustrating when I am ready to mix my colors for a bead. Some day I will have all the basic ones. Thanks for the recipe it helps so much. ~Brenda-E
- Hi Cindy, Sorry I’m being so impatient! I look forward to Fridays for your videos and recipes. I don’t have too many colors mixed up as yet, but am going to do as many of the recipes as possible and make myself the color samples to attach to the cards. That will make it so much easier to choose my colors. Warm regards. ~Cheryl-H
- I am very new to polymer clay and one of the scariest things to me was mixing my own colors. Your recipes have really spelled it out for me… and makes me less intimidated to try it, now I have the gusto to give it a go and I am really enthused about it. My husband wants to know if you give cooking lessons too… since I am so excited about clay recipes now, he wants me to be this excited about being in the kitchen. Hugs. ~Lisa-G
- I am always amazed at the beautiful color recipes you come out with and the lovely names for the palettes as well as the stories that go with each. Thanks to you and Doug for all your hard work – the thought that goes into each recipe and tutorial, the testing, filming and teaching. Your are awesome!! ~Cherie-H
***************************************************************************************************************************************
|
|
.
- Did You Know… that by purchasing an ongoing membership to this Polymer Clay Library, you will save over 66% on all future Videos/Recipes. Full details here: Become-A-Subscriber-Member
- Link To Go Back To Top Of This Page: Volume-082 Back Issue Package
- Purchase Other Single Volumes Here: Polymer Clay Tutor Back Issues