Purchase Vol-060 Back Issue package | $9.95 (US) One Time Fee
| In This Vol-060:
Faux Burl Wood Pens (6 Videos) Plus: Barnacle A-Series Color Palette (4 Recipe Cards) |
***************************************************************************************************************************************
 |
|
.
***************************************************************************************************************************************
Vol-060-1: Video #376: Introduction: In this 6 part video tutorial series, you will learn techniques and tricks that will have you creating stunning, unique and professional looking Faux Burl Wood Pens as well as jewelry and other great looking polymer clay projects.
Vol-060-2: Video #377: Faux Burl Wood Cane: In this video I will show you how to create your own one-of-a-kind Faux Burl Wood Cane in the colors of your choice. This cane mimics the swirling knots and the sparkling grain that is so distinctive in real Burl Wood specimens.
Vol-060-3: Video #378: Creating Burl Wood Sheets: In this video I will show you how to manipulate slices taken from your Faux Burl Wood Cane, and create sheets of clay that mimic sheets of real Burl Wood Veneers. These sheets can then be used to make a wide variety of polymer clay projects.
Vol-060-4: Video #379: Covering The Pen Blanks: Here I will show you the tips and tricks for wrapping the Burl Wood sheets around the brass pen blank barrels, in an easy yet flawless manner so that your pen is not only durable and well made, but gorgeous looking too.
Vol-060-5: Video #380: Sanding And Finishing: Whether you’re making pendants or pens with this Faux Burl Wood technique, you are going to want to give them a beautiful, professional finish. You do that through proper sanding, buffing and waxing your piece. In this video I will show you how!
Vol-060-6: Video #381: Assembling The Pen: This is where the whole thing comes together! In this video I will show you how to properly assemble your pen parts into a gorgeous pen. And it is easy with my secret trick… even if you don’t have one of those cool pen press machines! I will also share some other options should you choose not to use the pen kits that I suggest for the tutorial. So even if you don’t want to make a pen with your Faux Burl Wood technique, you will still have tons of cool ideas to play around with.
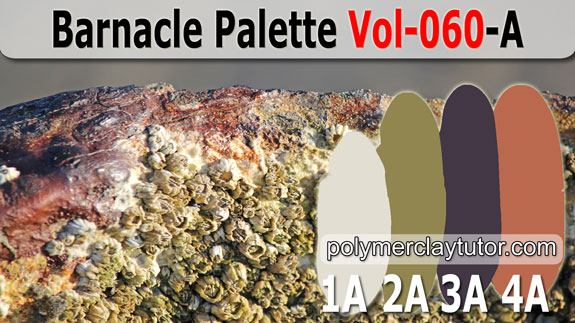 |
1-A: Barnacle 2-A: Algae 3-A: Purple Sea Star 4-A: Oxidation . . . . |
Barnacle is the grayish, putty colored white of the barnacles encrusted on the rocks and the chunks of rusty shipwreck remains lying on the sandy beach. Algae is the dusty olive green of the algae growing on the barnacles hard exterior shell. Purple Sea Star is the deep dark purple found in the weathered rusted parts of the metal. And Oxidation is the soft muted orange shade of the ships metal as it rusts away in the salty marine environment.
***************************************************************************************************************************************
|
|
.
***************************************************************************************************************************************
Customer Reviews: Faux Burl Wood Pens (6 Videos):
- Cindy, these little jewels will sell like hotcakes… thanks so much for branching out. Almost want to put one of those ball chains on them like the bank, so it never leaves my side, lol! ~Jocelyn-C
- YOU HAVE OUTDONE YOURSELF!!!!!! What a wonderfully comprehensive tute! So many others cover pens, but not this professionally! This way above any of these. This pen is beautifully done. Thank you both so much for all your work. I have wanted to cover pens for so long, but was not happy with how they looked. No MORE – now I can cover pens with a professional look. Love the Burl wood look… BUT my mind is in a whirl with other ideas too… like so many of your followers I Can’t SLEEP!!!!!!!!!!!!!!!! LOL. ~Patt-W
- I put off trying to find pen blanks for covering with polymer clay once I found out Cindy was going to have a tutorial on them. I wanted to do them the correct way and not stumble through and do it on my own. I am so excited about this tutorial since not only does she link us to a really nice inexpensive pen blank, we get to learn a whole new cane technique plus an additional benefit of jewelry ideas. ~DixieAnn-S
- I am always excited about up-coming tutorials, but this one is just in time for me to make a special gift for my grandson’s graduation. All kids love and need to get money for graduation but it is always nice to be able to add something special that you have made for them. I can’t wait to try this tutorial out and the Burl Wood is the perfect touch to this piece. Thanks again Cindy for bringing that special touch you always add to your tutorials. The Lietz team will deliver yet another perfect lesson tomorrow. Sending lots of Uuuuggs in appreciation. ~Peggy-B
- Woke up and I just couldn’t resist sneaking a peak, OK so I watched all of this months tutorials already. Kind of like eating just on bite of something you love. Can’t just sneak a peak when it is all there just waiting for you. I knew this set was going to have a special place in my heart as I hope it does my Grandson’s heart when I give him his pen for graduation. Thank you Cindy and Doug for making this a possibility for me not to just make him a gift but to make him a very special beautiful gift he hopefully will get a lot of use out of. Wish I could stay here and give you many more thanks but I need to get back to bed so I can start thinking my process out for this very special gift. Once again you have hit it way out of the ball park and into my heart. THANK YOU LIETZ TEAM, THANK YOU Praying you and your family have a wonderful weekend. Many, many Uuuuuugggggs. ~Peggy-B
- Ok so I haven’t gone to bed yet I wanted to go back on watch the cane video again first. This cane and all the possibilities is just Awesome. Tinting with just a little different colors. I think a hint of some of the mica powders instead of a pinch of different color clays could have a great effect. If I have time I might try a couple of different powders before deciding on a cane for my pen. I love playing with clay. You could go wild with this creation and I am sure that is just what you had in mind for us. To use our minds. I just can’t tell you how excited I am and thrilled at the timing for this tutorial. Thank you so much once again Cindy, you and Doug are AWESOME! Now if I can just be a regular visitor again here that would be AWESOME also. ~Peggy-B
- I love this technique… it’s MUCH more interesting than ordinary faux wood. ~Sue-F
- I know I’ll enjoy this one, Cindy… I’ve NEVER given up my pen and I’m constantly scribbling notes. Now I can have an attractive accessory at every workstation! ~Monique-U
- Gorgeous technique. ~Jill-V
- Love, love, love the look of this faux Burl Wood cane and so pleased Cindy is teaching it. I covered some cheap pens ages ago but (like the barrettes) I was not satisfied with them so would not sell them as really had not a clue how to do them. They looked OK but Cindy’s pens look beautiful and know the male members of my large extended family will treasure them. At one of the craft fairs I attend there are five jewelry stalls, although no polymer clay! I said I make other items as I do pyrography so love all types of wood. Now I will not feel guilty when another tree crashes to the ground for Arts sake. So I make miniature dolls house foods, key rings and other non-jewelry stuff. Now I will have some more gifts for guys, so a big thanks Cindy really looking forward to learn the “Cindy Way” to make them… cheers xx. ~Elaine-F
- Ah, Cindy, I had a ball watching this video! You made it so easy, and there are so many creative options to use when veneering poly clay to the tubes. ~Jocelyn-C
- Awesome as usual. ~Teresa-D
- Yep! This is cool!! I didn’t realise how inexpensive the kits were! This is a must try!! Now to play!! ~Catalina-L
- Cat I didn’t realize the kits were so inexpensive either… Cindy you have answered all my questions and concerns about making and covering a pen that was not the simple bic pen. Don’t get me wrong, I have covered many bic pens and everyone has enjoyed those also. But there was a definite need for this when it came to covering a pen for a lovely graduation gift. Uuuugggs to all. ~Peggy-B
- I like the idea of covering this type of pen that you can refill and keep using. ~Michelle-A
- Thank You. So happy to have found you and joined!! ~Linda-O
- Just watched the videos on the faux wood pens. You are so talented. My grandson uses a lathe for turning wood into pens. He’s 12. From the videos — your pens look so much like real wood. Thanks for sharing. Keep up the good work. ~Sara-T
- I just received my pens today and can’t wait until tomorrow to get started. I received some bad news yesterday as I was diagnosed with bone marrow and blood cancer. There is no cure but it can be controlled with chemo pills, and monthly blood transfusions. At least there is no pain with this per say. Just a 27cm spleen. Thanks Cindy with your great tuts. It does keep me going everyday. ~Elly-M
- Cindy – Your videos are the best I’ve ever seen! I definitely will point anyone interested in learning how to create with clay to your site. Thanks for your time and your great teaching ability! ~Carol-O
- I am constantly amazed at how much information Cindy passes on; I’ve been messing around with PC for some years but she still manages to bring up subjects that seem quite basic until we hear what Cindy has to add. And to be still doing the videos after 4 years is amazing. When I first joined (approx 2/3 years ago) I said I wondered if she’d be able to keep this up; she assured me she would and she has! – and continues to do so. I am so delighted to be part of her ‘family’. ~Marion-R
- Thank you very much Cindy. I love your tutorials! You have great energy and I’ve learned allot with your free ones. Now will be happy to support you with the more in depth ones. :) ~Lynn-V
- I thought I’d try the Faux Burl Wood technique on its own first, to get a feel for how it behaved before using it in specific projects. I followed Cindy’s instructions pretty closely for this first attempt, and even used Premo clay (eek!). It was also a good chance to try something from Helen Breil’s wonderful “Shapes” e-book, which I’ve been drooling over for a little while but hadn’t previously had a chance to try. With the convoluted grain of burl wood in mind, I first made a twisty pendant and a pair of earring dangles to match. I was really happy with the combination although they were a monumental pain to sand and buff! Next time I’ll stick them in the tumble sander: I should have worked out my own tumbling schedule with the new media Cindy recommended by then, and it will be interesting to see how effective it is with such weird shapes. (The smooth small pebbles I’ve used to date wouldn’t have got into the smallest hollows.) It was also interesting how much easier it was to make the shape twist in one direction than it was to make its mirror image. My brain is obviously lopsided! I haven’t assembled the finished pieces yet, but I’ll probably just use plain black leather or suede cord with the pendant, and either black or heavily oxidised copper minimalist earwires for the earrings. I also made a variety of ordinary flat shapes from the leftovers. They’ll become earring dangles or studs too. (I love earrings! :D) I found that with the colours I chose and the pattern I achieved, a satin finish to a medium shine looked better and more realistic than a super-high shine, which became a bit artificial. The main project I have in mind for Faux Burl Wood will use fairly large expanses of it (I’m skipping the pens for now), so I’m going to try a few construction variations to tune it for that. The technique exactly as taught works wonderfully for smaller items but would be a bit repetitive for my taste for larger pieces. In any case, another fantastic technique! :D ~Sue-F
- I just tried it with pinks and browns, and added a slight amount of tiny chopped translucent. Wow! Cannot wait to finish this pen to give to my Godmother for Mothers Day. I so like the way it came out, the burls are totally 3-D. ~Jocelyn-C
- Hi Cindy, I made 5 of these pens and have given 2 of them as gifts. One was for a good friend and the other for my great niece’s graduation. They both loved them. Thank you for what you share with all of us. ~Vivian-B
- Ordered my pens. Great tutorial. Thanks Cindy! ~Elizabeth-S
- $1000 Polymer Clay Pen Fund Raiser… ~Chrissy-W
Good afternoon Cindy, This will be a rather lengthy email/story, but I wanted to thank you particularly for the Burlwood Pen tutorial. That single tutorial has helped me raise over a thousand dollars for a fundraiser.
Back story: I fell in love with the look of the Burlwood cane and loved the idea of the pen using that cane. I decided to make one for my husband for his birthday. He LOVED it. As it was my first one, it wasn’t really the best, but he seriously LOVED it. It took him a while to convince me that it wasn’t just husbandly-duty speaking, but that he actually really loved that pen. He carries it everywhere and uses it constantly. He even left it in his car one day when he went to work and after trying to make due with a regular pen during a meeting, threw it across the room (literally apparently) and went out right then to get his pen.
Shortly after, he wanted me to make one for his best friend in the colors of his favorite sports team (the Sounders). I tried to work out how to do it in a way that would look nice and after several failed attempts, decided to use the same cane method as the Burlwood, but in the team colors. It turned out fantastic! (of course, I didn’t get a picture of that one, or the one I made my husband). His friend called me directly and thanked me profusely, telling me how much he loved that pen and so on.
When we found out that our daughter’s soccer team would be attending an international soccer tournament in England this upcoming summer, we brainstormed on how to help raise money for the trip since it is going to cost a TON! The team tried to several different plans, but very little was raised. My husband suggested that I make and sell these pens, offering a choice of clay colors and a variety of hardware finishes. I was a little leery since it would mean that there was a high potential for me spending the next several months calling in sick so I could spend all day making pens. But we went ahead and did it.
I made a handful as samples, produced a brochure, and my husband took it from there. He immediately sold a handful to some guys at his work and I sold some at my work, and my mom at hers. In an effort to cut this story a little shorter, let’s just say that since it started, we have sold quite a few pens and made over $1000 for this fundraiser!
We are still going at it and plan to continue until April/May. Hopefully we can get closer to the total amount due, but I am happy with what we have done so far even if nothing more comes of it.
I wanted to share some pictures with you (attached, and apologies for the quality of some of the photos) of some of the pens I have made. As I mentioned, we let the customers select the clay colors (though I might add a highlight color here and there, if something else was needed), so please don’t judge me by some of the color combinations! :)
Most people wanted colors to match their favorite sports teams (Spurs: Black/Silver, Cowboys: Blue/Silver, Lakers: Yellow/Purple) or their child’s University or High School (Texas A&M: Maroon/White, University of Texas-Austin: Burnt Orange/White, San Marcos High School: Purple/White). And the most popular pattern was the swirl (which is what I simplified the burlwood pattern name to on the order forms), though I have sold a ton of light and dark burlwood as well as some of my own patterns (the flowers, we needed more “girly” pens). Besides the burlwood pattern, I also used your leopard pattern (that was a very big hit with my daughter). The scrap clay pen was my mother’s idea. She saw my trash bowl and asked what I was going to do with it. I told her that I usually use that for the base layer of the pens (under the patterned pieces). She thought that I had much more than I needed for that (which I do, I work by the trial and error methodology, with obviously more errors than one would like!) and asked me to make a pen out of it. She actually sold that one… I personally thought it was hideous (the picture makes it look better than it really did, in my mind at least)… we called it Kaleidoscope.
Anyway, as I said, I just wanted to share what I have done with your tutorial with you. Thanks again for the tutorials that allowed this to happen. ~Chrissy-W
- I LOVE this story and LOVE these pens!!!! Talk about taking a Cindy tute and running with it, right? ~Elisabeth-S
- I made several unique and colourful pens for Christmas presents. They were a real hit! I managed to keep one for myself but I plan to make more too. Recommended video purchases from Cindy that’s for sure! :D ~Michelle-C
- Hi and Good Morning! I am new to the blog and to Cindy’s “class room.” I really don’t know what took me so long to find you all, it seems nearly every online search turns up a Cindy Lietz YouTube tutorial! But I am so thankful my path has finally crossed yours… it has made such a difference in the quality of my work. More often than not… now, I like what I make and make what I like! I wanted to do some pens, and was delighted to see this faux burl wood pen tutorial series… the pc covered bic pens are not even in the same galaxy as these beautiful pens Cindy shows us how to do. I also wanted to say how I love this family of clayers.. so kind and thoughtful. I am genuinely thankful to find you all. ~Terrie-J
- Hi Cindy, I used the Faux Burlwood tutorial to make a bunch of crosses that will be given to each person being baptized this weekend at a local church. They turned out great and the baptism coordinator loved them! Thanks for the tutorial. I love the PCT community! ~Michele-H
- Your faux burl wood tutorial has been good for me!!! It’s so easy to follow and gives such beautiful results, I am amazed that I can do this!!! I find it so motivating seeing the results. I am thoroughly enjoying your method and all the help and confidence your tutorial has given me. I’ve been playing all day!!! Thanks heaps. ~Jo-M
- Hi Cindy, I just discovered this tutorial. I love it! … My daughter and I were just discussing how encouraging you are on your videos. Thank you so much. ~Marilyn-S
Customer Reviews: Barnacle A-Series Color Palette (4 Recipe Cards):
- Love this color palette, the choices of natural items, and the story. Lived a very similar life here on the East Coast, and despite splinters the size of rulers, sunburns in ER, and a Newfoundlander whom when on the beach, needed the rule “one piece suits only” because she’d proudly grab and paddle in “saving the top,” I still cherish every single memory, especially those with Mom and Dad alone :)! Also we never left without our snorkle googles, the things you could see in the tidal pools, off the docks, and salt/fresh water marshes if you stuck your head in there for a minute! Those goose barnacles are a sight to see when they come out of their shells and wave around in the current. Yours on the West Coast are huge. ~Jocelyn-C
- I love the story as well as the colors. I often wondered what it would be like growing up with parents who loved and cared for you instead of an orphanage where everything is Rules, Rules, Rules. I would absolutely love living by a large body of water and go clam digging. Spring finally got here. ~DixieAnn-S
- I agree with Dixie Ann: the story is such a sweet memory and the colors are lovely too! I grew up in San Francisco so we have the ocean here too… but my fondest memories are actually going to summer homes at “the river” – I prefer forest to ocean even though my house is literally 1/4 of a mile away from the ocean now. ~Maria-C
- I grew up on Long Island in New York. I remember those days of getting to the beach during low tide and walking out onto the sand bars and exploring the creatures. We walked on our tip toes and pushed down watching for that squirt of water from under the sand . Ah… A CLAM !!!! Then dug, dug, dug with our hands hoping it would be a Cherry Stone rather than a razor clam. Great memories. My mother made us take swimming lessons in the Long Island sound. It was hard to focus on the lesson because I was getting my toes bit by sand crabs during low tide and dodging horseshoe crabs and jelly fish during high tide. ~Anna-S
- I could hear the waves crashing and almost smell that salty sea air. Those are real precious memories Cindy, you certainly are a child of nature. Looking forward to using this fresh new set of colors for something special in the future. ~Elaine-F
- Thank you Cindy for the colour swatches, and for the sweet memory. If you hadn’t been a polymer artist you could have been a professional story teller, my cousin does this and she gets invited to so many places, schools, halls etc., just to tell stories. But I’m glad you didn’t! ~Marion-R
***************************************************************************************************************************************
|
|
.
- Did You Know… that by purchasing an ongoing membership to this Polymer Clay Library, you will save over 66% on all future Videos/Recipes. Full details here: Become-A-Subscriber-Member
- Link To Go Back To Top Of This Page: Volume-060 Back Issue Package
- Purchase Other Single Volumes Here: Polymer Clay Tutor Back Issues